Owner’s Manual Microwave Oven RMW1156 Please read these instructions carefully before installing and operating the oven. Record in the space below the SERIAL NO. found on the nameplate on your oven and retain this information for future reference. SERIAL NO. Please save sales receipt for warranty.
PRECAUTIONS TO AVOID POSSIBLE EXPOSURE TO EXCESSIVE MICROWAVE ENERGY 1. 2. 3. 1. 2. 3. 4. Do not attempt to operate this oven with the door-open since open-door operation can result in harmful exposure to microwave energy. It is important not to defeat or tamper with the safety interlocks. Do not place any object between the oven front face and the door or allow soil or cleaner residue to accumulate on sealing surfaces. Do not operate the oven if it is damaged.
IMPORTANT SAFETY INSTRUCTIONS Do not leave paper products, cooking utensils or food in the cavity when not in use. When using electrical appliances, basic safety precautions should be followed, including the following: 9. Liquids, such as water, coffee, or tea can be overheated beyond the boiling point without appearing to be boiling due to surface tension of the liquid. Visible bubbling or boiling when the container is removed from the microwave oven is not always present.
20. Be certain the glass tray and roller rings are in place when you operate the oven 16. Do not operate this appliance if it has a damaged cord or a plug, if it is not working properly or if it has been damaged or dropped. 21. This appliance should be serviced only by qualified service personnel, contact nearest authorized service facility for examination, repair, or adjustment. 17. Do not immerse cord or plug in water. Keep cord away from heated surface.
INSTALLATION GUIDE 1. 2. 3. 4. Make sure that all the packing materials are removed from the inside of the door. Check the oven for any damage, such as misaligned or bent door, damaged door seals and sealing surface, broken or loose door hinges and latches and dents inside the cavity or on the door. If there is any damage, do not operate the oven but contact qualified service personnel.
If you have any questions about the grounding or electrical instructions, consult a qualified electrician or service person. Radio or TV Interference Should there be any interference caused by the microwave oven to your radio or TV, check that the microwave oven is on a different circuit, relocated the radio or TV as far away from the oven as feasible or check position and signal of receiving antenna.
COOKING TECHNIQUES Your microwave makes cooking easier than conventional cooking, provided you keep these considerations in mind: TURNING Turn foods over midway through cooking to expose all parts to microwave energy. This is especially important with large foods such as roasts. STIRRING Stir foods such as casseroles and vegetables while cooking to distribute heat evenly. Food at the outside of the dish absorbs more energy and heats more quickly, so stir from the outside to the center.
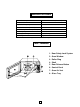
SPECIFICATIONS Power Consumption: 120V~60Hz, 1450W (Microwave) Output: 1000W Operation Frequency: 2450MHz Outside Dimensions(H×W×D): 11 13/16×21 1/4×17 9/16 in. Oven Cavity Dimensions(H×W×D): 9 7/16×13 15/16×14 1/8 in. Oven Capacity: 1.1 cu.ft Cooking Uniformity: Turntable System Net Weight: Approx. 35.2lb. Note: The above data may be further confirmed or updated. PART NAMES 1. Door Safety Lock System 2. Oven Window 3. Roller Ring 4. Shaft 5. Door Release Button 6. Control Panel 7.
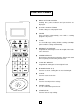
CONTROL PANEL Q Q Q Q Q Q Q Q Q Q Q Q MENU ACTION SCREEN Cooking time, power, indicators and present time are displayed. QUICK COOK BUTTONS Instant settings to cook popular foods TIMER Timer functions independently, even while a cooking program is in process. COOK Use for multi-stage cooking. Enable cooking at multiple power and time settings automatically. DEFROST BY WEIGHT Programmed defrosting based on the weight of the foods to be defrosted.
OPERATION INSTRUCTIONS SIGNALS DURING OVEN SETTINGS then use the number pads to enter the power level. You can set the power level from 0 to 100% (no need touch number pads when setting 100% power). ONE SIGNAL: Oven accepts the entry. TWO SIGNALS: Oven does not accept the entry, please check and try again. 3. ·After total time has elapsed, signals sound and END appears in display. Touch any pad or open oven door to clear END before starting another cooking function.
NOTE: .41 to .46 7 ·After setting SPEED DEFROST, oven can be programmed to automatically switch to one or two-stage cooking. .47 to .53 8 .54 to 59 9 .60 to .65 10 .66 to .71 11 .72 to .78 12 .79 to .84 13 .85 to .90 14 .91 to .97 15 above .97 go to next even ·For speed defrost and one stage cooking, follow steps above. Before touching START/STOP pad, touch COOK pad, and enter time and power level. Then touch START/STOP pad. ·For speed defrost and two-stage cooking, follow steps above.
QUICK COOK SETTINGS The QUICK COOK settings allow you to cook or reheat food automatically without entering power level or time. 3. For smaller portions, simply touch the applicable pad and start. For larger portions, push the pad twice. PIZZA FROZEN DINNER, BAKED POTATO and BEVERAGE allow you to cook multiple amounts of the same food. Simply touch pad once, and ENTER AMT appears in the display. Enter the amount of servings and start. 1. Touch PIZZA pad once. 2. Touch START/STOP pad.
2. REHEAT Touch START/STOP pad. Note: This setting lets you reheat a dinner plate of chilled leftovers with good results. For a plate of cool food (11 to 14 oz.) Touch REHEAT pad. 1. CLEANING AND CARE 1. Turn off the oven and remove the power plug from the wall socket before cleaning. 2. Keep the inside of the oven clean. When food splatters or spilled liquids adhere to oven walls, wipe with a damp cloth. Mild detergent may be used if the oven gets very dirty.