USER‘S GUIDE RP-7983/RP-7984 PORTABLE STEREO SYSTEM
Important Information Required by Federal Communications Commission Concerning Radio Frequency Interference This device generates and uses radio frequency (RF) energy, and if not installed and used properly, this equipment may cause interference to radio and television reception. This equipment has been type tested and found to comply with the limits for a Class B Computing Device in accordance with the specifications in Subpart J of Part 15 of FCC Rules.
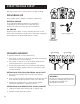
Where to Start Owning an RCA portable stereo system is like having a component stereo that you can take with you just about anywhere, giving you flexibility and convenience (not to mention great sound). Looking for a Good Read? You won’t find this instruction book on the best seller list, but it does contain a lot of information that you should know before using your portable stereo.
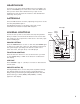
First Things First RECORD PLAY Before you start, you to need to know a couple of things.
Headphones To listen to your stereo with headphones (not included), use the 3.5 mm PHONES jack on the front of the unit. Make sure that you turn down the volume before you put on the headphones; then increase the volume to the desired level after they are in place. Antennas Since the AM antenna is built in; adjusting the position of the unit may help AM reception. The FM whip antenna on the back of the unit can be extended and rotated for better FM reception.
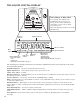
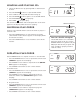
The Liquid crystal Display MULTI FUNCTION DISPLAY STEREO REPEAT 1 ALL PROGRAM SHUFFLE PLAY PAUSE CD FM kHz AM MHz TAPE TRACK MUTE PRESET VOLUME MW SEEK SCAN RADIO ROCK JAZZ VOCAL FLAT VOLUME TUNING PHONES BAND DISC SEEK/SCAN FM MONO RADIO TUNER PRESETS 1 3 2 Don’t Worry...It Won’t Bite Digital EQ TAPE 5 4 So you think the display looks intimidating. Don’t worry, you won’t see all of this stuff at the same time—you’ll only see what you need to see.
Using the Radio Not only does the digital tuner help you tune in radio stations more easily, it also lets you preset as many as five AM and five FM radio stations for easy access. MULTI FUNCTION DISPLAY RADIO FM MHz STEREO Tuning In Radio Stations PRESET After you choose the radio feature by pressing RADIO on the Function Control, you can do the following: • Press the BAND button to change the radio band to AM or FM. • Press the TUNING buttons to change the radio station.
Using the CD Player Combined with features such as Shuffle, Repeat, and Programmed play, you have lots of options for playing CDs. Look for this Logo Knowing Your Buttons You can play 3" and 5" compact discs that have this logo. The following buttons are used for basic CD operation: PLAY/PAUSE — This button works as a toggle switch: press to begin play, press again to pause play. TRACK/SEARCH • • and DISC In Stop mode— Press to move to the beginning of the preceding or following track.
Loading and Playing CDs 1. Select the CD function by pressing DISC on the Function Control. 2. Press the OPEN button to open the CD drawer. Play mode indicator REPEAT 1 ALL TRACK 3. Place a CD into the tray with the label facing up. 4. Press the OPEN 5. Press PLAY/PAUSE 6. Press STOP VOCAL button again to close the CD drawer. to begin play. to stop disc play. The current track number and the elapsed time of the track appear in the display while the track is playing.
Program mode indicator Programming Play Order 1. Press the PROGRAM button to enter Program mode. • - - Pr:01 appears in the display indicating that this is the first programmed track. 2. Press TRACK/SEARCH or to choose a track. (PROGRAM begins flashing in the display.) 3. Press PROGRAM to save the track in the program memory. (PROGRAM stops flashing in the display.) REPEAT 1 ALL PROGRAM SHUFFLE PLAY CD TRACK Track number Program number 4. Repeat steps 2-4 above to program up to 20 tracks.
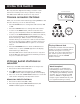
Using the Cassette tape player RECORD PLAY REWIND F FORWARD STOP/EJECT PAUSE Understanding the Buttons If you know what each button does, it’s easy to figure out how to operate the tape deck. RECORD — Press to record from the radio or the CD player. PLAY — Press to play a cassette. REWIND — From stop mode, press to rewind the tape toward the beginning. F. FORWARD — From stop mode, press to advance the tape toward the end.
Recording on Cassette Tapes Pause for a Moment You can record programs from the radio or the CD player. Just set up the system to use whichever option you choose, and then record it. For best results, use normal bias cassette tapes. Using the PAUSE button on the cassette deck instead of the STOP button to momentarily interrupt recording gives you a much cleaner sounding recording when you play it back later. Recording from the Radio 1. Insert a cassette tape into the tape deck. 2.
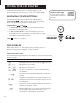
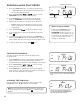
Using the REMOTE CONTROL (Model RP-7984 ONLY) Installing Batteries 1. Slide the battery cover in the direction of the arrow and lift. 2. Install 2 “AAA” batteries (not included). Face batteries in the direction indicated on the back. 3. Slide the cover firmly back into place. 2X AAA MADE 1.5V O IN CHINA P E N 2X AA 1.5V MADE The buttons IN CHINA Your remote control operates many of your portable stereo’s features.
CUSTOM EQ Setting (RP-7984 ONLY) The Custom EQ feature enables the listener to keep a personalized electronic equalizer setting in memory. To create your Custom EQ setting you must use the remote control. 1. Press CUST EQ button on the remote. USEr appears in the display. All preset EQ icons turn off. CD 2. Press CUST EQ again. The first band 200 (bass) appears in the display. 3. Press the VOL (volume) up and down buttons to adjust the level. 4.
Care and Maintenance CLEANING THE EXTERIOR • Disconnect the system from AC power before cleaning the exterior of the unit with a soft dust cloth. HANDLING COMPACT DISCS • • Do not touch the signal surfaces. Hold by the edges, or by one edge and the hole. Do not affix labels or adhesive tape to the label surfaces. Also, do not scratch or damage the label. • Discs rotate at high speeds inside the player. Do not use damaged (cracked or warped) discs.
Troubleshooting Tips 14 Problem Solution System doesn’t turn on • Make sure power cord is securely plugged into the AC power outlet (or that the batteries are fresh). • When operating on batteries, make sure the AC power cord is unplugged from the AC power jack on the back of the main unit. • Unplug the unit for a moment, and then plug it back in. • Check the outlet by plugging in another device. No sound • • • • Poor radio reception • Adjust the FM whip antenna for better FM reception .
Index A M-P AC Power 2 Antenna 3 MEMORY button 5 POWER button 3 Numeric Indicator 4 PLAY/PAUSE button 6 POWER button 3 PRESET buttons 5 PRESET indicator 5 PROGRAM button 8 Program edit 8 Programming play order 8 B BAND button 5 Battery Power 2 C Cassette deck 9 Cassette Deck Buttons FAST FORWARD 9 PAUSE 9 PLAY 9 RECORD 9 REWIND 9 STOP/EJECT 9 R Radio Band Indicator 4 Radio station presets 5 Recording on Cassette Tapes 10 Remote control 11 REPEAT button 7 Repeating Play Order 7 CD Buttons PLAY/PAUSE S
LIMITED WARRANTY What your warranty covers: • Any defect in materials or workmanship. For how long after your purchase: • One year. (The warranty for rental units begins with the first rental.) What we will do: • Provide you with a new, or at our option, a refurbished unit. • The exchange unit is under warranty for the remainder of the original product’s warranty period. How to make a warranty claim: • Properly pack your unit. Include any cables, etc., which were originally provided with the product.