USER‘S GUIDE RP-9328 RP-9338 RP-9348 RP-9349 RP-9368 AUDIO SYSTEM
FCC Information This device complies with Part 15 of the FCC Rules. Operation is subject to the following two conditions: (1) This device may not cause harmful interference, and (2) this device must accept any interference received, including interference that may cause undesired operation. In accordance with FCC requirements, changes or modifications not expressly approved by Thomson Consumer Electronics could void the user’s authority to operate this product.
Table of Contents FCC Information ...................................................... 2 Safety Precautions ................................................ 2 For Your Safety ........................................................ 2 Service Information ............................................. 2 For Your Records .................................................... 2 Table of Contents ................................................... 3 Special features ...............................................
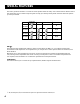
SPECIAL FEATURES This user’s guide was written for a series of audio systems that share many of the same features. Please refer to the chart below as you read through the guide to help you identify exactly which features match the system you have purchased. MODEL SURROUND SPEAKERS SRS CUSTOM EQ VIDEO 1/2 RP-9328 1 RP-9348 1/2 RP-9349 1/2 RP-9368 1/2 SRS ( )* This feature brings dimensional realism to stereo sound.
First Things First Unpack the system Unpack the system and its accessories. You should have: • main unit; • two main speakers and two surround speakers; • the RCA IR remote control; • an external/detachable FM wire type “T” dipole antenna; • and an external AM loop antenna.
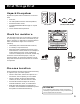
SETTING UP THE SYSTEM Connecting & placing the speakers Each speaker has its own connection terminals on the back of the system, so connect the wires from each speaker to one set of terminals. When connecting the speakers, make sure that the bare end of each wire makes contact with the metal grips inside the terminal. There are connections provided for main and surround speakers. 2. Press down on the tab to open the black terminal and insert the black wire (–) into the black terminal.
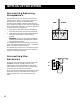
Setting up the system Connecting Components To hook up an auxiliary component, match the left and right audio output plugs from the component to the left (L) and right (R) VIDEO 1 or VIDEO 2 input jacks on the back panel. R L 2 VIDEO 1 Use the VIDEO input jacks on the back of the system to add a component that provides an additional source of sound into your system (VIDEO 1 or VIDEO 2) – additional VCRs, camcorders, or other compatible devices.
Setting up the system To set the timer: 1. Press the TIMER/CLOCK button. A red clock symbol should appear beneath the time. 2. Repeat Steps 2-5 from above. You can set the volume level you want the system to be at when it turns on. While still in the timer set mode, simply turn the volume dial to the desired level. When the timer is set, the volume level is stored and will not be disturbed during normal system operation. NOTE: The timer feature will not activate if the system is in use.
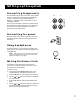
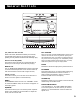
General Controls 3 2 1 OPEN / CLOSE DISC CHANGE 3 HIGH D I S C S PERFORMANCE D I R E C T 3 A C C E S S DISC AUDIO SYSTEM BASS BOOST POWER TAPE CD TUNER VIDEO 1•2 VOLUME STOP PLAY/ PAUSE DEMO SEEK/SCAN PRESET TUNE SHUFFLE INTRO REPEAT FM STEREO ATS EQ BAND POP CUSTOM JAZZ ROCK TIMER/CLOCK PHONES RECORD / PLAYBACK • AUTO STOP PLAYBACK • CONTINUOUS PLAY 2•1 DECK DECK 1 2 1, 2, 3 direct disc access Disc CHANGE When in CD mode, these buttons allow you to directly choose
General CoNtrols This button allows you to open and close the CD compartment door. will stop for approximately five seconds at each of the FM stations received until the button is pushed again. INTRO SET/demo This feature allows you to listen to the first 10 seconds of each track on the disc in the play position. This feature allows you to store preset radio stations or programmed track lists in the system’s memory. This works in both the CD and TUNER functions.
general controls VFD (Vacuum fluorescent display) Messages As you activate different functions, the VFD will indicate which modes are active and what command the system is currently processing. Below is an example of all the messages you will encounter at one time or another as you enjoy your system.
Using the system Auto preset programming Using the tuner While in the FM band, your system is capable of automatically programming into its memory any FM stations broadcasting in stereo in your area. Simply press and hold the TUNER button for approximately one second. “AUTO PRESET PROGRAMMING” will scan across the display while the mode is active. BASS BOOST POWER TAPE CD TUNER VIDEO 1•2 VOLUME STOP When finished, the system will tune to the first preset station.
Using the system Shuffling Play Order Repeating a Program Turning on the Shuffle feature causes the tracks to play in a random order. When you program tracks into memory, you can repeat the entire program by pressing the REPEAT button twice after the program begins playing. • • Press the SHUFFLE button to start random track play. SHUFFLE appears in the display while the feature is active. Press the SHUFFLE button a second time to turn it off.
Using the system READ Recalling and Editing the ATS Program Editing the ATS program is a lot like editing a regular program. 1. Press the ATS button to go to AUTO TRACK SKIP mode. 2. Press SET to move to the next program number until you get to the programmed track you want to change. 3. Press DISC CHANGE to choose the disc, and then press or to choose a replacement track. 4. Press the SET button to change the current skipped track to the one you just selected.
Using the system 2. Press the TUNER button. 3. Select a radio station. 4. Press the REC ( ) button to begin recording. 5. Press STOP/EJECT ( ) to end recording. Recording from CD 1. Insert a blank cassette tape into tape deck 1. 2. Press the CD button. 3. Insert a CD and select the first track you want to record 4. Press PLAY ( ) twice to begin and pause CD play. 5. Press PAUSE ( ) and then REC ( ) on the tape deck. 6.
Using the remote control Battery Installation 1. Open the battery compartment door. 2. Insert 2 AAA-size batteries as indicated on the back of the remote control. 3. Close the battery compartment door. POWER TUNER VIDEO 1•2 CD TAPE EQ PRESET General Controls TAPE – Press to activate tape mode. On logic deck systems, it toggles between deck 1 and 2 (for Logic Deck version only). EQ PRESET – Press to scroll through the preset EQs: pop, jazz, rock, custom (not available on RP-9328) or flat.
Troubleshooting tips Problem System doesn’t turn on Solution • Make sure power cord is securely plugged into the AC power outlet. • Unplug the unit for a moment, and then plug it back in. • Check the outlet by plugging in another device. • Adjust volume setting. • Check for proper connection of speaker wires. • Make sure you’ve selected the correct function: RADIO, CD, TAPE. • Make sure volume is not muted. To deactivate, press MUTE on the remote.
Care and maintenance Cleaning the Exterior Disconnect the system from AC power before cleaning the exterior of the system with a soft dust cloth. Handling Compact Discs • Do not touch their signal surfaces. Hold by the edges, or by one edge and the hole. • Do not affix labels or adhesive tape to the label surfaces. Also, do not scratch or damage the label. • Discs rotate at high speeds inside the player. Do not use damaged (cracked or warped) discs.
INDEX A F S AC power 7 Antennas 6 ATS (Auto Track Skip) 13 ATS button.
Canadian warranty US warranty Thomson Consumer Electronics Canada, Inc. warrants to the purchaser or gift recipient that if any manufacturing defect becomes apparent in this product within 1 year from the original date of purchase, it will be replaced free of charge, including return transportation. What your warranty covers: • Any defect in materials or workmanship. For how long after your purchase: • One year.
Model RP-9328/38/48/49/68 20887680 (E/S/F Rev. 1) 98-27 Printed in Hong Kong P.O. Box 1976, Indianapolis, IN 46206 © 1998 Thomson Consumer Electronics, Inc.
GUIA DEL USUARIO RP-9328 RP-9338 RP-9348 RP-9349 RP-9368 SYSTEMA AUDIO 1
Informacion importante requerdia por la comision federal de comunicaciones en lo que se refiere a la interferencia en radio frecuencia Este aparato genera y usa energía en radio frecuencia (RF) y si no se instala y usa adecuadamente este equipo puede causa r interferencia a la recepción de radio y televisión. Este equipo ha tenido prueba-tipo y cumple con los límites para un Aparato Computacional Clase B de acuerdo con las especific aciones del Inciso J de la Parte 15 de los Reglamentos FCC.
índice Información sobre la FCC ................................... 2 Precauciones ............................................................. 2 Para su seguridad ................................................... 2 Información sobre servicio .............................. 2 Para sus registros .................................................. 2 Índice ............................................................................ 3 caracteristicas especiales ..................................
Caracteristicas especiales Esta guía del usuario ha sido redactada para una serie de sistemas de audio que comparten características similares. Cuando la lea, sírvase consultar la tabla que aparece a continuación y que le ayudará a identificar las características correspondientes al sistema que usted compró.
Introducción Desembalaje del sistema Desembale el sistema y los accesorios. La caja debería contener: • la unidad principal • dos altavoces principales y dos altavoces de sonorización periférica • un control remoto de infrarrojo, marca RCA • una antena dipolo de alambre, tipo “T” para FM,externa/desmontable Asegúrese de que el lugar tenga una circulación de aire adecuada. La buena ventilación es esencial para proteger el sistema contra el calor interno que se crea adentro del mismo.
Instalación del sistema Conexión de los altavoces Cada altavoz tiene sus propios terminales de conexión en el panel trasero del aparato central. Conecte los cables de cada altavoz a un juego de terminales, asegurándose de que las puntas desnudas de los alambres entran en contacto con los dispositivos metálicos de sujeción dentro del terminal. El aparato cuenta con conexiones para los altavoces principales y los de sonorización periférica. La conexión del altavoz de subgraves es del tipo RCA. 2.
Instalación del sistema Conexión de componentes complementarios Use las entradas VIDEO, en la parte posterior del sistema, para agregar un componente que suministre una fuente adicional de sonido a su sistema (VIDEO) - otro VCR o un camcorder, u otros dispositivos compatibles. 3. Utilice la tecla o para ascender o descender hasta llegar a la hora correcta. 4. Oprima nuevamente la tecla SET; los minutos empiezan a destellar. 5.
Instalación del sistema Para programar el temporizador: 1. Oprima la tecla TIMER/CLOCK. En el visor, debajo de la hora, debería aparecer un símbolo de reloj rojo. 2. Siga los pasos 2 a 5 descritos más arriba. Usted puede programar el nivel de volumen que desea tener cuando se encienda el aparato. Mientras está en el modo de programación del temporizador, simplemente gire la perilla de volumen al nivel deseado.
Controles generales 3 2 1 OPEN / CLOSE DISC CHANGE 3 HIGH D I S C S D I R E C T PERFORMANCE A C C E S S 3 DISC AUDIO SYSTEM BASS BOOST POWER TAPE CD TUNER VIDEO 1•2 VOLUME STOP PLAY/ PAUSE SET/DEMO SEEK/SCAN PRESET TUNE SHUFFLE INTRO REPEAT FM STEREO ATS EQ BAND CUSTOM POP JAZZ ROCK CLOCK/HR/MIN PHONES RECORD / PLAYBACK • AUTO STOP PLAYBACK • CONTINUOUS PLAY 2•1 DECK DECK 1 2 Acceso directo a los discos 1, 2, 3 Disc CHANGE En el modo de lector de discos, estas tecl
Controles generales Teclas de funciones REPEAT (repetición) Estas teclas son: CD (disco compacto), TAPE (grabador), TUNER (sintonizador) y VIDEO. Utilícelas para encender el sistema en el modo en que desea que funcione, o para pasar de un modo a otro mientras el sistema está encendido. En el modo de lector de discos, esta tecla permite repetir una pista o todas las pistas de un disco, o un programa. REW (rebobinado) Esta tecla rebobina la cinta hasta el comienzo.
Controles generales Track/Search y VOLUME (volumen) (pista/búsqueda) Gire esta perilla para ajustar la intensidad del sonido. Gire hacia la izquierda para bajar el volumen. Cuando el sonido está apagado un mensaje pasará en forma continua por el visor. Gire hacia la derecha para subir el volumen. En el visor aparecerá la intensidad de volumen, en una escala que va de mínimo a máximo. Estas teclas se activan en el modo de sintonizador y de lector de discos.
Utilización del sistema Programación automática de emisoras en la memoria Utilización del sintonizador Mientras está en la banda de FM, su sistema puede programar automáticamente en la memoria cualquier emisora de FM que transmita en estéreo en su zona. Simplemente mantenga oprimida la tecla TUNER durante un segundo. En el visor aparecerá “AUTO PRESET PROGRAMMING” (programación automática) mientras el modo está activo.
Utilización del sistema Reproducción aleatoria Para repetir un programa Si se activa la función SHUFFLE (reproducción aleatoria), el sistema reproducirá todas las pistas en una secuencia aleatoria. • Oprima la tecla SHUFFLE para que empiece la reproducción aleatoria de las pistas. En el visor aparece SHUFFLE mientras esté activada esta función. • Para desactivar la función, oprima nuevamente la tecla SHUFFLE.
Utilización del sistema Para cambiar un programa de eliminación automática de pistas FULL El procedimiento es muy similar al que se sigue para cambiar un programa corriente. 1. Oprima la tecla ATS para poner el aparato en el modo de eliminación automática de pistas. 2. Oprima SET para pasar al número siguiente del programa hasta que llegue a la pista que desea cambiar. 3. Oprima DISC CHANGE para seleccionar un disco; luego, oprima o para seleccionar la pista que reemplazará a la que desea cambiar.
Utilización del sistema 2. Oprima la tecla TUNER. 3. Seleccione una emisora de radio. 4. Oprima REC ( 5. Oprima STOP/EJECT ( ) para empezar la grabación. ) para terminar de grabar. A Coloque una cinta virgen en el compartimiento 1. A 1. Cuando graba material nuevo, se graba sobre lo ya grabado en la cinta. Para proteger una cinta contra un borrado accidental, rompa una o las dos lengüetas plásticas (una a cada lado de la cinta), situadas en la parte superior del casete.
Utilización del control remoto Instalación de las pilas 1. Abra la puerta del compartimiento de las pilas. 2. Coloque dos pilas AAA tal como se indica en la parte posterior del control remoto. 3. Cierre la puerta del compartimiento de pilas. TRACK FWD (búsqueda hacia adelante) - en el modo de lector de discos, oprima una vez para buscar hacia adelante en todas las pistas o mantenga la tecla oprimida para barrer la pista en curso hacia adelante.
Consejos para la detección de fallas Problema EL sistema no se enciende. No hay sonido. Mala recepción de la radio. EL disco compacto no se oye. Solución • Asegúrese de que el cable está bien enchufado en un tomacorriente de CA. • Desenchufe el aparato por un momento y vuelva a enchufarlo. • Verifique el tomacorriente enchufando otro aparato. • Ajuste el volumen. • Verifique la conexión de los cables de los altavoces. • Asegúrese de que ha seleccionado la función correcta: RADIO, CD, TAPE.
Cuidados y mantenimiento COMO LIMPIAR LA PARTE EXTERNA DEL SISTEMA ESTEREO COMO LIMPIAR LOS CABEZALES DE LA CINTA • Las partículas de óxido de hierro de la cinta magnética pueden acumularse en los componentes que entran en contacto con ella. Estos depósitos de óxido de hierro pueden causar borraduras incompletas, sonidos apagados al reproducir las cintas y pueden impedir efectuar la parada automática de la cinta.
indice temático A g R Abrir/cerrar 10 Acceso directo a los discos 9 Alimentación con corriente alterna 7 Antenas 6 ATS (eliminación automática de pistas) 13 ATS, tecla 13 ATS, programa 14 Auto track skip (Ats) 10 Audifonos 7 Grabador 14 Grabación desde componentes auxiliares 15 Grabación desde el lector de discos 15 Grabación desde la radio 15 Grabación desde otro casete 15 Guardar emisoras de radio en la memoria 12 REC (grabar) 10 Repetición de una secuencia programada 13 Reproducción aleatoria 13 Rep
Garantía vigente en ee.uu. Su garantía cubre: • Todo defecto de materiales o mano de obra Vigencia de la garantía: • Un año a partir de la fecha de compra (El período de la garantía para los aparatos de alquiler comienza el primer día de alquiler 0 45 días a partir de la fecha de envío a la empresa de alquiler, cualquiera sea la fecha que cae primero.) Responsabilidad de la compañía: • Brindarle un aparato nuevo o, si lo consideramos necesario, un aparato reacondicionado.
Model RP-9328/38/48/49/68 20887680 (E/F/S Rev. 1) 98-27 Impreso en Hong Kong P.O. Box 1976, Indianapolis, IN 46206 © 1998 Thomson Consumer Electronics, Inc.