T IWA mn men Mfl men men ntrn umn men men men itcn men bnumn b men I\ mn P men t men a men d men - men men men mn men men mn mn mn 8 men RCA men mn mum iwn mn HIGH FIDELITY WARNING: TO PREVENT FIRE OR ELECTRIC SHOCK HAZARD, DO NOT EXPOSE THIS PRODUCT TO RAIN OR MOISTURE. TliE ffiNlNlNG FLAW ANDARRM. MUD WilMlK TliE TRIANGLE Is A SIGN ALERllNG YOU OF -DANGEROUS VOLTAGE- lNSlGE TM PnoGucT. WARMffi CAUTION: TO REDUCETnE RISK OF ELECTRICSnOCK. DO NOT REMOVE COVER (OR OACK).
CONTENTS GETTING STARTED For YourOwnRecords ............................................................................... UnpackingYourSystem .............................................................................. WheretoPlacetheSystem ......................................................................... BASIC . . ...4 CONNECTIONS ConnectingtheTwoUnits ............................................................................. . Connecting Speakers.......................................
IMPORTANT PRECAUTIONS INFORMATION 1 Do Not Open the Cabinet If the cabinet is opened, you may be exposed to dangerously high voltages. Never open the cabinet under any circumstances. Do Not Touch the Pickup Lens The pickup - the heart of the Disc player - is located inside of the disc tray opening. To avoid dust collecting on the pickup, do not leave the tray open for long periods. If the lens becomes dirty, clean it with a soft brush or use an air blower brush designed for camera lenses.
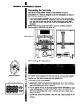
GETTING STARTED (continued) Unpacking Your System Carefully remove all items from the shipping carton. Be sure to remove all packing materials and wrappings. We recommend that you save the shipping carton and packing materials in the event you want to store, transport, or ship the unit in the future. Your new RCA audio system includes the following items: l l l l Tuner/Amplifier unit CD/Cassette unit Hand-held remote control l-meter FM antenna wire AM loop antenna .
BASIC CONNECTIONS Connecting the Two Units Your new RCA audio system includes a Tuner/Amplifier unit and a CD/Cassette unit. These are designed so that the CD/Cassette unit rests on top of the Tuner/Amplifier unit. I l Connect the SYSTEM CONTROL plug on the back of the Tuner/Amplifier unit to the SYSTEM CONTROL receptacle on the back of the CD/Cassette unit. Note that the plug has one row of nine pins and one row of eight pins.
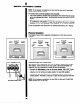
NOTE: On all speaker connections, makes contact with the terminal. To connect two surround be sure that the bare end of each lead speakers (not included): Use only 8D speakers. Speakers with specifications other than 851may be damaged or may damage the system . Such damage becomes the owner’s responsibility. l Follow the same steps used to attach front speakers, but use the terminals labeled SURROUND SPEAKERS to make the connections.
BASIC CONNECTIONS (continued) Adding an Auxiliary Component Use the VlDEOlAUX input jacks on the back of the Tuner/Amplifier unit to add a component that provides an additional source of sound into your system - a tape recorder, CD player, VCR, camcorder, or other compatible device. l Match the left and right output plugs from the auxiliary component Left (L) and Right (R) VIDEO/AUX input jacks. The auxiliary components recording.
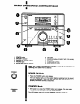
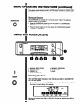
BASIC 1. 2. 3. 4. 5. OPERATING INSTRUCTIONS POWER button STANDBY indicator SENSOR for remote control PHONES jack EQUALIZER selector buttons 6. VOLUME 7. SOURCE buttons (TUNER, NOTE: See “USING THE REMCITE CONTROL,” operating your system from a distance. POWER 00 TAPE, CD, AUWAV) 8. BALANCE 9. SURROUND BUllON 10. BASS BOOST BU’ll’ON page 25, for instructions POWER ON Mode l Press the POWER button and release.
BASIC OPERATION CD TAPE (conflnued) Selecting a Source of Sound 0 II II II TUNER INSTUCTJONS The source selector buttons - TUNER, TAPE, CD, and AUXIAV the sources of sound available to you through the system. AUXlAV indicate To select a source of sound, simply press the button that represents the desired source. The system shifts to the selected source. l Adjusting Volume Turn the VOLUME dial clockwise to increase volume. Turn it counterclockwise to decrease volume.
BASIC OPERATING lNSTRUCTlONS (continued) Bass boost is intended to enhance the quality of sound at low-volume levels. This option should usually be set to OFF at higher volumes to prevent possible distortion of sound and damage to speakers. Surround Sound Use SURROUND to activate the “surround change applies to all speakers. SURROUND 0 l l USING sound” effect. The effective Press the SURROUND button to turn this option on (“SURROUND SOUND” message is displayed).
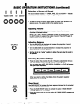
BIASIC OPERATION INSTUCTIONS (continued) Switching Between AM and FM To change from AM to FM (or vice versa) press the SAND button. l Pressing SAND switches the system back and forth between the two recep tion modes. Tuning in a Station Press and hold MANUAL/SEEK V or MANUAL/SEEK A for at least one second and the tuner will scan automatically down or up for a receivable radio signal. It stops when it reaches a signal that is strong enough for clear reception.
..‘ ‘-?;$ 1 BASIC OPERATION Selecting INSTRUCTIONS (continued) a Preset Station To select a preset station: l ..Yw *;. .& rti,,,. ii-< ;,j. ,d $jij 1.c\ $2 *., .& Select the desired tuning mode (AM or FM). Press the BAND button to switch between the two modes. Press PRESET A or PRESET V to reach the number that stores the desired station. l The display shows the currently selected preset number. / tg FM H IL ?sfiiiimmmremIprm yE yz yF YeJ =a MHz FLAT yy F1(F EO PRESEls -XG.
USING THE COMPACT 1. 2. 3. 4. 5. 6. 7. 8. DISC PLAYER TIME EDIT SYNCHRO DUBBING PLAY/PAUSE STOP TRACK REVERSE TRACK FORWARD SEARCH REVERSE 9. 10. 11. 12. 13. SEARCH FORWARD INTRO SCAN REPEAT OPEN/CLOSE RANDOM 14. DISC SELECT 15. PROGRAM Reading the Display 1. 2. 3 4. 5.
THE II PLAYER Selecting the Compact Disc Player To select the compact disc player, press the CD selector button. The system will now operate with the CD player as the selected source of sound, available for playback or recording. l CD 0 OPEN/CLOSE 0 (continued) Loading and Removing Discs The disc tray holds up to 3 compact discs, accommodating Sinch sizes. To load discs: l Press the OPEN/CLOSE l Place discs on the tray, label side up. either 5-inch or button. The disc tray slides out.
USING THE COMPACT DISC PLAYER (continued) If the CD player is in stop mode, press ,111 (PLAY/PAUSE) and the first available disc will start to play. The display flashes the number of the currently playing disc above the numbers of the other two discs. l Play starts with the first track of the selected disc and continues sequentially through the last track on disc 3. The compact disc player then enters stop mode.
THE COMpAC’lr (continued) Skipping to a Specific Track You can move quickly to the start of any track on the current disc by using the TRACK buttons. The disc may be in play, pause, or stop mode. @Q l To skip forward to the start of the next track, press w l To skip back to the start of the previous track,, press )rr (track forward). (track reverse). If you skip to a new track while the disc is playing, the selected track begins to play automatically.
USING THE COMPACT l l DISC PLAYER lcontinuedl Press TIME again to return to the original display of elapsed time since the start of the current track. Press STOP to stop play and show the total number of tracks and total playing time of the selected disc. Programming the Order of Tracks You can program the CD player to play tracks in any desired order, using discs in any sequence, and repeating tracks as often as you like. The program may contain up to 32 tracks.
THE COMPACT $< I (continued] 6. Press w (track forward) or trr (track reverse) to select the track from the selected disc. The track number is displayed before the “F!” For example, track 3 from disc 1 displays like this: 7. Press PROGRAM 6. Repeat steps 5 to 7 to store additional i? 9. r.
USING THE COMPACT DISC PAYER To repeat the current track continuously, “REPEAT 1” option. l (continued) press REPEAT to select the To repeat the current disc continuously (or all tracks in a program), REPEAT to select the “REPEAT DISC” option. l press . To repeat continuously all discs in the disc tray, press REPEAT to select the “REPEAT ALL DISC” option. To cancel the repeat feature, press REPEAT until no repeat message appears on the display.
USING THE COMPACT DISC PLAYER (continued) SYNCHRO Dubbing from CD to Tape The SYNCHRO DUBBING feature lets you initiate play of a disc and recording of that disc onto cassette by pressing a single button. l Press the CD selector button. l Insert the cassette in tape deck 1 and press RECORD. l Insert the disc and select the desired track. l Press SYNCHRO DUBBING. Play of the disc and taping of it onto the cassette begin simultaneously. NOTE: See “Important guidelines.
USING THE COMPACT DISC PLAYER (continued) 8 Press EDIT. The CD player enters pause mode, and the display shows the total playing time of tracks that can fit onto side A of the cassette. 9. Press the SYNCHRO button on the CD player. The cassette in tape deck 1 advances for 8 seconds (to prevent recording onto the tape’s “leader”). After 8 seconds, the disc begins playing and is recorded onto the cassette.
USiNG II THE DUAL Selecting TAPE DECK (continued) the Tape Deck To select the dual tape deck, press the TAPE selector button. The system switches to the tape deck as the selected source of sound: l TAPE Inserting and Removing Cassettes To insert a cassette in either tape deck 1 or tape deck 2: 0 STOP!EJECT l Press STOP/EJECT to open the door of the tape deck. l Insert the cassette with the exposed part of the tape facing down. l Push the door closed.
USJNG THE DUAL TAPE DECK (continued) Playing a Cassette (Both Sides) on Deck 2 Tapes in deck 2 can be set to play in either direction - from left to right or from right to left. Insert the cassette you want to play. l Select the desired direction of play by pressing the 4 DIR ) button. The direction of play is indicated by the lighted LED. l Select the desired play mode: l 1) One-Play Mode: Press MODE button to the “in” position.
USING THE DUAL TAPE DECK (continued) Recording from a Compact Disc Press the CD selector button to select the compact disc player as the source for recording. l Load the disc you want to record from and select it using the DISC SELECT button. If necessary, press W (track forward) or W (track reverse) to reach the desired track. Insert the cassette you will record on in tape deck 1, advancing past the tape’s leader if necessary. l l l Press RECORD button on tape deck 1.
USING 0 AUIUAV THE DUAL USING (continued) Recording from an Auxiliary Source l l l 0 TAPE DECK l Connect the auxiliary sound source (a VCR, another tape deck, etc.) as described on page 7. Press AUX to select the auxiliary unit as the source of sound. Insert the cassette to be recorded on in tape deck 1, advancing tape’s leader if necessary. past the Press the RECORD button to begin recording from the auxiliary source.
USING THE REMOTE (continued) Playing the Tuner (Radio) ; TUNER I 8 aWI : BAND l Press TUNER to select the tuner as the source of sound. l Press BAND to switch from FM to AM and vice versa. Press PSCAN to automatically scan preset stations. The system pauses to play each preset for 5 seconds, giving you the chance to stop on the station or allow the scan to continue. Press PSCAN again to stop on a desired station or to stop the scan process.
CARE AND MAINTENANCE Cleaning the System’s Exterior Before cleaning the system, disconnect fire or shock. l AC power to prevent the hazard of . Clean the exterior of the unit using a soft dust cloth. If desired, use a soft, damp cloth and mild soap to clean the display sections - but be careful not to scratch these sensitive panels! Handling Compact Discs CARE OF DISCS II am #oITMAwlo With this CD player, use discs which display the mark shown.
CARE AND MAINTENANCE Care of Cassette Decks l Periodic cleaning of the tape heads and capstan is necessary to maintain good sound reproduction. The build up of iron oxide particles, which is often even more severe with inferior tapes, will reduce the performance of the cassette. It is recommended that the heads and capstan be cleaned after every 25 hours of use; more often if playback has deteriorated.
CARE AND MAINTENANCE I Erase Protection Your Cassette Deck erases whatever is on a tape when it records new material. To protect a tape from accidental erasure, break off one or both plastic tabs (one for each tape side) on the back of the cassette. If you later decide to record on the tape, seal over the hole with a piece of cellophane tape- TROUBLE CHECKS Use the suggestions below to check out problems.
j TROUBLE CHECKS Poor radio reception l Check AM/FM antenna connections. l Adjust antenna position for better reception. Try turning off electrical appliances near the unit - including dryers, vacuum cleaners, and fluorescent lights. l Compact Compact disc will not play disc sound skips l Be sure the disc tray contains a disc. l Assure that all discs are inserted label side up. l Clean discs as explained in “Care and Maintenance.” l Press HI l Be sure CD source button is selected.
NOTES
ONE-YEAR LIMlTED WARRANTY What does your warranty covet? l Any defect in material or workmanship. For how long after the original purchase? l One year. l The warranty for rental units begins with the first rental. What will we do? l Provide you with a new, or at our option, a reconditioned unit. l The exchange unit is warranted for the remainder of your product’s original one-year warranty period. How do you make a warranty claim? l Properly pack your unit. Include any cables, etc.