05 8
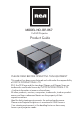
MODEL NO. RPJ167 Full HD Projector Product Guide PLEASE READ BEFORE OPERATING THIS EQUIPMENT This product has been manufactured and sold under the responsibility of CURTIS INTERNATIONAL LTD. RCA, the RCA logo and the two dogs (Nipper and Chipper) logo are trademarks used under license by CURTIS INTERNATIONAL LTD. – further information at www.rca-brand.com. All other products, services, companies, trademarks, trade or product names and logos referenced herein are the property of their respective owners.
For RCA Full HD Projector 3. Heed all Warnings. 5. Do not use this apparatus near water. 6. Clean only with a dry cloth. 8. Do not install near any heat sources such as radiators, heat registers, stoves, or other appara ) that product heat. convenience receptacles, and the point where they exit from the apparatus. 11. Unplug this apparatus during lightning storms or when unused for long periods 12. Refer all servicing to d service personnel.
For RCA Full HD Projector 1. Do not look directly into the projector light. 2. Don’t touch the project lens 3. Mains adapter is used as disconnect device and it should remain readily operable during intended use. In order to disconnect the apparatus from the mains completely, the mains plug should be disconnected from the mains socket outlet completely. 4. CAUTION: Use of controls or adjustments or performance of procedures other than those specified may result in hazardous radiation exposure. 5.
FCC Warning This device complies with Part 15 of the FCC rules. Operation is subject to the following two conditions: (1) this device may not cause harmful interference, and (2) this device must accept any interference received, including interference that may cause undesired operation. NOTE: This equipment has been tested and found to comply with the limits for a Class B digital device, pursuant to Part 15 of the FCC Rules.
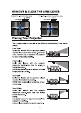
Table of Contents Important Safety Instructions - - - - - - - - - - - - - - - - - - - - - - - - - - - - P1 Additional Warnings and Precautions - - - - - - - - - - - - - - - - - - - - - - P2 FCC Warning - - - - - - - - - - - - - - - - - - - - - - - - - - - - - - - - - - - - - - - - - P3 What’s Included - - - - - - - - - - - - - - - - - - - - - - - - - - - - - - - - - - - - - P3 Table of Contents - - - - - - - - - - - - - - - - - - - - - - - - - - - - - - - - - - - - P4 Remove & Close the Lens Cover Placing
5
6
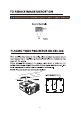
ADJUST THE FOCUS AND KEYSTONE 7
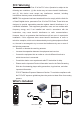
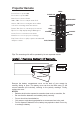
Projector Remote MENU Power: Press to power ON. POWER ON Press twice to power OFF. Mute: Press to mute volume. HOME MENU M VOL+ /VOL-: Press to adjust audio level. Arrows / OK : Press to navigate and confirm OK selections in Settings and other menus. Return/ Exit: Press to exit the projector menu. Flip: Press to flip display image 180 degrees. OK NAVIGATOR BUTTONS MUTE VOLUME- Home : Press to enter the home menu. FLIP Menu:Press to access projector Settings.
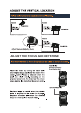
Controls Of Projector 8 910 11 5 12 13 14 4 3 2 15 1 16 6 7 DC 17 18 1.Right 2.Source 3.Left 4.Return 5.OK/Power 6.Keystone Correction 7.Focusing Ring 8.Headphone Jack 9.AV 10.HDMI Port 1 11.HDMI Port 2 12.HDMI Port 3 13.USB Port 1 14.USB Port 2 15.IR Window(Back Side) 16.Power Input 17.IR Window(Front Side) 18.
Return Right Left OK/Power Press to navigate onscreen menus and make selections. Long press to power on/off the projector. TURN ON 1) Plug the projector into a power source, Indicator light:Red. 2) Press the power button . Indicator light: White. 3) The projector turned on after 5 seconds. 2 Notice for installing adapter ① Connect DC plug from adaptor to projector DC in. ② Connect AC adaptor to AC outlet. If connecting this way, it 's much more easily to operate the products. 1 TURN OFF 1.
Connection Instructions Select an input source You will see the picture below when the projector is turned on. HDMI1/HDMI2/HDMI3) by pressing the arrows buttons(UP/DOWN/LEFT/RIGHT) on the projector touch panel or remote control. connection instructions. Interface HDMI device connection The projector can connect to devices with HDMI input function. It is compatible with laptops, DVD players, Blu-ray players, Chromecast, TV Stick, etc. An HDMI cable is included.
Multimedia connection Insert USB into the corresponding slots (as shown in the picture). Select “ MOVIE”, “MUSIC”, “ PHOTO” to enter the content you want to play. Sub-Menu on Photo screen When photo playback, press the button and more function screen show on lower (figure 1). Pause Prev. Next Stop Use the button to select + icon and press the button Rotate Rotate Zo... to play special function.
AV video device connection Connect the projector AV interface with the AV cable, as is shown in the pictures. Video Cable: YELLOW Audio Left Channel: WHITE Audio Right Channel: RED Female AV Cable(not include) AV OUT Portable DVD Player/Video Player Male AV Cable(not include) Projector Audio devices connection The projector can connect to a headphone and to a wired audio system using a 3.
PROJECTOR SETTING Options Related to “PICTURE” are set on this screen Press button to enter projector menu. Press again to previous status. Use buttons to select manual page. This manual showed on right upper of view screen. OK PICTURE AUDIO OPTION TIME Select Picture Mode Contrast Brightness Color Tint Sharpness Color Temperature Noise Reduction Menu Standard 50 50 50 50 50 Medium Middle Adjust 1. Picture Mode Select Standard, Dynamic, Mild ,or User(custom). 2.
PROJECTOR SETTING Options Related to “AUDIO” are set on this screen. Press button to enter projector menu. Press again to previous status. Use buttons to select manual page. This manual showed on right upper of view screen. OK PICTURE AUDIO OPTION Sound Mode Treble Bass Balance Auto Volume Standard 90 50 0 Off TIME Select Menu Adjust 1. Sound Mode Select Standard, Movie, Music, Sports ,or User (custom). 2. Treble, Bass Set Sound Mode to “User “ to adjust these settings. 3.
PROJECTOR SETTING Options Related to “OPTION” are set on this screen. Press button to enter projector menu. Press again to previous status. Use buttons to select manual page. This manual showed on right upper of view screen. OK PICTURE AUDIO OPTION OSD Language Aspect Ratio Projection mode Reset Info English 16:9 Front TIME Select Menu Adjust 1.
PROJECTOR SETTING Options Related to “TIME” are set on this screen. Press button to enter projector menu. Press again to previous status. Use buttons to select manual page. This manual showed on right upper of view screen. OK PICTURE SOUND OPTION Clock Off Time On Time Sleep Timer Auto Sleep Off Off Off Off TIME Select Menu Adjust Timer Select auto sleep function to off, 1Hour, 2Hours, 4Hours, 8Hours.
Power Input DC 35V , 4.28A Connect Included Adapter Included Adapter Input AC100-240V,50/60Hz Connect DC input of unit Output DC 35V, 4.28 A Color or Temperature 6000-7000K Projection Size 35-200 inch Signal Port HDMI / AV USB 1 Port Support USB device up to 1TB Support format mpg,avi,MP4,MP3 Weight 1.76 KG Dimension 252 x 205 x 103mm Speaker 2*5W Projection distance 1m -7m TROUBLESHOOTING please contact Customer service: 1-800-968-9853.
Is the warning light indicator red? If so, the projector is overheating which turns the light off automatically. 1.Leave the projector to cool for a few moments. The Lamp (Bulb) switches 2.Once cooled, check nothing is blocking the ventilation vents. off after a period of time 3.Check the air filter is clean and clean if necessary. 4.Turn on the projector. If the issue persists please contact your support provider for further assistance.
20