MODEL NO. RPJ240-COMBO-VOUCHER MULTIMEDIA PROJECTOR Ideal for dark viewing environments for optimal performance. Please note:Projector brightness is measure in ANSI lumens. Your viewing environment is the deciding factor on how many lumens your projector needs. PLEASE READ BEFORE OPERATING THIS EQUIPMENT This product has been manufactured and sold under the responsibility of Curtis International Ltd.
Important Safety Instruc ons 1. Read these Instruc ons. 2. Keep these Instruc ons. 3. Heed all Warnings. 4. Follow all instruc ons. 5. Do not use this apparatus near water. 6. Clean only with a dry cloth. 7. Do not block any ven la on openings. Install in accordance with the manufacturer’s instruc ons. 8. Do not install near any heat sources such as radiators, heat registers, stoves, or other apparatus (including amplifier) that product heat. 9.
Addi onal Warnings and Precau ons 1. Do not look directly into the projector light. 2. Don’t touch the project lens 3. Mains adapter is used as disconnect device and it should remain readily operable during intended use. In order to disconnect the apparatus from the mains completely, the mains plug should be disconnected from the mains socket outlet completely. 4. CAUTION: Use of controls or adjustments or performance of procedures other than those specified may result in hazardous radiation exposure. 5.
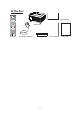
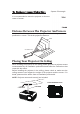
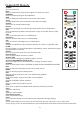
In The Box MUTE RANDOM OSD ANGLE SUBTITLE REPEAT PBC TITLE DVD MENU A-B PROG SLOW SETUP Projector Screen hooks/strips DVD SOURCE MENU Main unit EXIT FLIP AUDIO GOTO ZOOM Remote AC Power Adapter Lens Cover 3 User Manual TOP5 tips
Table of Contents Important Safety Instructions - - - - - - - - - - - - - - - - - - - - - - - - - - - - P1 Additional Warnings and Precautions - - - - - - - - - - - - - - - - - - - - - - P2 FCC Warning - - - - - - - - - - - - - - - - - - - - - - - - - - - - - - - - - - - - - - - - - P3 In The Box - - - - - - - - - - - - - - - - - - - - - - - - - - - - - - - - - - - - - - - - - P3 Table of Contents - - - - - - - - - - - - - - - - - - - - - - - - - - - - - - - - - - - - P4 Remove & Close the Lens Cover Plac
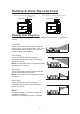
Remove & Close The Lens Cover Remove the lens cover before using Close the lens cover when unit not using REMOVE CLOSE LENS COVER LENS COVER Placing Your Projector Your projector can be installed in four different configurations ( see picture below): Front Table: Select this location with the projector placed near the floor in front of the screen. This is the most common way to position the projector for quick setup and portability.
Square /Rectangle It is recommended to move the projector as close to center of screen. Distance Between The Projector And Screen Measure the distance between the projector and where you want to position the screen. This is the projection distance.
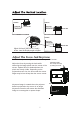
Follow below picture to adjust the vertical location. SCREEN SCREEN VERTICAL DIMENSION VERTICAL DIMENSION PROJECTOR ROJECTOR SCREEN VERTICAL DIMENSION PROJECTOR Adjust this knob ( ANGLE ADJ. knob) to fine- tune the display angle to higher. Adjust The Focus And Keystone Follow below picture to adjust the focus and trapezoidal screen. Adjust the focus by turning the knob while observing the image pixels near the center of the screen. Optimal focus is obtained when the pixels are clearly visible.
Controls Of Remote POWER Press to power ON. Mute Mute the audio of the player.Press it again to activate the sound. RANDOM Press to random playing for the loaded disc. OSD Press to display the information of the current video/ audio. Angle On supported DVDs, press and hold to view alternate angles. Subtitle Short press to change subtitle mode. Repeat Press here repeatedly to cycle through repeat options for the loaded disc. . DVD SOURCE PBC Press to activate Play Back Control function only for a VCD disc.
AAA / UM4 AAA / UM4 BATTERY DOOR Remove the battery compartment cover on the back of your remote by carefully sliding to open. The battery cover can then be lifted away. Fit the correct batteries (not included), referring to the polarity markings. Finally, replace the cover. NOTES: • Batteries shall not be exposed to excessive heat such as sunshine, fire • Be sure that the batteries are installed polarity correctly. • Do not mix old and new batteries.
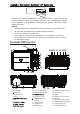
Install Power Adapter Follow below picture to connect power adapter Connect small end of adapter FIRST. Plug the adapter body to power outlet. - Press the button to turn on unit, press again to turn off. / SOURCE - Press the button to select input source. / MENU - Press the button to enter projector menu. OK - Press the buttons to select screen item of projector menu. / EXIT - Press the button to exit the projector menu. - Press the buttons to fast search forward and rewind on USB / TF/DVD .
Connect HDMI Show The Image On Projector Screen Follow below picture to connect HDMI cable and device. 1. Turn off the unit before connect HDMI cable. light GREEN 3. Press the / SOURCE device will show on projector screen. There are 2 HDMI input, HDMI1 interface corresponds to HDMI 1 in SOURCE mode , and HDMI2 interface corresponds to HDMI 2 in SOURCE mode. 4. Press the button to turn off unit power.
Connect VGA Show The Image On Projector Screen Follow below picture to connect HDMI cable and device. 1. Turn off the unit before connect VGA cable. 2. Press the button to turn off power of your projector before connection. light GREEN 4. Press the / SOURCE will show on projector screen. 5. Press the button to turn off unit power.
Connect Audio Output ( Aux Out / Line Out / Earphones) Follow below picture to connect audio cable and device. 1. Press the button to turn off power of your projector before connection. 2. Use audio cable to connect follow below figure. 3. After connect and turn on both units. Your projector sound from external device now. 4.
Using TF Card And USB Playback (Media Player) Install USB / TF device: 1. Turn off the unit before install USB / TF card. 2. Install the USB device into USB port. GREEN. 4. Press the / SOURCE search the MEDIAPLAYER mode. OK OK the button to OK remote to start playback. 8. Press NOTE FIRST. Sub-Menu on Photo screen 1. When photo playback, press the Figure 1. screen show on lower (figure 1). 2. Use the button to select icon and press Pause Prev. Next Rotate Rotate + Zo...
Using DVD playback 1. Press the button to turn on unit and the power indicator light GREEN. 2. Press the /SOURCE button to enter and use buttons to search the DVD mode. 3. Open the disc cover and insert a playable DVD or CD disc, make sure the label side is facing up, and then close disc cover. 4.The player will scan the disc, and then the layback will start automatically. If a disc menu appears on the screen, see "Using the disc menu" for details. 5. Press button to fast search forward and rewind. 6.
Using Projector Menu 1.0 Press button to enter projector menu. Press again to previous status. Picture Mode Standard Contrast 50 Brithness 50 Color 50 Sharpness 50 50 Tint Color Temperature Medium Aspect Ratio Auto Noise Reduction Middle Screen USE TO SELECT Picture Mode Standard PRESS OK USE TO SELECT Color Temper... USE PRESS OK TO SELECT Noise Reduction USE buttons to select manual page. OK This manual showed on right upper of view screen.
Using Projector Menu 2.0 Press button to enter projector menu. Press again to previous status. Sound Mode Standard Treble 50 Bass 50 Balance 0 Auto Volume Off Surround Sound Off USE TO SELECT Sound Mode Standard PRESS OK USE TO SELECT Balance 0 USE OK buttons to select manual page. This manual showed on right upper of view screen. Use to select different sound effect Standard / Movie / Music / Sports / User. If select User, follow below figure to set digit. Use to select Balance level to 0-50.
Using Projector Menu 3.0 Press button to enter projector menu. Press again to previous status. OSD Language Bluetooth Restore Factory Default Panel Flip Rotate Info USE PRESS OK To select Off / On for Bluetooth connect. Set to “ON” to turn on Bluetooth function. TO SELECT PRESS OK TO SELECT Panel Flip Rotate 0 PRESS OK USE button to select different Use language. Follow below figure. TO SELECT Restore Factory Default USE OK OK PRESS OK Bluetooth USE 0 Use buttons to select manual page.
Using Projector Menu 4.0 Press button to enter projector menu. Press again to previous status. Clock - - - Off Timer Off On Timer Off Sleep Timer Off Auto Sleep Never USE PRESS OK PRESS OK TO SELECT Sleep Timer Off USE PRESS OK TO SELECT On Timer Off USE buttons to select manual page. This manual showed on right upper of viewing screen. TO SELECT Off Timer Off USE OK TO SELECT Clock - - - USE Use Use / / Hour / Minutes. to select timer turn off to Day Use / / Hour / Minutes.
4:3 Letterbox - select this if you have a standard 'square' television (4:3 aspect ratio). The full image will be shown on the screen with black letterbox bars on the upper and lower portions of the image. 16:9 - Choose this display option on any widescreen display (most HDTVs). Angle Mark: Displays current camera viewing information on the right hand corner of the TFT screen if available on the disc. Note that this function only works with those discs encoded with multiple camera angles.
Audio Setup: These are settings for the video quality of the DVD output to display: Sharp,BRIGHTNESS, CONTRAST, HUE, SATURATION For S ha r p setting, there are three options: High, Medium, Low. Enter these items respectively. Other Setting Use direction key LEFT/RIGHT to adjust the value. Then press OK Preferences TV Type: This DVD player is compatible with both NTSC and PAL televisions. Choose either NTSC (US/Americas/Japan) or PAL (Europe/Asia) TV output settings to correspond your television.
NTSC - Select this signal when connected to a NTSC television. The output of PAL discs will automatically be converted to NTSC format. PAL - Select this signal when connected to a PAL tele- vision. The output of NTSC discs will automatically be converted to PAL format. Auto-select this,video output will auto select TV PAL/NTSC by video source.For example,when in logo state,will output NTSC format; if playing a PAL DVD video,will output PAL format….
Installation Instructions 1. Simple screen package includes screen fabric, hooks and doubleside adhesive tapes. 2. First of all, pull the screen fabric flat and lay it on the wall where it will be installed. Mark every position of the grommets correctly on the wall. 3. Second, stick each hook on an adhesive tape. 4. Then stick the hooks with the tapes on every position marded on the wall. 5. Finally, put the screen flat by hanging the grommets on the relevant hooks.
TROUBLESHOOTING Before resorting the maintenance service, please kindly check by yourself with the following chart. No Image is Projected or a "No Signal" message is displayed 1.Power light is on. If it is not on, check the projector is plugged into the mains, that the socket is switched on, and then press the power button on the projector. 2.Check the lens cover has been removed. 3.Check the cables are securely attached and installed as per the User Manual. 4.The image source may not be set correctly.
25
FCC Warnings This device complies with part 15 of the FCC rules. Operation is subject to the following two conditions: (1) this device may not cause harmful interference, and (2) this device must accept any interference received, including interference that may cause undesired operation. Warning: Changes or modifications to this unit not expressly approved by the party responsible for compliance could void the user’s authority to operate the equipment.