€_UI_E
Thisdevice complies with Part 15 of the FCCRules. Operation is subject to the following two conditions: (1) This device may not cause harmful interference, and (2) this device must accept any interference received, including interference that may cause undesired operati In accordance with FCCrequirements, changes or modifications not expresslyapproved by Thomson Consumer Electronicscould void the user'sauthority to operate this product. Thisproduct complies with DHHS Rules21 CFRSulxhapter J.
FCC INFORMATION ................................................................................ 2 Safety Precautions .................................................................................................................... For Your Safety ......................................................................................................................... Service Information ..................................................................................................................
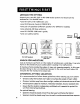
UNPACK TH E SYSTEM Unpack your new RS-1247 or RS-1248 audio accessories. You should have: • one RS-1247 or RS-1248 • one RCARemote Control • one pair of speakers • one external main AM loop • one RS-1247/RS-1248 • and one safety system and locate all the unit; (CRK291B1); (different speakers for different models); antenna; user's guide; leaflet.
SPEAKERS If you have purchased our RS-1247, your speakers are identical. If you've selected our RS-1248, you'd find that the physique of the speakers aren't identical, 10ut placing either one on the right and the other on the left won't matter. Though the speakers for the two models are different, very much the same. To connect a speaker wire either speaker or the unit, follow these steps: their connections to the terminals.of are a 1.
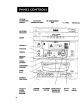
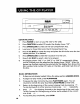
VACUUM FLUORESCENT DISPLAY CD PLAYER CONTROL BUTIrONS CD COMPARTMENT TRAY 1-2-3 DISC OPEN/CLOSE FM STEREO INDICATOR POWER PRESET EQ FUNCTION PHONES MEMORY/ DEMO TUNING BUTTONS TUNF.
VACUUM FLUORESCENT DISPLAY The vacuum fluorescent display (VFD) shows the current such as volume level, playing disc number, playing track play mode, radio frequency, selected Preset EQ, etc, Further explanation of the display procedures of each function. CD PLAYER CONTROL These control buttons CD COMPARTMENT messages will status of the unit number, selected accompany the operational 13U'I-FONS are for CD player, they function only in CD mode.
PHONES You can listen to your audio system through a set of headphones (not included). Take note, when a set of headphones is plugged into the system, sound output will divert from the speakers to your set of headphones. MEMORY/DEMO In Tuner mode, use MEMORY to store up to 32 preset radio CD mode, use MEMORY to store up to 32 tracks. In Standby button to enter display Demonstration mode.
L Your system's tuner is very much similar to the usual ones that you'd find in other audio systems. It too has tuning buttons, band selector for choosing between AM and FM radio stations, FM stereo button for stereo effects when listening to FM radio broadcast, plus a Memory button for storing your preset radio frequencies. TUNER OPERATIONS 1. If the system is not already 2. Press FUNCTION 3. Press BAND 4.
I HM / .j_ DISC CHANGER AUDIOS_TE_ LOADING 1. Press POWER 2. Press FUNCTION 3. Press OPEN/CLOSE 4. Load one to three 5. Press 1-2-3 DISC to rotate the tray and place the third vacant position, if so desired. 6. Press.OPENICLOSE 7. Press 1-2-3 8. The display shows "DSC 1" or "DSC 2" or "DSC 3" momentarily. When you've finished your disc selection the display shows "READ".
PROGRAMMING Be sure that the PLAY ORDER system 1. If discs are not 2. Press MEMORY 3. Press 1.2-3 4. Press location is in Stop mode already loaded, to enter _ or follow program DISC to select prior to setting the section program play order. on LOADING DISCS. mode. a disc. _ memory to select a track to be placed in memory location number for continual programrning). to enter selection. 1 (next 5. Press MEMORY 6.
PLAYING AND LOADING DISCS SIMULTANEOUSLY Your 3 Disc Changer Audio System has one other feature that you simply cannot resist; while the system is playing a disc, you can open the CD compartment tray to unload the other 2 discs and re-load 2 new ones without iilterrupting the playing music. Let's say if you're playing disc 2 and you want to replace discs 1 and 3 with two other discs.
SHUFFLE PLAY THE TRACKS OF ALL Dnscs The difference between this mode and the previous one is that with previous mode, the system continues playing the tracks of all loaded repeatedly and CD play mode won't end unless you press Stop. With it plays each track once for all loaded discs, after all tracks have been the system stops CD play mode. Follow the steps below to select this . . 3. If discs are not already LOADING DISCS.
REPEAT PLAY -ONE TRACK To repeat play any one particular track, follow step 5 in BASIC: OPERATIONS page 10 to skip forward or backwards to that particular track, press PLAYIPAUSE, then press REPEAT repeatedly until the display shows "REPEAT 1". The system will play that track over and over until you press Stop to end CD play.
Your RS-1247/RS-1248 audio system comes with dual cassette decks. With dual cassette decks you can play cassette tapes one after another. Tape deck 1 can record and playback tapes, while tape deck 2 has only a playback function. When using cassette tape selecting Tape mode. decks be sure to use the IJ--LT-:pl-I1 I1 LOADING CASSETTE Function button for I -:: TAPES 1. Press POWER to turn 2. Press FUNCTION to select Tape mode, the display 3.
AUTOMATIC TAPE STOP When a cassette tape is engaged and reaches the end of the tape, resume to the Off position. in a particular mode (except Pause mode) the tape deck buttons automatically DUAL DECKS TAPE PLAY Your system can be set to play deck 2 then playback discontinuance. Check that your system deck 2. If tapes are not CASSETTE TAPES. lp 2. Press PLAY to start 3.
RECORDING FROM THE CD 1. . 3. , Follow steps RADIO. PLAYER 1 and 2 of the Select CD Player mode display shows "CD". previous by pressing section on RECORDING FUNCTION Load one to three CDs into the CD compartment to select the desired disc, then press <_>, or desired first track you want to record. Quicky play. press PLAY/PAUSE twice repeatedly tray, :_-_ to pause CD, avoiding FROM until the press 1-2-3 DISC to select the immediate CD 5. At deck 1, press PAUSE then 6. Now...
INSTALLING BA'PI'ERI ES The remote control must be inserted with AAA batteries prior use. Follow the steps below to ensure correct installation. 2 Fit tl_b tip of your index finger into A, slightly push the tab of the battery compartment lid towards direction B, lightly lift upwards to detach the lid. . Before inserting the batteries, observe the polarities (that is, + and - ) of the batteries, then relate the polarities to the engraved diagram inside the battery compartment. Now insert the batteries.
IF YOU SELECTTUNER: . . 3. . Search for a radio station automatically by pressing SEEK and the system searches for the next frequency with enough signal strength. To stop auto Seek, press either TUNING arrows ( • or • ). one of the Search for a radio station manually pressing either one of the TUNING (• or•). 0 by arrows BASS TUNER Select a preset radio station frequency by pressing PRESET to enter Preset mode, press either one of the TUNING arrows ( • or • ) to choose a preset memory location.
. . IF The Repeat function is for repeating disc or track play. Press REPEAT repeatedly to toggle between and select one of the modes: repeat one track, repeat one disc, repeat all loaded disc(s). During selection, be sure to look at the display to see the changing of modes, stop pressing when the display..shows your desired mode. Choosing the Shuffle function will set the system playing tracks in a shuffle( sequence.
The following are some of the messages you may see when the system is in CD mode. Refer to the descriptions below when you see a message on display. This message is displayed when: STBY the system OPEN the CD compartment tray is opening. CL the CD compartment tray is closing. READ the system the content MUTE the Mute function is activated. Also refer to page 18, step 3 of section For Sound Effect and Volume Adjustments for a more detailed functional explanation.
CLEANING THE EXTERIOR Prior to cleaning the exterior, be sure to unplug the power cord from power outlet. Wipe the exterior with a soft, clean, and slightly waterdampened-cloth. the AC CD CARE HANDLIN.G CLEANING CD_ : CDS : Always handle CDs by their edges or hold it with your index finger in the hole and a thumb at one edge.
TAPE TYPE SELECTION In today's hypermarkets and stores there are 3 types of cassette tape available for sale: Type I, Type II, Type III. When you purchase new cassette tapes be sure to select Type I because both Type II and Type III are not suitable for use with this system and may cause poor sound quality. TAPE CARE STORING TAPE_S: High temperatures such as exposure to sunlight or storage in hot places may warp the tape's case or damage the tape itself.
SYSTEM DOESN'T TURN ON Check your power source, is the power plug fitted and plugged into the power outlet properly, are the batteries in the remote control fresh? If not, do make sure that the power plug is properly plugged in and that the batteries are replaced with fresh ones. Unplug the power cord from the power outlet back in again. Is there power at that particular to another power outlet.
CD SOUND SKIPS • Is the CD dirty? • Is the disc warped, scratched or cracked? If the disc is damaged in any way don't attempt to play that disc as it may cause damage to the CD lens. • Is there shock or vibration the system to some other DISTORTED OR NoisY If it is, clean it by following the instructions on page affecting the system? if so, you should firm, level and stable surface. 22.
A P Antennas 5 Automatic Tape Stop 16 B Band Panel Controls 6, 7, 8 Phones (jack) 8 Playing and Loading CDs Simultaneously Power 7 -- Power Supply 5 Preset EQ 7 Selector 8 Programming ¢ Care & Maintenance 22, 23 Cassette Player Control Buttons Cassette Tape Decks 8 CD Care 22 CD Compartment Tray 7 CD Lens Care 22 CD Player Control Buttons 7 Check for Moisture 4 8 D S Service Information 2 Shuffle Play 12 Sound Effect (Preset EQ) Indicators Speakers 5 Super Bass 8 Dual Decks Tape Play 16 T
What your warranty covers: • Any defect in materials or workmanship. For how long after your purchase: • One year. (The warranty period for rental units begins with the first rental or 45 daysfrom date of shipment to the rental firm, whichever comes first.) What we will do: • Provideyou with a new or,at our option, a refurbishedunit. • The exchange unit is under warranty for the remainder of the original product's warranty period. How to make a warranty claim: • • Properlypackyour unit.
Thomson Consumer Electronics Canada, Inc. warrants to the purchaser or gift recipient that if any manufacturing defect becomes apparent in this product within 1 year from the original date of purchase, it will be replaced free of charge, including return transportation. This warranty does not include damage accidents, misuse or leaking batteries. Should your product it to the not perform selling to the properly dealer OR with product during proof resulting the warranty of purchase period, 1.