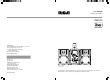
user manual manual de usuario RS2135i IMPORTADOR Comercializadora Thomson de México, S.A. de C.V. Álvaro Obregón No. 151. Piso 13. Col. Roma. Delegación Cuauhtémoc C.P. 06700. México, D.F. Telefono: 52-55-11-020360 RFC: CTM-980723-KS5 Thomson Inc. P.O. Box 1976 Indianapolis, IN 46206-1976 © 2007 Thomson Inc. Trademark(s) ® Registered Marca(s) ® Registrada(s) Marque(s) ® Deposée(s) www.rcaaudiovideo.com Printed In China / Impreso en China 5642 9360 (EN/E) iPod not included. iPod no incluido.
Important Safety Instructions FCC information FCC Information For Your Safety This device complies with Part 15 of the FCC Rules. Operation is subject to the following two conditions: (1) This device may not cause harmful interference, and (2) this device must accept any interference received, including interference that may cause undesired operation. In accordance with FCC requirements, changes or modifications not expressly approved by Thomson Inc.
Important Information Important Information Technical Specification Product: 5CD Audio System Brand: RCA Model: RS2135i Electrical Consumption: Service Information Safety Precautions Headphone Safety This product should be serviced only by those specially trained in appropriate servicing techniques. For instructions on how to obtain service, refer to the warranty included in this Guide. • Make sure you turn down the volume on the unit before you put on headphones.
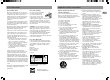
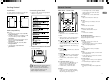
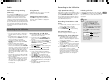
Contents Getting Started FCC Information ...................................... 1 Recording to the USB Drive ................. 15 Important Safety Instructions ................. 2 Deleting Files from USB Drive .............. 16 Deleting All Files ................................... 16 Content of Box EN ON SOURCE STANDBY MENU BAND FM ST Important Information ............................ 3 iPod Mode .............................................. 17 B.BOOST DEMO EQ INFO VOL Getting Started ..
Getting Started General Controls Installation Connecting Your iPod To ensure sufficient ventilation, keep the space shown below free from other surfaces: 1. Check the table and use the appropriate adaptor for your iPod. 4” • • In Recording mode, it selects display options and shows record time and remaining time. In Tuner mode, it selects radio band. EN DISC SKIP • Skips to the next disc in CD mode. 4” 4” 4” Main Unit – Front view RECORD • Starts and stops recording to the USB drive.
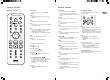
General Controls General Controls Remote Control ON ON/STANDBY • Turns the power on or off (STANDBY mode). SOURCE STANDBY BAND • In Tuner mode, it selects radio band. MENU BAND FM ST B.BOOST DEMO SOURCE • Selects the CD player, USB, tuner, AUX and iPod. FM ST • Selects between stereo and mono sound in the FM tuner mode. EQ INFO • In the CD or MP3/WMA mode, it displays various information (e.g. Track time, remaining time, ID3 tag, etc.) • In the USB mode, it shows memory usage.
Display and Settings Display 3. Press / to set the minute. 4. Press TIMER to change to Timer Off setting with clock time flashing. Repeat steps 2 & 3 for timer off time setting. 5. Press TIMER to select source. Press / to select TUNER/TUNER REC/DISC/USB/iPod. If TUNER REC is selected, press / to select the preset station. 6. Press TIMER to set volume. Adjust VOLUME CONTROL to select desired volume level. 7. Press TIMER to save settings. Press TUNE/ PRESET to cancel setting.
CD and mp3 Disc Playback USB Playback Fast Forwarding/Reversing/ Skipping Tracks Important CD and mp3/wma Information Connecting USB drive to the Main Unit • Notes on CD-R/RW Disc: • Some CD-R and CD-RW discs may not be playable due to the state of the disc or the device that was used for recording. • Do not affix any type of labels to either side (recordable or labeled side) of a CD-R/ RW disc as this may result in the unit malfunctioning.
Radio Auto Preset Programming (FM only) Press and hold the BAND button for 2 seconds to scan stations in the FM band. The stations will then be stored as preset channels. A maximum of 32 stations can be stored. Be careful of your preset channels being erased accidentally because the scanning and storing process is automatic upon pressing the button. You can stop the automatic scan by pressing any button, but the erased stations cannot be recovered.
iPod Mode Advanced Playback Controls In iPod mode, you can navigate and playback music on your iPod. Connecting your iPod to the Unit 1. Switch off your iPod or pause its music playback. 2. Place the appropriate adaptor (refer to page 7) on the iPod dock at the top of the unit. 3. Place your iPod on the iPod dock and press SOURCE to select the iPod mode. • "iPod Connecting" displays on the main unit. "iPod not found" will be displayed if no iPod is connected to the unit.
Advanced Playback Controls Advanced Navigation Controls Renaming Tracks Remote Control You can rename files in the USB drive. 1. In the USB stop mode, press / to select folder. 2. Press / to select the file in the current folder. 3. Press PROG to enter rename mode. 4. Press / or VOLUME CONTROL to select the first letter of the new file name. 5. Press to confirm the current letter and move to the next letter. 6. Press to modify the previous letter. 7.
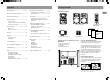
Troubleshooting Tips Advanced Navigation Controls • • • Tips on Playback Sequence of Disc • Check that the mp3/WMA disc is created with a single folder structure. Refer to the diagram below for playback sequence details on multi-level folder structure. For example, the folders and songs from level 2 are played before moving to play folders and songs from level 3. Folder playback sequence is indicated by the letters A to G.
Limited Warranty (U.S.) Maintenance Disconnect the unit from the power source before performing any maintenance. Cleaning Clean the exterior of the unit using a soft dust cloth. CD Player CAUTION! This unit operates with a laser. It must be opened by only a qualified technician. Handling CDs • • • • Do not touch the signal surfaces. Hold the CD by the edges, or by one edge and the hole. Do not affix labels or adhesive tapes to the label surfaces. Do not scratch or damage the label.