This device complies with Part 15 of the FCCRu_es.Operation Communications Commission has prepared a helpful booklet, is subject to the following not cause harmful inter ference, and (2) this device must "How To Identify and Resolve Radio TV htterference Problems_" This booklet is available from the U.S.Government accept any interference received, including interference that Printing Office, Washington, DC 20402. Please specify stock may cause undesired operation.
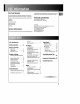
! For Your Records in appropriate servicing techniques, For instructions on how to obtain service, refer to the warranty included in this Guide. In the event that service should be required, you may need both the model number and the seria_ number, tn the space Technical specification i below, record the date and place of purchase, and the serlaI number: Power Supply: 120V-60Hz Power consumption: 135Watts Mode! NO, Remote Control No. Date of Purchase P_aceOf Purchase Serial No.
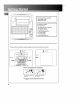
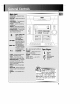
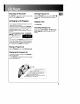
I. AM Loop Antenna Connector 2, Main Speaker Jacks 3, FM Antenna Jacks [ Unpacking the system: You should have: • • • • • • • one main unit (with 2 speakers); one remote control; one AM loop antenna; T-Type FM antenna wire; one user's guide; one safety leaflet. owner registration card To ensure sufficient ventilation, keep the spacings shown below free from other surfaces: 10cm/4" 10cm/ 4" \ m \ 5cm/ 2" ........... \ 10cm/ 10cm/4" !0 °° Antenna and Speaker Wire Connection PUSh terminal insert
mode. Look at the display icons to identify the current mode.
Showing the Demonstration In aft mode, pressDIMMERiDEMO to turn on/off magic demonstration except timer on or sleep mode is active, Pressand release TIMER to turn on/off Activating the Timer the alarm. The alarm is active when the clock icon indicator is lit. DISPLAY TIMERICLOCK Adjusting the Display Brightness O 1. Pressand hold CLOCK until the hour flashes on 1. Pressand hold DIMMER/DEMO for more than 2 seconds. 2. While the dimmer is dis- the display. 2.
UsingPresetEqualizerCurves PressEQ on the main unit or on the remote to toggle among FLAT]ROCK, POP,JAZZ, CLASSIC& CUSTOM BassBoost PressS.BOOST to turn orSoff boosting the bassfrequency. The display shows briefly the sefecSon, Muting Audio Creating a Custom Curve 1
Repeating the Play Order Deleting Program List PressREPEATto repeat the current track, current disc, all discs,or turn REPEATmode off. While in PROGRAM mode, press and hold STOP [] for 5 seconds, They system displays the message CLEAR. Setting Up a CD Program You can program the CD player to play up to any 32 tracks on the CDsin the tray. 1. While the CD player isstopped, press PROGISET to enter program mode.
Setting Presets 1, PressTUNE/PRESETbutton to enter TUNER mode, 2, PressSKIP FORWARD _ _ I BACKWARD _ to accessthe desired frequency. 3. Pressthe PROG/SETbutton once. I. PressSOURCE to select TUNER. 2. PressBAND to select between AM or FM radio band, 4. The most recently accessedprogram location will be displayed. 5. If a different program location ispreferred, press SKIP BACKWARD _ _ I FORWARD_ _ to move to the desired preset number (1132). 6, PressPROG/SETto store the selected frequency at that preset.
{ii_ii_!_" _{!i_iiii:!_iKix Playing a Tape From CD Tip: You can play a tape from either deck. 1. PressSOURCE repeatedly to select TAPE. 2. Open the cassette door. 3. Insert a tape into the door and push the door closed. 4. PressREW _IRFWD _ to position the tape to the desired starting position. (Deck 1 Only) 5. PressPLAY _ to start playback. 1. Insert a tape into deck 1. 2. PressSOURCE repeatedly to select CD. 3. Insert the disc(s)to be recorded. 4. Select the track, CD, or program to be recorded.
Solution Solution • Check power cord for a secure connection. • Switch to another function (TAPE, Tuner) and then back to CD. • Unplug the unit for a moment, and then plug into power source again. • Check the outlet by plugging in another device. • Increase the volume setting. • Check connection to speakers. • Check that you have selected the appropriate function: CD, TAPE,Tuner. • Make sure mute is off. • Check antenna connection. • Move antenna.
Disconnect the audio system from the power source before performing any maintenance. Safety Precautions Cleaning only by a trained technician. • Never operate this product with the cabinet removed, Clean the exterior of the system using a soft dust cloth. CD Player CAUTION! This system operates with a laser. It must be opened by only a qualified technician.
Headset Safety Don't Infringe • DOnot play your headset at high volume. Hearing experts warn against extended high-vol- This product should only be used for the purposes for which it is sold, that is, entertainment, violating ume play. • If you experience ringing in your ears, reduce volume or discontinue use. no copyright law. Any attempts to use this product for which it is not intended is unlawful and therefore not condoned by Thomson multimedia.
What your warranty covers: • Defects in materials or workmanship. For how long after your purchase: • One year from date of purchase for labor and parts Warranty period for rental units begins with the first rental or 45 days from date of shipment to the rental firm, whichever comes first. What we will do: • Pay any Authorized RCAAudio ServiceCenter the labor charges to repair your unit.
Limitation of Warranty: • THE WARRANTY STATEDABOVE IS THE ONLY WARRANTY APPLICABLETO THIS PRODUCT. ALL OTHER WARRANTIES, EXPRESS OR IMPLIED (INCLUDING ALL IMPLIED WARRANTIES OF MERCHANTABILITY OR FITNESSFOR A PARTICULARPURPOSE)ARE HEREBY DISCLAIMED. NO VERBAL OR WRITTEN INFORMATION GIVEN BY THOMSON MULTIMEDIA INC., ITS AGENTS OR EMPLOYEES SHALLCREATEA GUARANTY OR IN ANY WAY INCREASE THE SCOPEOF THIS WARRANTY. • REPAIROR REPLACEMENT AS PROVIDED UNDER THIS WARRANTY IS THE EXCLUSIVE REMEDY OF THE CONSUMER.
What your warranty covers: Defectsin materialsor workmanship. For how long after your purchase: One year from date of purchase for labor and parts The warranty period for rental units begins with the first rental or 45 days from date of shipment to the rental firm, whichever comes first. What we will do: Pay any Authorized RCAAudio Service Center the labor charges to repair your unit.
Limitation of Warranty: • THE WARRANTY STATEDABOVE IS THE ONLY WARRANTY APPLICABLETO THIS PRODUCT. NO VERBAL ORWRITTEN INFORMATION GIVEN BY THOMSON MULTIMEDIA LTD., ITS AGENTS OR EMPLOYEES SHALL CREATEA GUARANTY OR IN ANY WAY INCREASE THE SCOPEOF THIS WARRANTY. • REPAIROR REPLACEMENT AS PROVIDED UNDER THIS WARRANTY IS THE EXCLUSIVE REMEDY OF THE CONSUMER. THOMSON MULTIMEDIA LTD.SHALL NOT BE LIABLE FOR INCIDENTAL OR CONSEQUENTIAL DAMAGES RESULTINGFROM THE USE OF THIS PRODUCT.