RCA Models: RT2500 RT2500R
This device generates and uses radio frequency (RF)energy, and if not installed and used properly, this equipment may cause interference to radio and television reception. This equipment has been type tested and found to comply with the specifications in Subpart Jof Part 15 of FCCRules. These rules are designed to provide reasonable protection against radio and television interference in a residential installation. However, there is no guarantee that interference will not occur in particular installations.
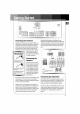
FCCInformation Remote Codes Getting Started Unpacking the Receiver ................... Inserting batteries into remote control ...... Set up and Maintenance of the Receiver ..... Connecting to Audio-Visual Components .... Connecting the Antennas ................. Connecting the Speakers .................. Connecting the Subwoofers ............... Positioning your Speakers ................. Connecting for Power .................... Using Headphones ....................... Demo Mode ........................
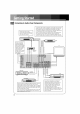
Unpacking the Receiver Set up and Maintenance For RT2500& RT2500R,check that you received the fol- the lowing items: • one receiver unit; • one RCAUniversal Remote Control (CRK76); Receiver • Provide spacesfor sufficient ventilation as indicated: • one external FM Dipole antenna; • one external AM loop antenna; • one audio cable (two wires) with red and white RCA connectors; • one video cable (single wire) with yellow RCAconnectors; • one instruction book; of I lOcm ____ lOcm • one safety leaflet
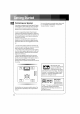
Connecting to Audio-Visual Components Protectyour Componentsfrom Overheating Thisreceiver allows you to connect to a large variety of audio or video components. Arrange Beforeyou Connect • Do not stack components directly on top of each other. • Protect components from power surges. • Connect all components before plugging any power cords into the wall outlet. • Always turn off the receiver and/or components before you connect or disconnect any cables.
Connectingto Audio-VisualComponents If you have a SAT receiver or DVD player, you can make use of an optical digital connecting cord (not supplied) or coaxial digital connecting cord (not supplied) to enjoy DTS/Dolby Digital sound quality. One optical / coaxial cable is needed for each SAT receiver / DVD player. When optical Remark: If you have a video camera, video game machine, or an extra VCR, connect it to VCR 2jack at the front of the receiver or coaxial cable is used, no more analog cable is needed.
iiiiiiiii iiiiiiiii i iiiiiiiii iiiiiiiii iiiiiiiii Ctia_onnec__n o the Antennas The AM and FM antennas connect to the AM and FM terminals on the system's back panel. They must be hooked up in order to receive clear reception, Uncoil the antenna wires and locate the bare ends. Pressdown on the tab to open the terminal and Red/Black (Main Speakers), Blue/Black (Center Speaker) and Grey/Black (Rear Speakers).When connecting the speakers, make sure the colors of speaker wires and terminals are matched.
Positioning your Speakers Your system is equipped with Dolby Digital & Digital Theatre System, which enable the unit to reproduce sound effects asthey were intended. However, the speakers must be properly positioned and balanced.
Connecting for Power Make sure you connect all your other electronic components and the speakers before plugging your receiver into the outlet. Plug the power cord in the walt outlet, matching the wide blade of the plug with the wide slot in the outlet. Besure to insert the plug completely. Using Headphones To listen privately through your audio system, use the PHONESjack on the receiver. However, make sure you turn down the volume before you put on the headphones.
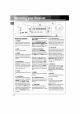
Q® _uu_ o® ............ _WW I_ Receiver Controls ! 1. STANDBY To turn the unit on/off, : When the ...... _rr 7.DSP (Digital Sound Processor) & NIGHT mode Press corresponding button to select 12. 6 CH (6 Channels) Press to select the input connected to an external 6-Channel decoder, Press the mode (STADIUM/CONCERTI again to return to the most recently system is turned on.
Your Remote Control Pleasebe sure you have inserted the batteries into the remote control (see relevant section on page 3.) You can test it by pressing any button, tf it works, the red LEDwill light. 1. ON/OFF To turn on or off the receiver and other auxiliary components (see page 10 "Using the Remote to Control Additional Components"). ber while the word is sti flashing and the frequency will be stored. (For details, refer to "Storing and Recalling Stations in Memory" on page 10.) 2.
m The Built.in Radio The receiver has built-in AM/FM radio function. You can simply connect it to receiver or remote power and speakers to listen to your favorite radio stations. control; then press MENU on the remote control. The flashing word MEMORy in ida Will appear in display. 1. Select TUNER. 2. Tune to your favorite station. 3. AdJust volume. 4. Set preset EQ if needed 5. Set surround mode if needed.
the remote command, • Trls re_te r_y not o_erateall msdels of the b_nds Note: Once your component is encoded, you can pressON/OFF on the remote once to turn offthe component and then followed by the second time quickly to turn off the receiver (i.e. this unit).
NightMode By using Dynamic Range Compression technology, you can enjoy enhanced sound quality by Dolby Digital at night without interrupting your roommates or neighbors. While enjoying a Dolby Digital enabled component (DVD, SAT),you can activate Night Mode by pressing NIGHT button at the front of the receiver, and this mode will compress the difference in volume between normal voices and sounds like explosions. There are two modes (SOFT,SOFTER)for you to choose the extents of compression.
iii i Front Speake_ se!ection Center Speaker Selection Surround Speaker Selection Subwoofer selection Subwoofer Phase Large/Sma!! Large/Sma!l/None Large/Small/None Yes/No + /_ Front Speaker distance Centre Speaker distance Rear Speaker distance O_40 ft 0-40 ft O-40 ft i Speaker Icons The receiver shows you the speakers' types and settings on the display with the following icons: By pressing the button repeatedly while display is still showing :5_ _:;, the display will toggle among: front, center, su
Troubleshooting Tips Noise creates when the TV is turned on. Receiver/Tuner Operation • TheTV is too close to the audio system. STEREO indicator Specific instruments is off. sound displaced. • Check the connections between the receiver and • Adjustthe antenna. the speakers if the sound does not match the video. • Pressthe Source Button for the video source. The signal is Mono. Severe hum or noise. • The signal is too weak. Connect an external antenna.
i CABLE CODES ABC ANTRONIX VCR CODES 5008, 5003, 5004, 5005, 5006, 5009, 5053 5008, 5009 ARCHER CABLETENNA CABLEVlEW CENTURY CITIZEN 5008, 5009, 5010, 5011 5008 5008 5011 5011 COLOUR VOICE COMTRONICS CONTEC EASTERN GARRARD GC ELECTRONICS 5012, 5013 5014, 5015 6016 5017 5011 5009 GEMINi GENERAL INSTRUMENT 5018,5019,5049 5003 2027 2002, 2026 AKAI 2003, 2004, 2005, 2007, 2008, 2111, 2112, 2113 AMERICAN ASHA AUDIO HIGH DYNAMICS 2021 2013 2009, 2010 2014 2011 BEAUMARK 2013 BROKSONIC CAUX 2012,
MEMOREX 2002, 2011, 2013, 2014, 2021, 2023, 2026, MGA 2104, 2131 2029,2065,2113 MGN TECHNOLOGY MIDLAND 2013 2053 MINOLTA MITSUBISHI 2055, 2056, 2107 2029, 2055, 2056, 2065, 2066, 2067, 2069, • 2070, 2071, 2072, 2073, 2074, 2106, 2113, 2123 MONTGOMERY MOTOROLA WARD 2075, 2131 2021, 2131 MTC 2002,2013,2026 MULTITECH NEC 2002, 2013, 2016, 2026, 2053, 2061 2009, 2010, 2011, 2016, 2018, 2058, 2064, NIKKO 2076, 2078, 2079, 2111, 2123 2014 NOBLEX 2013 OLYMPUS OPTIMUS 2021 2014, 2131 OPTONICA
KAWASHO KAYPANI !002,1004, 1175 1006 KENWOOD KLOSS NOVABEAM 1004,1006, 1068,1069, 1019 1174, 1183 KTV LOEWE !038,1070, !062 1171, 1176,1177 LOGiK LUXMAN 1083 1004,1006 LXl !000,1006,1049, !162,1181 1062,1071, 1004,1006,1008, 1019,1062, i MAGNAVOX 1072, 1073, 1077,1088, 1089, 1130, 1134,1183,1184 MAJESTIC MARANTS MARANTZ 1062 1004,1006, MEGATRON MEI 1006,1059 !176 MEMOREX !001,1006,1082, 1083,1162 MGA 1004,1005,1006, 1080,1082 1019,1022,1051, 1062, 1078 1054,1151, 1171, 1172,118
SAT (SAT,6CH) button 8, 9 TAPE button 8, 9 TV button 8, 9 A Accessories included 3 AM antenna (see Antenna) 5 ANT*FMS button 9 Antenna VCR 1 button VCR 2 button AM antenna 5 FM antenna 5 ARENA button (see DSPmode) 8, 9 Audio codes 18 B Basic controls of the remote Batteries R Rear Speaker distance 13 RECORDbutton (see Operation Remote Control 8, 9 8, 9 programming 10 Remote control buttons 13 REVERSEbutton GO BACK,DISK button 9 GUIDE,RDM,PTY button 9 $ H S-Video Input 8 Second VCR 8 9 Headphon
What your warranty covers: • Any defect in materials or workmanship. For how long after your purchase: • One year. (The warranty period for rental units begins with the first rental or 45 days from date of shipment to the rental firm, whichever comes first.) What we will do: • Provide you with a new, or at our option, a refurbished unit. • The exchange unit isunder warranty for the remainder of the original product's warranty period. How to make a warranty claim: • Properly pack your unit.
Thomson Consumer Electronics Canada, Inc. warrants tothepurchaser orgiftrecipient thatifanymanufacturingdefect becomes apparent inthisproduct within 1year from theoriginal date ofpurchase, itwillbe replaced freeofcharge, including return transportation. This warranty does notinclude damage totheproduct resulting fromaccidents, misuse orleaking batteries. Should your product notperform properly during thewarranty period, either: 1.Return ittotheselling dealer withproof ofpurchase forreplacement, OR 2.