RT2500 ENG 5/26/00 2:56 PM Page 3 u s e r m a n VOLUME al HT OFF I I I SURR. MO 6 CH ET EQ UP PRES TEST/ SET BYPASS O S-VIDE VCR 2 VIDEO L AUDIO R a DE P.
RT2500 ENG 5/26/00 2:56 PM Page 4 FCC Information This device generates and uses radio frequency (RF) energy, and if not installed and used properly, this equipment may cause interference to radio and television reception. This equipment has been type tested and found to comply with the specifications in Subpart J of Part 15 of FCC Rules. These rules are designed to provide reasonable protection against radio and television interference in a residential installation.
RT2500 ENG 5/26/00 2:56 PM Page 5 Contents FCC Information Getting Started Unpacking the Receiver . . . . . . . . . . . . . . . . . . .2 Inserting batteries into remote control . . . . . .2 Set up and Maintenance of the Receiver . . . . .2 Connecting to Audio-Visual Components . . . .3 Connecting the Antennas . . . . . . . . . . . . . . . . .5 Connecting the Speakers . . . . . . . . . . . . . . . . . .5 Connecting the Subwoofers . . . . . . . . . . . . . . .5 Positioning your Speakers . . . . . . . . .
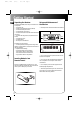
RT2500 ENG 5/26/00 2:56 PM Page 6 Getting Started EN Unpacking the Receiver Set up and Maintenance of the Receiver For RT2500 & RT2500R, check that you received the following items: • one receiver unit; • Provide spaces for sufficient ventilation as indicated: • one RCA Universal Remote Control (CRK76); • one external FM Dipole antenna; • one external AM loop antenna; 10 cm • one audio cable (two wires) with red and white RCA connectors; • one video cable (single wire) with yellow RCA con10 cm 10 cm n
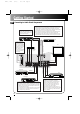
RT2500 ENG 5/26/00 2:56 PM Page 7 Getting Started Connecting to Audio-Visual Components This receiver allows you to connect to a large variety of audio or video components. Before you Connect • Protect components from power surges. • Connect all components before plugging any power cords into the wall outlet. • Always turn off the receiver and/or components before you connect or disconnect any cables. Protect your Components from Overheating EN • Do not block ventilation holes in any component.
RT2500 ENG 5/26/00 2:56 PM Page 8 Getting Started EN Connecting to Audio-Visual Components If you have a SAT receiver or DVD player, you can make use of an optical digital connecting cord (not supplied) or coaxial digital connecting cord (not supplied) to enjoy DTS/ Dolby Digital sound quality. One optical / coaxial cable is needed for each SAT receiver / DVD player. When optical or coaxial cable is used, no more analog cable is needed.
5/26/00 2:56 PM Page 9 Getting Started EN (CD) (SAT) (DVD) If you want to enjoy full range of sound effects, with small speakers, it is a must to use the subwoofer with the speakers to maintain adequate bass signal for the surround sound effect. Speaker cords, 1 for each speaker, are needed for connection. Twist the stripped ends of speaker cord about 2/3 inch (15 mm). Press down on the tab to open the terminal and insert the wire. Snap the tab closed.
RT2500 ENG 5/26/00 2:56 PM Page 10 Getting Started EN Positioning your Speakers Your system is equipped with Dolby Digital & Digital Theatre System, which enable the unit to reproduce sound effects as they were intended. However, the speakers must be properly positioned and balanced.
RT2500 ENG 5/26/00 2:56 PM Page 11 Getting Started EN Connecting for Power Make sure you connect all your other electronic components and the speakers before plugging your receiver into the outlet. Plug the power cord in the wall outlet, matching the wide blade of the plug with the wide slot in the outlet. Be sure to insert the plug completely. Using Headphones To listen privately through your audio system, use the PHONES jack on the receiver.
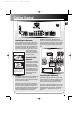
RT2500 ENG 5/26/00 2:56 PM Page 12 Operating your Receiver EN Digital Sound Processor VOLUME 5 STANDBY SURR. MODE 6 CH CLUB DSP OFF NIGHT 7 13 14 15 TEST/ SET UP PRESET EQ BYPASS 2 4 PHONES 3 DVD SAT VCR-1 VCR-2 CD FM/ AM TV TAPE 6 8 VCR 2 SET DEMO HOME THEATER AUDIO VIDEO RECEIVER EL 11 12 P.SCAN ARENA LE V 10 CHURCH LE EB TR I THEATER BASS I TUNING CONCERT I 9 MUTE M I STADIU 1 S-VIDEO VIDEO L AUDIO R MULTI JOG 16 Receiver Controls 1.
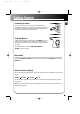
5/26/00 2:56 PM Page 13 Operating your Receiver Your Remote Control EN Please be sure you have inserted the batteries into the remote control (see relevant section on page 3.) You can test it by pressing any button. If it works, the red LED will light. TV ON OFF VCR1 1 DVD•6 CH VCR2 AM•FM SAT•CABLE 2 CD TAPE CH + 2. Source Buttons To turn on and select various audio/ video sources. You can also enter the 6 Channels direct input mode by pressing DVD•6CH. 9.
RT2500 ENG 5/26/00 2:56 PM Page 14 Operating your Receiver Digital Sound Processor VOLUME STANDBY STADIU M CONCERT THEATER CHURCH ARENA NIGHT DSP OFF CLUB 3 DVD I P.SCAN 5 SURR. MODE SAT 6 CH 4 LE EB TR I TUNING I BASS MUTE I The receiver has 2 built-in AM/FM radio function. You can simply connect it to power and speakers to listen to your favorite radio stations.
RT2500 ENG 5/26/00 2:56 PM Page 15 Operating your Receiver the remote command. Note: Once your component is encoded, you can press ON/OFF on the remote once to turn off the component and then followed by the second time quickly to turn off the receiver (i.e. this unit). If you only want the receiver to be turned off, select FM/ AM while the unit is ON before pressing ON/OFF. EN Tips: • This remote may not operate all models of the brands shown.
RT2500 ENG 5/26/00 2:56 PM Page 16 Advanced Sound Control EN Night Mode By using Dynamic Range Compression technology, you can enjoy enhanced sound quality by Dolby Digital at night without interrupting your roommates or neighbors. While enjoying a Dolby Digital enabled component (DVD, SAT), you can activate Night Mode by pressing NIGHT button at the front of the receiver, and this mode will compress the difference in volume between normal voices and sounds like explosions.
RT2500 ENG 5/26/00 2:56 PM Page 17 Advanced Sound Control Front Speaker selection Center Speaker selection Surround Speaker selection Subwoofer selection Subwoofer Phase Front Speaker distance Centre Speaker distance Rear Speaker distance Large/ Small Large/ Small/ None Large/ Small/ None Yes/ No +/0-40 ft 0-40 ft 0-40 ft Speaker Icons EN The receiver shows you the speakers’ types and settings on the display with the following icons: Small Main Speakers Large Main Speakers Small Center Speakers By
RT2500 ENG 5/26/00 2:56 PM Page 18 Care and Maintenance EN Troubleshooting Tips Receiver/Tuner Operation STEREO indicator is off. • Adjust the antenna. The signal is Mono. Severe hum or noise. • The signal is too weak. Connect an external antenna. Remote Control Operation The remote control does not operate the unit. • Another function mode is selected on the remote. Press the correct Source Button. • No batteries installed.
RT2500 ENG 5/26/00 2:56 PM Page 19 Remote Codes CABLE CODES ABC ANTRONIX ARCHER CABLETENNA CABLEVIEW CENTURY CITIZEN COLOUR VOICE COMTRONICS CONTEC EASTERN GARRARD GC ELECTRONICS GEMINI GENERAL INSTRUMENT HAMLIN HITACHI HYTEX JASCO JERROLD MAGNAVOX MEMOREX MOVIE TIME NSC OAK PANASONIC PARAGON PHILIPS PIONEER PULSAR RCA REALISTIC REGAL REGENCY REMBRANDT RUNCO SAMSUNG SCIENTIFIC ATLANTA SIGNAL SIGNATURE SL MARX SPRUCER STARCOM STARGATE STARQUEST TANDY TELEVIEW TOCOM TOSHIBA TUSA TV86 UNIKA UNITED ARTISTS
RT2500 ENG 5/26/00 2:56 PM Page 20 Remote Codes EN MEMOREX MGA MGN TECHNOLOGY MIDLAND MINOLTA MITSUBISHI MONTGOMERY WARD MOTOROLA MTC MULTITECH NEC NIKKO NOBLEX OLYMPUS OPTIMUS OPTONICA ORION PANASONIC PENTAX PENTEX RESEARCH PHILCO PHILIPS PILOT PIONEER PORTLAND PROSCAN PROTEC PULSAR QUARTER QUARTZ QUASAR RCA RADIOSHACK/REALISTIC RADIX RANDEX RICOH RUNCO SAMSUNG SANKY SANSUI SANYO SCOTT SEARS SHARP SHINTOM SHOGUN SIGNATURE SINGER SONY STS SYLVANIA SYMPHONIC TANDY TASHIKO TATUNG TEAC TECHNICS TEKNIKA
RT2500 ENG 5/26/00 2:56 PM Page 21 Remote Codes KAWASHO KAYPANI KENWOOD KLOSS NOVABEAM KTV LOEWE LOGIK LUXMAN LXI MAGNAVOX MAJESTIC MARANTS MARANTZ MEGATRON MEI MEMOREX MGA MIDLAND MINUTZ MITSUBISHI MONTGOMERY WARD MOTOROLA MTC MULTITECH MULTIVISION NAD NEC NIKKO NTC ONWA OPTIMUS OPTONICA ORION PANASONIC PHILCO PHILIPS PILOT PIONEER PORTLAND PRICE CLUB PRISM PROSCAN PROTON PULSAR PULSER QUASAR RADIO SHACK/REALISTIC RCA RHAPSODY RUNCO SAMPO SAMSUNG SAMSUX SANSUI SANYO SCOTCH SCOTT SEARS SHARP SHOGUN
RT2500 ENG 5/26/00 2:56 PM Page 22 Index EN A Accessories included 3 AM antenna (see Antenna) 5 ANT•FMS button 9 Antenna AM antenna 5 FM antenna 5 ARENA button (see DSP mode) 8, 9 Audio codes 18 B Basic controls of the remote 9 Batteries 2 Brightness of display 8 SAT (SAT•6CH) button 8, 9 TAPE button 8, 9 TV button 8, 9 VCR 1 button 8, 9 VCR 2 button 8, 9 G GO BACK•DISK button 9 GUIDE•RDM•PTY button 9 H Headphones (see Phones) 7, 8 C I Care and maintenance 14 CD button (see Function buttons) 8, 9
RT2500 ENG 5/26/00 2:56 PM Page 23 US Warranty What your warranty covers: • Any defect in materials or workmanship. For how long after your purchase: • One year. (The warranty period for rental units begins with the first rental or 45 days from date of shipment to the rental firm, whichever comes first.) What we will do: • Provide you with a new, or at our option, a refurbished unit. • The exchange unit is under warranty for the remainder of the original product's warranty period.
RT2500 ENG 5/26/00 2:56 PM Page 24 Canadian Warranty EN Thomson Consumer Electronics Canada, Inc. warrants to the purchaser or gift recipient that if any manufacturing defect becomes apparent in this product within 1 year from the original date of purchase, it will be replaced free of charge, including return transportation. This warranty does not include damage to the product resulting from accidents, misuse or leaking batteries.