IMPORTADOR Comercializadora Thomson de Mexico, S.A. de C.V. Miguel de Cervantes Saavedra 57 Col. Ampliacion Granada C.P. 11529 Mexico D.F. Telefono: (55)25 81 53 20 R.F.C.: CTM-980723-KS5 0151 EXPORTER Thomson multimedia Inc. P.O. Box 1976 Indianapolis, IN 46206 - 1976 © 2002 Thomson multimedia Inc. Trademark(s) ® Registered Marca(s) Registrada(s) Marque(s) Deposée 55302850 Rev.1 (EN/F/E) www.rca.com www.rca.
u s e r m a n VOLUME u ECEIVER AUDIO VIDEO R H O M E T H E AT E R ON/STANDBY SURR MODE FM/AM MUTE SOURCE TUNING MEMORY SETUP TEST TONE EQ LEVEL BASS/TREBLE DIGITAL INPUT a SOURCE DSP MODE OK ST / MONO V-AUX VIDEO L - AUDIO - R PHONES l RT2350/RT2350BK/RT2600 It is important to read this instruction book prior to using your new product for the first time. Es importante leer este manual antes de usar por vez primera su euipo.
FCC Information This device complies with Part 15 of the FCC Rules. Operation is subject to the following two conditions: (1) This device may not cause harmful interference, and (2) this device must accept any interference received, including interference that may cause undesired operation. In accordance with FCC requirements, changes or modifications not expressly approved by Thomson multimedia Inc. could void the user’s authority to operate this product.
Table of Content FCC Information EN Care and Maintenance Getting Started Unpacking the Receiver . . . . . . . . . . . . .2 Unpacking the Speakers . . . . . . . . . . . . .3 Inserting Batteries into Remote Control .3 Set Up and Maintenance of the Receiver . . . . . . . . . . . . . . . . . . . . . . . . . .3 Protect your Components from Overheating . . . . . . . . . . . . . . . . . . . . . . .3 Connecting to Audio-Visual Components . . . . . . . . . . . . . . . . . . . . . .4 Digital Connection . . . . . . .
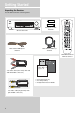
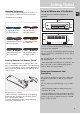
Getting Started Unpacking the Receiver You should receive the following items: + VOLUME H O M E T H E AT E R A U D I O V I D E O R E C E I V E R - ON/STANDBY SOURCE SURR MODE FM/AM MUTE TUNING MEMORY SETUP TEST TONE EQ DIGITAL INPUT BASS/TREBLE LEVEL OK SOURCE + - DSP MODE ST / MONO V-AUX PHONES VIDEO L - AUDIO - R One pair of “AA” batteries One receiver unit One external FM Dipole antenna One external AM loop antenna One RCA Universal Remote Control one audio cable (two wires) wit
Getting Started Unpacking The Speakers Set up and Maintenance of the Receiver • one set of speakers including 2 front speakers, 1 centre speaker, 1 subwoofer and 2 rear speakers.
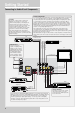
Getting Started Connecting to Audio-Visual Components DIGITAL CONNECTION If you have a SAT receiver DVD player or CD player with a digital output, you can make use of an optical digital cable (not supplied) or coaxial digital cable (not supplied) to carry the audio portion of the signal and enjoy Dolby Digital sound quality. One optical or coaxial cable is needed for each SAT receiver, DVD player or CD player.
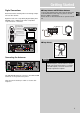
Getting Started Digital Connections Read instructions carefully when connecting components to the receiver. Digital In Jacks can accept Dolby Digital (AC-3), DTS (RT2600 only) or PCM signals when compatible components are connected. AM Loop Antenna and FM Indoor Antenna 1. Uncoil the Antenna wire and locate the base end of the AM antenna and snap into place as shown below in AM Loop Antenna. 2.
Getting Started Connecting the Speakers CENTER SPEAKERS Speaker wires FRONT SPEAKERS RIGHT LEFT - + + - CENTER - + WHITE / BLACK RED / BLACK GREEN / BLACK 1 for each speaker, is needed for connection. Twist the stripped ends of speaker cord about 2/3 inch (15 mm). Press down on the tab to open the terminal and insert the wire. Release tab to lock wire in the terminal.
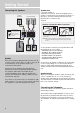
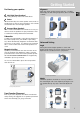
Getting Started Positioning your speaker Alignment Align the center speaker evenly with (A), or slightly behind (B), the left and right speakers, but not ahead of them. 1 Left, Right (Front Speakers) They carry primarily music and sound effects 2 Center In surround mode, the center speaker carries much of the dialogue as well as music and effects. It should be set between the left and right speakers.
Getting Started Preferred surround placement Location If possible, place surround speakers to either side of the listening area, not behind it. Advanced Setting Alternative Surround Placement Rear wall If rear wall mounting is the only choice, aim the speakers at each other (A), towards the front (B) or even towards the sidewalls (C, D). Experiment with placement until surround sounds seem to envelop you, rather than coming from behind you.
Getting Started Test Tone / Channel balance Channel balance Your receiver is equipped with a test signal generator for balancing the channels. As the signal "travels" from channel to channel, adjust the level controls until each channel plays at the same loudness level. Connecting for Power Make sure you connect all your other electronic components and the speakers before plugging your receiver into the outlet.
Operating Your Receiver 5 1 13 14 10 6 VOLUME H O M E T H E AT E R A U D I O V I D E O R E C E I V E R ON/STANDBY SOURCE SURR MODE FM/AM MUTE TUNING MEMORY SETUP TEST TONE EQ DIGITAL INPUT BASS/TREBLE LEVEL OK SOURCE DSP MODE ST / MONO V-AUX PHONES 2 3 4 12 9 11 8 15 7 VIDEO L - AUDIO - R 16 Receiver Controls 1. STANDBY/ON To turn the unit on/ off. When the system is turned on, the unit will go to the mode it was in before powered off. 2.
Operating Your Receiver Your Remote Control Please be sure you have inserted the batteries into the remote control (see relevant section on page 3.) You can test it by pressing any button. If it works, the red LED will light. 1. ON/OFF To turn on or off the receiver and other auxiliary components (see page 14 “Using the Remote to Control Additional Components”). 2. Source Buttons To turn on and select various audio/ video sources. 1 3.
Operating Your Receiver Display C S L C R LS LFE RS • Audio output is in dts mode (RT2600 only) • Speaker Icons. • Audio output is in Dolby Digital mode. SLEEP • Unit in Sleep mode. MEMORY • Audio output is in Dolby Pro Logic mode. • Unit in Memory or Preset mode. • Audio output is in Dolby Pro Logic II mode. (RT2600 only) ST • Tuner stereo signal detected. TUNED • Tuner station detected. 12 KHz MHz • Tuner frequency unit. EQ • EQ effect activated.
Operating Your Receiver Switching on/off Selection of Audio/Video source • To switch on the receiver, press ON/STANDBY button once, or any source button on the remote control. When one of the source buttons is pressed, the audio and video input corresponding to the name will be activated. The receiver acts as a switching device between all the sources that are plugged into it.
Operating your Receiver You can connect up to 7 audio/video sources to this amplifier: Source button Corresponding connector (receiver front panel) (receiver back panel) - DVD SAT VCR V-AUX CD TV TAPE FM/AM DVD IN (audio / video) SAT IN (audio / video) VCR IN/OUT (audio / video) V-AUX IN (audio / video) CD IN (audio only) TV IN (audio only) TAPE IN/OUT (audio only) built-in When a source is selected, the source name will be shown on the display.
Operating your Receiver NOTE Once your remote is encoded, you can press ON/OFF on the remote once to turn off the component and then followed by the second time quickly to turn off the receiver (i.e. this unit). If you only want the receiver to be turned off, select FM/ AM while the unit is ON before pressing ON/OFF. Using the receiver to play a source After having properly connected a source (DVD, CD, VCR) to the receiver, you can partly control them through the receiver.
Operating your Receiver Operating the Radio The receiver has a built-in tuner that allows for AM/FM radio function. Manual tuning 1. Connect the FM and AM antenna accordingly (see "Connecting the Antenna" on page 5 section for details) 5- Tune the stations by pressing TUNING UP or DOWN repeatedly until the desired station is found. Alternatively, you can press and hold TUNING UP or DOWN for about one second to activate the automatic SEARCH function.
Operating your Receiver Storing radio stations: The receiver can store up to 40 radio stations in memory. You can enter every single radio station yourself or the receiver can store all available radio station automatically in an ascending order. Manual preset EN 1. Select FM or AM band by pressing FM/AM repeatedly. Automatic preset storing : (FM only) SOURCE 1.
Operating your Receiver Retrieving preset stations 6 Channel external input (RT2600 only) 1. Press FM/AM to select tuner mode An external decoder (Dts, Dolby Digital, etc…) or a device with built-in multi-channel decoder and 6 channel output connector (DVD player, TV…) can be connected to the 6CH input. It is therefore possible to play any future 6 Channels coding (SACD, DVD Audio) thanks to this connection.
Advanced Sound Control Sound Enhancement Systems Dolby Digital This receiver is equipped with several built-in sound enhancement systems. The Dolby Digital mode lets you enjoy full digital surround from software processed in the Dolby Digital format. Dolby Digital provides better sound quality and more powerful presence than conventional Dolby Surround.
Advanced Sound Control Stereo The Stereo mode uses the two main channel outputs from the front speakers. Use this mode if you have connected the front speakers only. NOTE If linear PCM source (CD), format wil be Dolby Prologic even with Digital Input. DSP (Digital Sound Processor) These digital sound effects resemble sounds in a real environment such as (STADIUM / THEATER / CONCERT / CLUB / CHURCH / ARENA).
Advanced Sound Control Fine Setting of the Speakers 4. Press LEVEL again to save your setting. This receiver supports a wide range of speakers and subwoofers. For optimal surround sound enjoyment, you need to register the speaker selection settings of your audio system. If you buy this receiver with accompanied speaker package, then this step has been done for you. 5. Repeat step 3 to adjust other speaker volume levels.
Advance Sound Control Speaker Icons NOTE The receiver shows you the speakers’ types and settings on the display with the following icons: • The sub-woofer selection will always be YES when the main speakers are set to small (SML). • For the subwoofer phase setting, it will be affected by how you locate the subwoofer. Try both + and - settings and select the one that has better bass effect.
Care and Maintenance Troubleshooting Tips TAPE OUT and REC OUT do not operate in VCR mode. Receiver/Tuner Operation • Check to make sure the unit is not in 6-channel direct input mode. ST indicator is off. Cleaning the Exterior • Adjust the antenna. • Press DIGITAL INPUT/ST/MONO button to insure you are not outputting in mono. • Disconnect the system from AC power before cleaning the exterior of the system with a soft dust cloth, or with a slightly damp leather chamois. Never use strong solvents.
Remote Codes VCR CODES CABLE CODES ABC ANTRONIX ARCHER CABLETENNA CABLEVIEW CENTURY CITIZEN COLOUR VOICE COMTRONICS CONTEC EASTERN GARRARD GC ELECTRONICS GEMINI GENERAL INSTRUMENT HAMLIN HITACHI HYTEX JASCO JERROLD PIONEER PULSAR RCA REALISTIC REGAL REGENCY REMBRANDT RUNCO SAMSUNG SCIENTIFIC ATLANTA SIGNAL SIGNATURE SL MARX SPRUCER STARCOM STARGATE STARQUEST TANDY TELEVIEW TOCOM TOSHIBA TUSA TV86 UNIKA UNITED ARTISTS UNITED CABLE UNIVERSAL VIDEOWAY VIEWSTAR 5002, 5008, 5008, 5008 5008 5011 5011 5012, 501
Remote Codes MEMOREX MGA MGN TECHNOLOGY MIDLAND MINOLTA MITSUBISHI MONTGOMERY WARD MOTOROLA MTC MULTITECH NEC NIKKO NOBLEX OLYMPUS OPTIMUS OPTONICA ORION PANASONIC PENTAX PENTEX RESEARCH PHILCO PHILIPS PILOT PIONEER PORTLAND PROSCAN PROTEC PULSAR QUARTER QUARTZ QUASAR RCA RADIOSHACK/REALISTIC RADIX RANDEX RICOH RUNCO SAMSUNG SANKY SANSUI SANYO SCOTT SEARS SHARP SHINTOM SHOGUN SIGNATURE SINGER SONY STS SYLVANIA SYMPHONIC TANDY TASHIKO TATUNG TEAC TECHNICS TEKNIKA TMK TOSHIBA TOTEVSION UNITECH VECTOR RESEAR
Remote Codes KAWASHO KAYPANI KENWOOD KLOSS NOVABEAM KTV LOEWE LOGIK LUXMAN LXI MAGNAVOX MAJESTIC MARANTS MARANTZ MEGATRON MEI MEMOREX MGA MIDLAND MINUTZ MITSUBISHI MONTGOMERY WARD MOTOROLA MTC MULTITECH MULTIVISION NAD NEC NIKKO NTC ONWA OPTIMUS OPTONICA ORION PANASONIC PHILCO PHILIPS PILOT PIONEER PORTLAND PRICE CLUB PRISM PROSCAN PROTON PULSAR PULSER QUASAR RADIO SHACK/REALISTIC RCA RHAPSODY RUNCO SAMPO SAMSUNG SAMSUX SANSUI SANYO SCOTCH SCOTT SEARS SHARP SHOGUN SIGNATURE 26 1002, 1175 1004, 1068,
Limited Warrranty (U.S.) What your warranty covers: Limitation of Warranty: • Defects in materials or workmanship. • THE WARRANTY STATED ABOVE IS THE ONLY WARRANTY APPLICABLE TO THIS PRODUCT. ALL OTHER WARRANTIES, EXPRESS OR IMPLIED (INCLUDING ALL IMPLIED WARRANTIES OF MERCHANTABILITY OR FITNESS FOR A PARTICULAR PURPOSE) ARE HEREBY DISCLAIMED. NO VERBAL OR WRITTEN INFORMATION GIVEN BY THOMSON MULTIMEDIA INC.
Limited Warranty (Canada) What your warranty covers: Limitation of Warranty: • Defects in materials or workmanship. • THE WARRANTY STATED ABOVE IS THE ONLY WARRANTY APPLICABLE TO THIS PRODUCT. NO VERBAL OR WRITTEN INFORMATION GIVEN BY THOMSON MULTIMEDIA LTD., ITS AGENTS OR EMPLOYEES SHALL CREATE A GUARANTY OR IN ANY WAY INCREASE THE SCOPE OF THIS WARRANTY. • REPAIR OR REPLACEMENT AS PROVIDED UNDER THIS WARRANTY IS THE EXCLUSIVE REMEDY OF THE CONSUMER. THOMSON MULTIMEDIA LTD.