User manual RTB1023 It's important to read this instruction prior to using your new product for the first time.
FCC Information This device complies with part 15 of the FCC Rules. Operation is subject to the following two conditions: (1) This device may not cause harmful interference, and (2) this device must accept any interference received, including interference that may cause undesired operation. This equipment has been tested and found to comply with the limits for a Class B digital device, pursuant to part 15 of the FCC Rules.
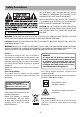
Safety Precautions THE LIGHTNING FLASH AND ARROWHEAD WITHIN THE TRIANGLE IS A WARNING SIGN ALERTING YOU OF “DANGEROUS VOLTAGE” INSIDE THE PRODUCT. THE EXCLAMATION POINT WITHIN THE TRIANGLE IS A WARNING SIGN ALERTING YOU OF IMPORTANT INSTRUCTIONS ACCOMPANYING THE PRODUCT. SEE MARKING ON BACK OF PRODUCT CAUTION: USE OF CONTROLS OR ADJUSTMENTS OR PERFORMANCE OF PROCEDURES OTHER THAN THOSE SPECIFIED MAY RESULT IN HAZARDOUS RADIATION EXPOSURE.
Important Safety Instructions Please Read and Save for Future Reference. Some of the following information may not apply to your particular product; however, as with any electronic product, precautions should be observed during handling and use. • Read these instructions. • Keep these instructions. • Heed all warnings. • Follow all instructions. • Do not use this apparatus near water. • Clean only with a dry cloth. • Do not block any ventilation openings.
Important Information Additional safety information • Always leave sufficient space around the product for ventilation. Do not place product in or on a bed, rug, in a bookcase or cabinet that may prevent air flow through vent openings. • Do not place lighted candles, cigarettes, cigars, etc. on the product. • Connect power cord only to AC power source as marked on the product. • Care should be taken so that objects do not fall into the product. • Do not attempt to disassemble the cabinet.
Table of Contents FCC Information ................................................ 1 Safety Precautions ............................................ 2 Important Safety Instructions .......................... 3 Important Information ..................................... 4 Features .............................................................. 4 Table of contents ............................................... 5 Connections and Setup ..................................... 6 Connecting to your TV ..............
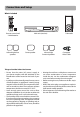
Connections and Setup What’s included Remote control and 2 AAA batteries Left and right front speakers Main unit (receiver) Center speaker Left and right Surround speakers Subwoofer Composite Video Cable Things to Consider before You Connect • Ensure that the mains (AC power) supply in your house complies with that indicated on the identification sticker located on the back of your unit.
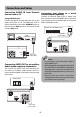
Connections and Setup Connecting to your TV Method 1 (best) HDMI • Connect the HDMI OUT jack on the rear of the unit to the HDMI IN jack on your TV using a HDMI cable (not included). • You can select the resolution of the player’s HDMI output signals (HDMI Auto, 1080p, 1080i, 720p, 480p and 480i) to match your TV’s resolution capabilities, please see instructions on page 20 for details.
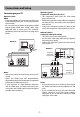
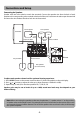
Connections and Setup Connecting AUDIO IN from External Sources such as TV Using AUDIO IN Jacks Connect the AUDIO IN jacks from the unit to the AUDIO OUT jacks on TV, SAT/Cable Box, VCR or other component. Press either SOURCE button on the main unit or AUX button on the remote control to select AUX mode.
Connections and Setup Connecting the Speakers Speaker wires are color-coded to match the terminals. Connect the speaker wire from the back of each speaker to the corresponding color terminal at the back of the unit. Press down the tab to open the terminal and insert the wire. Release the tab to lock wire in the terminal.
Connections and Setup Positioning Speakers Front Speaker Placement For best results, follow the speaker placement below. 3 1 Alignment Align the center speaker evenly with (A) or slightly behind (B) (the left and right speakers), but not ahead of them. 2 1 3 4 Courtesy Dolby Laboratories 1. Left, Right (Front Speakers) Front speakers carry primarily music and sound effects. 2. Center In surround mode, the center speaker carries most of the dialog as well as music and effects.
Connections and Setup Better Surround Placement Location If possible, place surround speakers to either side of the listening area, not behind it. Height If space permits, install surround speakers 2-3 feet above viewers. This helps to minimize localization effects.
Overview of Controls ON/OFF Press to turn on your unit, or put your unit in standby mode. When your unit is in standby mode, power is still entering your unit. To disconnect power, unplug the power cord. OPEN/CLOSE Press to open or close the disc tray. R(red), G(green), B(blue), Y(yellow) When playing a Blu-ray Disc that has a Java application, press to control playback. For more information, see the documentation that came with the Blu-ray Disc.
Overview of Controls Dimmer Setup To adjust the brightness of display on front of Bluray disc player. Press SETUP button and the“DIM 0”appears, then use / buttons to select "DIM 0", "DIM 1" or "DIM 2". Sleep Setup Press SETUP button and the “DIM 0” appears. Use / buttons to select "SLP OFF", then press the / buttons select 30M, 60M, 90M or 120M. The unit will automatically turn off once it counts down the sleep time. Test Tone Press SETUP button and the “DIM 0” appears.
Quick Setup When turned on for the first time or after resetting it to the factory default, the Quick Setup menu will pop up as following. 4. Press or button to select HDMI Auto, 1080p, 1080i , 720p, 480p or 480i and press OK. (For details about the Resolution, please see page20.) Would you like to do Quick Setup? 5. Press button to select “Next” and press OK, then the display for TV Aspect selection appears.
Playing a Blu-ray Disc or DVD Regional Coding This unit has been designed to play back BD-video encoded for region “A” and DVD-video encoded for region “1”. You cannot play back BD-video or DVDvideo that are labeled for other regions. Look for the symbols on the right on your BD-video or DVD-video. If these region symbols do not appear on your BDvideo or DVD-video, you cannot play back the disc in this unit. The letter or number inside the globe refers to region of the world.
Special Functions Searching for a title, chapter or elapsed time 1. During playback, press GOTO button one or more times to select a search mode. • Press once to select the Goto Title mode. • Press twice to select the Goto Chapter mode. • Press three times to select the Goto Time mode. 2. Press the number buttons to enter the title number, chapter number or time, then press OK button. Your unit goes to the title, chapter, or time you entered.
Playing files on a data disc Playing an audio CD 1. Press ON/OFF button on the remote control or ON/STANDBY button located on the unit’s front panel. 2. Press OPEN/CLOSE button to open the disc tray. 3. Place a CD on the disc tray with the label facing up, then press OPEN/CLOSE button to close the disc tray. It may take a few seconds for the CD to load. 4. After loading a disc, playback starts automatically. 5. To eject the CD, press OPEN/CLOSE button.
Watching movies with VUDU Using a USB device Playing USB flash (“thumb”) drive Insert a USB thumb drive containing picture files into your unit. A selection menu appears on the screen: VUDU is an online service that allows you to rent or purchase HD movies. It also provides a wide range of interesting and useful online apps. To use the VUDU movie service or access VUDU Apps, please ensure your unit is successfully connected to a network with internet access. (See “Network Setting” section on page 23).
Enjoying BD-Live AUX Some BD-ROMs contains BD-Live features that can be downloaded to the external memory (local storage) for enjoyment. In order to access BD-Live functions, the Blu-ray disc player must be properly configured for BDLive internet access, and it must be equipped with additional memory (USB Flash Drive). 1. Insert a USB Flash Drive of at at least 1GB capacity (not supplied) into the USB jack on the front panel of the Blu-ray disc player. • The USB device is used as the local storage.
The Settings Menu The Settings menu appears automatically when the unit is in BD/USB stop mode. Use or button to select Settings. Network Quick Setup BD-ROM BD-Live Settings Display Display Settings 1. In the main menu of Settings, press button, then use or button to select Display. 2. Press button and press or button to select an option, then press OK button. 3. Press or button to select the desired option, and then press OK button to confirm your selection. 4.
The Settings Menu Film Mode Movies are recorded on film at a rate of 24 pictures (frames) per second. Many of the movies on Blu-ray discs are recorded on the discs at this frame rate. However, not all TVs can display 24 progressive frames/second of video. If the TV cannot display this frame rate, you need to turn off Film Mode. Note Only your unit’s HDMI output supports 1080p video output at any frame rate. The component outputs are limited to 1080i, regardless of the Film Mode setting.
The Settings Menu Stereo Downmix: Allows you to downmix the multi-channel audio into fewer channels. • Stereo (LoRo) — Downmixes the multi-channel audio into two channel stereo. Choose when the Blu-ray disc player is connected to the equipment that does not support virtual surround function such as Dolby Pro Logic. • Surround Encoded (LtRt) — Downmixes the multichannel audio into surround compatible stereo.
The Settings Menu Network Settings Quick Setup 1. In the main menu of Settings, press button, then use or button to select Network. 2. Press button. 3. Press or button to select Wired, then press OK button. The IP Settings screen appears. If the network connection is active, Link Up appears next to Link Status. If the network connection is not active, Link Down displays next to Link Status. 4. Press or button to select IP Mode, then press OK button. 1.
Troubleshooting The unit does not switch on. • Make sure it is plugged in. • Press ON/OFF button on the remote control or ON /STANDBY button on the front of the unit. The device switches off spontaneously. • If the SLEEP SETUP (see page 12 and 13 for details) is set to 30, 60, 90,120 minutes, the device will turn off automatically once it counts down the sleep time.
Additional Information Precautions Use • If your unit has been stored in a cool place for any length of time, during a journey for example, wait for about 2 hours before using it. • The openings located on the top and bottom are for ventilation and must not be obstructed. • During thunderstorms, we recommend that you isolate the unit from the electrical supply so that it is not damaged by electrical or electromagnetic surges. • This unit is designed for continuous use.
Additional Information CD-R, CD-RW Compatible Formats In order to ensure playback, discs must conform with BD, DVD or CD standards. This unit may not play some recordings or files due to differences in recording formats, software used and disc types. BD-ROM BD-ROMs (Blu-ray Disc Read-Only Memory) are commercially produced discs and are available in the same capacities as BD below.
Additional Information “Blu-ray Disc” and are trademarks. VUDU is a trademark of VUDU, Inc. “BD-Live” and “BD-Live” logo are trademarks of Blu-ray Disc Association. Manufactured under license from Dolby Laboratories. Dolby and the double-D symbol registered are trademarks of Dolby Laboratories. HDMI, the HDMI logo and High-Definition Multimedia Interface are trademarks or registered trademarks of HDMI Licensing LLC. Manufactured under license under U.S.
Additional Information Internet Content and Services Disclaimer All internet content and services accessible through this device belong to third parties and are protected by copyright, patent, trademark and/or other intellectual property laws. Such internet content and services are provided solely for your personal noncommercial use, and you may not use such content or services in a manner that has not been authorized by the internet content owner or service provider.
Limited Warranty AVC MULTIMEDIA ("AVC") makes the following limited warranty. These limited warranties extend to the original consumer purchaser and is limited to non-commercial user of the product. One Year Parts & Labor Warranty AVC products purchased in the United States are warranted to be free from defects in materials or workmanship for a period of one year from the date of their original retail purchase.
Limited Warranty All warranties implied by state law, including the implied warranties of merchantability and fitness for a particular purpose, are expressly limited to the duration of the limited warranties set forth above. With the exception of any warranties implied by state law as hereby limited, the foregoing warranty is exclusive and in lieu of all other warranties, guarantees, agreements and similar obligations of manufacturer or seller with respect to the repair or replacement of any parts.