Home Theater ser's ul m
_CC' This device complies with Part 15 of the FCCRules. Operation is subject to the following two : (1) This device may not cause harmful interference, and (2) this device must accept any interference received, including interference that may cause undesired operation. This equipment has been tested and found to comply with the limits for a Class B digital device, pursuant to Part 15 of the FCCRules.
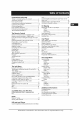
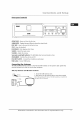
Connections and Setup Things to consider before you connect .................... 2 Accessories provided .................................................. 2 Front panel controls ................................................... 3 Connecting to audiovisual equipment ...................... 4 Connecting the speakers ............................................ 5 Positioning speakers .................................................. 5 Front speaker placement ...........................................
Things to consider before you connect • Ensure that the mains supply in your house complies with that indicated on the identification sticker located on the back of your unit. Install your unit horizontally, away from any source of heat (fireplace) or appliances creating strong magnetic or electromagnetic fields. The components of this unit are sensitive to heat. The maximum ambient temperature should not exceed 35 ° Celsius/95 Fahrenheit.
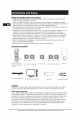
Ce w'_e_t e '_}s a_'/_d _6etu_ Front panel controls OPEN/CLOSE - Opens and close the disc tray. SUBWOOFER - Toggles between different subwoofer output levels. DISC SKIP - Goes to the next slot in the disc tray. STOP - Stops disc playback. PLAY/PAUSE - Starts playing a disc, Pause. SOURCE - Selects the input source. VOLUME - Adjusts the volume, Surround sound Eght indicator- The LED lights when Surround mode is active, ON/STANDBY - Switches the unit on and off.
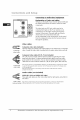
Connecting • F to audiovisual e_ment Explanation of jacks and cables The jacks on the back of your receiver (pictured left) and the cables shown below are used to connect to other components, VIDEO ®Y® COMPONENTVIDEO ( REGULAR AND PRO6SCAN) The video jacks are OUT jacks, which need to be connected to IN jacks on the TV or monitor you're connecting to (so the video content goes from the receiver to the screen).
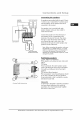
Connecting the speakers CENTER SPEAKER FRONTSPSAKERS Sixspeakersare provided with the unit (2 front, 1 center, 2 rear, 1 subwoofer). To achieve good surround effects, all six speakers need to be connected to the receiver. One speaker wire is provided with each speaker.Speaker wires are color-coded to match the terminals. Connect the speaker wire from the back of each speaker to the corresponding color terminal at the back of the unit. Press down the tab to open the terminal and insert the wire.
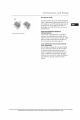
Magnetic shielding Speakers placed less than two feet from the TV set must be magnetically shielded in order to prevent picture distortion. Front and center speakers provided with this unit are magnetically shielded to protect your TV set. Note: It is not recommended to place the rear speakers and subwoofer near the TV set, Front speaker placement _ ...... Follow the suggestions for speaker placement get the best results.
No adjacent _ _ _-_i/ir i walls Surround speakers can go on stands facing each other to approximate sidewall mounting (A), or to the sides or rear of the viewing area, aimed upwards; they can go right on the floor, or preferably, a few feet off the floor such as on end tables (B). Test tone/Channel balance Channel balance Your receiver is equipped with a test signal generator for balancing the channels.
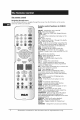
The remote control Navigating through menus Usethe direction buttons to navigate through the menus, Pressthe OK button on the remote control to confirm your selection. Remote mode control functions in DVD/CD ON,OFF - Switches the unit on and off. DVD - Selects the DVD mode, TUNER - Selects the TUNER and changes between AM/FM mode. USR - Selects the included Lyra rap3 player or the USB device. AUX - Selects the AUX. 0-9 - Number entry. Presses 1 through 5 to directly access a disc in the disc tray.
Remote control functions in Tuner mode TUNER - Selects the TUNER and switches between FM/AM. VOL+/- - Adjusts the sound volume. MUTE - Mutes and restores sound output. TUNER+/- - Tunes up and down the radio frequencies. MEMORY - Stores a station. CH+/- - Selects programmed stations. AUDIO - Toggles between Stereo and Mono in FM mode.
Compatible discs "_DVD "_DVD-R,DVD-RW, " CD • CD-R, CD-RW Compatible DVD+R, DVD+RW formats • DVD, VCD (Video Compact Disc), SVCD(SuperVideo Compact Disc),JPEG • CD, rap3, WMA See page 31-32 for more information about discs and compatible formats. Regional coding Your DVD player has been designed to processregional management information stored on DVD discs.The regional code for your player is 1. Discsthat have a different regional code will not play. Operating the DVD receiver 1.
T_pes of Menus = Disc menu - The appearance and contents of this menu varies according to the type of disc you have inserted. It is separate from the Setup menu. Info menu - The player's Info menu appears as a banner at the top of the screen while the disc is playing. Press the INFO button on the remote to toggle the Info menu on or off. Setup menu - Press the SETUP button to access this menu. Basic Playback Operations Playback Switch the DVD player and the TV set on. 1.
Accelerated play While the disc is playing, pressthe REVERSEor FORWARDbutton one or more times to vary the speed and direction of the accelerated play. PressPLAYto resume normal playback. Pause While the disc is playing, playback, press PAUSE once for freeze frame, Press PLAY/PAUSE to resume normal FFame advance 1. PressPAUSEtwice. FRAMEis displayed. 2. PressFORWARDto move forward one frame at a time. 3. PressPLAYto resume normal playback. Variable slow motion 1.
Using the Info menu 1. Press the INFO button on the remote while a disc is playing to display the Info menu. The first banner shows title, chapter, and time display information. 2. Press the INFO button again for audio language, subtitles, and camera angle. 3. Press the INFO button a third time for play mode, bookmark and sleep timen 4. Use the left/right arrow buttons on the remote to select an icon. 5. Use the up/down buttons to scroll through the options. NorPs:Marly discsonly have one title.
£ CD Info Display track play Title/chapter time display mode (DVD)/track bookmark sleep timer (audio CD and VCD) To directly access a title, chapter (DVD) or a track (audio CD and VCD), press the INFO button, press OK. Select the Title(TT), Track(TRK) or Chapter(CH) icon and enter a number directly with the numeric buttons. Press OK again to confirm. Note: Many discsonly have one title Time display_ To access the Time Display, press the INFO button on the remote.
Play mode (all discs except mp3/WMA/JPEG) Note: For rap3 play mod_s, please refer to page 17 1.While the disc is playing, pressthe INFObutton twice for CD/VCDand three times for DVD. 2. Selectthe Play Mode icon using the left/right arrow buttons. 3. Usethe up/down arrow buttons to select an option. • DVD play modes: standard, program, title repeat, chapter repeat, A-B repeat, chapter random. Notes: Program play mode is only available if a program list has been created (see below).
Bookmark (DVD and audio CD) The player can store up to 5 disc locations as long as the disc remains in the player and the unit remains switched on. Note: Tbis function is only available with dis_swbose elapsedrinle or remaining time appear_in rbe Into menu. 1. Press the INFO buttontwice for CD/VCD and three times for DVD. Select the Bookmark icon with the left/right buttons, and press OK. A menu is displayed with five bookmarks. 2. The first bookmark space is highlighted. Press OK to set the bookmark.
Plai_p3/WMA Files or displayinq JPEG Files Mp3/WMA is an audio file format which compresses recorded music. The main advantage of the Mp3/WMA format isthat CD-quality music tracks can be stored on a personal computer in user friendly compressed files. JPEG files are image files. Make sure that they have a resolution of less than 2 megapixels. Note: The time taken for the contents of the disc to be displayed varies according to tbe size and number of JPEG files on the dist.
The player has abuilt-in tuner thatallows forFMradio function. The AMloop antenna allows for AMradio function. Manual Tuning 1. Connect the FM aerial and the AM loop antenna at the back of the unit. Rotate the AM loop for better reception. 2. PressTUNERto enter TUNERmode and toggle between FM and AM. 3. When the FM station broadcasts Stereo sound, ST is displayed. 4. Tune a station by pressing repeatedly the TUNER+/-buttons until the desired station is found.
The playback controls of USB devices and rap3 player are basically the same. Connect the USB device or rap3 player first before starting playback. Connecting or Disconnecting USB devices to _the Main_ Unit 1. Insert the USB port of the USB device you want to connect into the USB socket of the unit. 2. Unplug the device to disconnect. Connecting or Disconnecting the rap3 Player to the Main Unit 1. Press and hold the lock button on the back of the player and push the USB connector the player. 2.
Ripping to the USB device or the rap3 player are basically the same. Connect the USB device or rap3 player first before ripping. Note: CDRipping function only supports CDDAdiscs Ripping CD to USB or rap3 Player 1. During CD playback, press RECon the remote to activate the Ripping Menu. 2. Select one of the menu itmes using the up/down arrow buttons. Pressthe left/right arrow buttons or OK to change the setting. Speed High speed ripping mode can save time when ripping from CDs.
insert battery into the player 1. Slidethe battery door by following the direction of arrow. 2. Insert a "AAA"(UM4) battery with polarities corresponding compartment. 3. Replace the door to the battery compartment. to the indications in the Note.
Display Overview 1. Shows current [] [] E3E3 volume level. 2. The relative play mode indicator current selection. lights to show G,3_ repeat track 0 - repeat all - random playback 0 _ repeat random P - program playback 3. _ is displayed activated. 4. _ playback mode when the key lock function shows the battery is level. 5. This section shows song information.
DSP Pressthe DSP button repeatedly to select among DSPmodes: FLAT> BASS> POP> ROCK> JAZZ The current selection shows briefly on the display. 001 DSP 00:28 FLAT Play modes During playback, press M repeatedly Normal playback Repeat Track - _ to select among the following playback modes: Repeat All - O Random Playback Repeat Random Playback- _ P - program playback mode O Check for Updates Visit www.thomson-lyra.com for the latest news and firmware upgrades for our LyraDigital Audio Player.
There are four options Language Setup. in the main setup menu: General Setup, Display Setup, Speaker Setup and Press the SETUP button to bring up the main menu. Select one of the menu icons across the top of the screen. screen using left/right buttons. The tomenu's options choices are displayed on the left side of the Press the the right arrowarrow button to move the option's on the right.
Rating The disc publisher is responsible for coding scenes according to the rating limits. Below is an explanation of Ratings. To change the rating limit, highlight the RATING option and press the right arrow button. Select the rating limit using the up/down arrow buttons and press OK. Rating limits take affect only when the player is locked. Rating Explanations 1 KID SAF - Kid safe; it is safe even for kids. 2 G - General Audience; recommended as acceptable for viewers of all ages.
Video ProgressiveFunction provides high quality pictures with lessflickering. Turn on ProgressiveScan if you used the Component Video jacks of the player to connect a TV or monitor compatible with a progressive scan signal, Select ON and press OK to activate Progressive Scan. IMPORTANT! Once Progressive Scan has been activated, an image will only be visible on a progressive scan TV or monitor.
_e Set_,_t_ _e_'_u Language Setu_ With this menu, you can set the language dialog, subtitles and the disc menus. for player menus, If you chose "English" during initial set-up, any menus generated bythe disc are in English, and so is the language of the dialogs (if this language is available on the disc). 1. Select the Language Setup icon in the main menu using the left/right arrow buttons. 2. Select one of the options using the up/down arrow buttons. 3.
Troubleshootinq (Main Unit) The unit does not switch on. * Make sure it isplugged in. , Pressthe ON/OFFbutton on the remote control or the ON/STANDBYbutton on the front of the unit. The device switches off spontaneously. The device switches off automatically when it is in STOP mode for more than 30 minutes without any user intervention. Switch it on again. It is impossible to read the disc. Insert the disc with the printed side facing up.
Troubleshooting (rap3 Player) Theplayer does not turn on when PLAYbutton pressed. • Battery may be inserted incorrectly. Battery may be empty. Skipping tracks or bad sound quality? • Repeat or random function may be activated. There may be strong magnetic fields (e.g. too close to TV) near the unit. Low Battery level. Replace with new one. Cannot perform playback? • LOCKfunction may be activated. There may be no rap3 tracks in the card or internal memory. Memory Card may be damaged.
Precautions Use • If your unit has been stored in a cool place for any length of time, during a journey for example, wait for about 2 hours before using it. • The openings located on the top and bottom are for ventilation and must not be obstructed. • During thunderstorms, we recommend that you isolate the unit from the electrical supply so that it is not damaged by electrical or electromagnetic surges. • This unit is designed for continuous use.
N r} Disc Formats In order unit to ensure may used _ not play _C_ ' _ e_ you can p_ playback, some discs recordings must conform or files due with DVD, CD, to differences VCD or SVCD in recording standards. formats, This software & Disc types. • Do not use its full capacity. • CD-Rs should be preferably used instead of CD-RWs (rewritable CDs) as, in certain cases, CD-RW playback may be faulty.
JPEG files CD-Rand CD-RW with JPEGfiles, Certain JPEGfiles, includingprogressive JPEGfiles, cannot be read by this player, The total number of files and folders on the disc should be lessthan 650. Make sure that files have the ".jpg" extension. Fileswithout the ".jpg" extension will not be able to be read bythe player - even though the files are shown asJPEGimages on your computer. WMA flies CD-Rand CD-RW discscontaining audio files in WMA (Windows Media Audio) format.
Limited Warranty What your warranty covers: Defects in materials or workmanship. For how long after your purchase: One year from date of purchase - Unit exchange, which includes parts and labor, The warranty for rental units begins with the first rental or 45 days from date of shipment rental firm, whichever comes first. to the What we will do: Exchange the defective unit for a new, or at our option, refurbished unit.
The representative will advise the address to mail a cashier's check or money order for payment if there are any out of warranty labor or parts charges, and you elect not to use your credit card. After we receive your product, a new or refurbished unit will be shipped to you. What your warranty does not cover: Acts of nature, such as but not limited to lightning damage. Adjustment of customer controls. Damage from misuse or neglect.
Visit the RCA website at www.rca.com Please do not send any products or on the carton. to the Indianapolis address listed in this manual This will only add delays in service for your product. Thomson Inc. 10330 North Meridian Street Indianapolis, 02006 Thomson Trademark(s)® IN 46290a Inc.