Thisdevice complies withPart15oftheFCC Rules. Operation issubject tothefollowingtwo conditions: (1)Thisdevice maynotcause harmful interference, and(2)thisdevice mustaccept any interference received, including interference that maycause undesired operation. ForYour Records In the event that service should be required, you may need both the model number and the serial number. In the space below, record the date and place of purchase, and the serial number: Model No. Remote Control No.
RCA is among the first Consumer Electronics Lyra, into the market. enlarge its offering you tremendous to other products pleasure This music management format and stores them while listening is a true audio • It gives access to thousands You can download Playing the MP3 format, RCA is proud of its initial starting with the release of its rap3 player, success and has developed music.
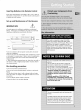
FCC Information MusicMatch Software Getting Started Unpacking the DVD Receiver ......... Unpacking the Speakers ............. Inserting Batteries into Remote Control Set Up and Maintenance of the Receiver .......................... 2 2 .3 3 Protect your Components from Overheating ....................... Disc Information ................... 3 3 Connecting to Audio-Visual Components ...................... Digital Connection ................. Connecting Antennas ............... Connecting the Speakers ...
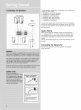
4+ -0 4+ -0 One pair of "AAA" batteries One DVD receiver unit '--_ One Pig-Tail antenna wire One external AM antenna one video cable (single wire) with yellow connectors; loop • one instruction book; • one safety leaflet: • one Quick Connection One RCA Universal Remote Control (RCR311AAM1) Guide UnpackingThe Speakers • one set of speakers speakers, and right including 1 centre speaker, rear speakers.
Inserting Batteries into Remote Control Insert two AAA batteries according to the + and - signs on the battery compartment. To use the remote control, point it directly at your receiver, Set up and Maintenance of the Receiver IMPORTANTNOTE • Provide spaces for sufficient ventilation as indicated below, If the space is insufficient, the unit may overheat resulting in malfunction and shorter life time. 10cm/4" • Do not connect to the AC power tions are completed.
i ANALOG iNPUT - i Alternatively, if you have no VCR or SAT, you can connec[ any other compatible components like TAPE player TV to your DVD receiver via the VCR/SAT input. - VCR audio!video out will have output signal in SAT, DVD/CD and TUNER modes. When VCR (source) is selected, there will be no _a from VCR audio/video out. I VCR JL8;I_,' __ o,.- >.
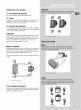
iiiiiiiiiiiiiiiiiiiiiiiiiiiiiiiiiiiiiiiiiiiiiiiiiiiiiiiiiiiiiiiiiiiiiiiiiiiiiiiiiiiiiiiiiiii ............... Connecting the Antennas horizontally The AM minals They and on the must FM antennas system's be hooked connect back to the AM and FM ter- panel. up in order to receive clear reception. the AM 2.
To ease speaker connections, minals are color-coded, FRONT • • • • SPEAKERS cords and the ter- White/Black (Front Left Speaker), Red/Black (Front Right Speaker), Green/Black (Center Speaker) Blue/Black (Rear Left Speaker), • Grey/Black • Purple/Black CENTER SPEAKER the speaker (Rear Right Speaker). (Subwoofer) Connect the speaker wire and to the corresponding receiver, Do the same for the subwoofer.
Positioning (_ Left, Right (Front Speakers) They carry @ your speaker primarily music and sound iiiiiiiiiiiiiiiiiiiiiiiiiiiiiiiiiiiiiiiiiiiiiiiiii i iiiiiiiiiiiiiiiiiiiiiiiiiiiiiiiiiiiiiiiiiiiiiiiiii iiiiiiiiiiiiiiiiiiiiiiiiiiiiiiiiiiiiiiiiiiiiiiiiii _ ii iiiiiiiiiiiiiiiiiiiiiiiiiiiiiiiiiiiiiiiiiiiiiiiiii effects.
Advanced Setting Alternative Surround Placement Rear wall If rear wall each other mounting is the only choice, aim the speakers at (A), towards the front (B) or even towards the sidewalls (C, D). Experiment with placement until sounds seem to envelop you, rather than coming behind surround from you. Courtesy Dolby Laboratories No adjacent walls Surrounds can go on stands facing each other to approximate the preferred sidewall mounting (A), or to the sides or rear of the viewing area aimed upwards.
Test Tone / Channel balance Channel balance Your receiver is equipped with a test signal generator for balancing the channels. As the signal "travels" from channel to channel, adjust the level controls until each channel plays at the same loudness level. Please refer to "Fine setting your speaker" section for more details.
5 DVD/CD CHANGER 10. DISC SKIP • Pressto skipto the next disc in the tray. 11. VOLUME Turn the knob to adjust volume level. 12. PLAY/PAUSE To play and pause DVD/CD playback. 13. STOP To stop DVD/CD playback. 14. REPEAT • Pressto toggle on the repeat function in DVD/CD playback. ° In CD mode : refer to CD / rap3 player section. • In DVD mode: refer to DVD player section. 15. PROGRAM ° Pressto toggle on the program function in DVD/CD playback. • In CD mode : refer to CD / mp3 player section.
Remote Control Please control be sure (see pressing any you relevant button. have inserted section on If it works, the page the batteries 3.) You red LED into the can test will light. remote it by ON.OFF [] [] [] [] [] [] 1. ON-OFF • To turn on or off the receiver and other auxiliary components "Using the Remote to Control Additional Components"). 2. Source Buttons • To turn on and select various audio/video 3. CH+, CH- (Channel (see page 14 sources.
iiiiiiiiiiiiiiii CHAP • Chapter number for DVD mode is activated, playback, PROG. • Program TUNED • Tuner station detected. ST • Tuner stereo signal detected. REPEAT / REPEAT TRACK / REPEAT CHAP / REPEAT A.B. / REPEAT FOLDER • CD, mp3 and DVD in repeat (mp3 only) mode. KHz / MHz • Tuner frequency • Speaker unit. Icons. SLEEP • Sleep mode is activated. • Display disc information • Larger number refers to the current disc being played.
Switching on loft • To switch on the receiver, press the ON/STANDBY button on the receiver once to enter standby mode. Press the SOURCE button on the receiver or one of the source buttons or ON/OFF the receiver. • Standby: the remote return button on the remote control to power on when the receiver is on, press the ON/OFF on or the ON/STANDBY button on the receiver to to standby mode.
4, Release the component button, then press the button to see if the component turns off. 5. If this does not work, repeat use the next code (if available) component until the component command. Volume ON.OFF steps 3 and 4 by trying to listed for the brand of your responds to the remote punchthrough By default, the VOL+/VOL- and MUTE buttons will only control the DVD receiver, regardless which mode (TV, VCR, etc) the receiver is in.
Sound Enhancement Systems This receiver enhancement several is equipped systems, with built-in sound Dolby Pro Logic II The Pro Logic II mode uses the built-in circuit to steer the Left, Center, Right and Surround left and right channel audio signals and uses all five speakers to play both stereo and Dolby Pro Logic program source, such as TV and VCR. Dolby Pro Logic II includes Dolby Pro Logic II Movie, Pro Logic II Music and Dolby Pro Logic Emulation.
SDURCE NAT AVAILABLE ANL Built-in ANL Builtqn INPUT Analog Input Select this setting to play analog signals from VCR or SAT. DSP(Digital Sound Processor) These digital environment sound effects resemble sounds in a real such as Arena, Jazz Club, Theater, Stadium and Disco. DSP automatically converts analog audio signals to digital ones which enables you to adjust the sound without degrading the sound quality. Different modes will give you different feels of size and types ment.
Fine Setting of the Speakers All the basic settings have already speakers included in the box. However, to make the surround been sound pre-set more for the effective and suit the acoustic conditions in your listening room, you may need to delay the signal coming from some of the speakers.
Basic Playback Features 1. To select the DVD/CD input source, press the SOURCE button on the main unit until "DVD/CD" appears on the display. You may also directly press the DVD/CD source key on the remote. iiiiii RESUMEMODE: The next time pLAY is pressed,the unit wi!l begin playback at the location where it was last Stopped.
On-screen banner display You can access the on-screen back to select many trated with an icon. banner is available particular feature, banner playback However, only display if the disc was created An invalid icon appears on the screen when select an icon that does not function. Also, is "grayed out" Title to tell Audio Chapter you play- with you the icon that k.M so. Camera angles Subtitles Title icon is being highlighted in this during features.
Selecting a title 1. Refer to the title menu. previous page "General use" to open the 2. Enter a title number using the number keys on the remote control, Add 0 in front of single-digit title number (e.g. 9 = 09). You can also use UP/DOWN key to change the title number. Selecting a chapter 1. Refer to the title menu. previous page "General use" to open the 2. Enter a chapter number using the number keys on the remote control. Add 0 in front of single-digit chapter number (e.
Using bookmarks The bookmark feature allows you to mark a point on the disc for quick access. You can store up to 9 bookmarks. Addingbookmarks 1. Refer to Page 20 "General menu. use" to open the bookmark 2. Use the arrows on the remote to move the cursor (yellow frame) to the "Mark" check line, hen press OK to add a bookmark when reaching a scene of interest. 3. TTo add another bookmark, with the arrow button.
Play mode 1. Refer to page 20 "General use" to open the playmode menu. 2. Press the up/down buttons to select among : Normal >Program edit/Program play > Repeat Repeat Title > Repeat Chapter > Normal 3. Press OK to confirm the AB > setting. Program playback Editprogram 1. Refer to the previous page ("General use") to open the play mode menu, or press and hold the PROGRAM button on the Note: front Program of the edit unit to access the can only program be activated during mode.
3. Use the Chapter, number. LEFT and RIGHT then the arrows UP and DOWN 4. Use the LEFT and DOWN and then press OK. to select arrows arrows Title or to select the to highlight "Insert" 5. Use the arrow buttons to highlight "Play" (start program playback) or "Done" (return to normal playback with program saved) and then press OK. Cancelprogram Program will be cancelled when; 1. the disc tray is opened; 2. power is turned off; 3. STOP is pressed twice.
Set up menu General use 1. Press MENU in STOP AND RESUME mode to display the set up menu on screen. The menu shows the current set- tings. disc 2. Use the menu, not the player setup menu. arrow buttons OK to open the selected 3. Press the LEFT arrow to highlight an option and press menu. to go back to the or press GO BACK to exit the setup menu previous completely.
iiiiiiiiiiiiiiiiiiiiiiiiiiiiiiiiii Menu language This step will define the language short messages shown on screen, 1. Open the menu language of menus and other menu. iiiiiiiiiiiiiiiiiiiiiiiiiiiiiiiiiiiiiiiiiiiiiiiiiiiiiiiiiiiiiiiiiiiiiiiiiiiiiii 2. Use the UP or DOWN arrows to scroll select the language and then press OK iiiiiiiiiiiiiiiiiiiiiiiiiiiiiiiiiiiiiiiiiiiiiiiiiiiiiiiiiiiiiiiiiiiiiiiiiiii_i_i main menu.
Rating (Parental control) This setting prevents the playback of DVDs that may not be suitable for all audiences, by using the rating level that may be encoded on the disc. If the rating level of the disc is higher than the preset back will be prohibited is entered. 1, Open the rating level (to be set in this step), the playunless the password (see next step) menu. 2, Use the UP or DOWN arrows to highlight the rating requiring a password to start disc playback.
4. Use the number then press OK, buttons to enter a new password and • when an incorrectpassword is entered, a new password menu appears so that you can enter and confirm the password again • A lock icon shows on unit display when password 5, Repeat the above step to confirm the password and return to the password menu. Use the LEFT arrow to return to the main menu, is required Clearpassword to view rated discs.
TV aspect This step selects the TV aspect, conventional (4:3). 1. Open the TV aspect arrows to the If you have a wide-screen Widescreen". movie (16:9) or menu. 2. Use the UP or DOWN then press OK to return - For 16:9 wide-screen you will to select TV aspect main menu. (16:9)TV, choose and "16:9 get (Do not select 16:9 widescreen setting if you are using a 4:3 TV set. or the image may look distorted with some DVD disc.
Loading and playing an audio CD • Use .rap3 as the extension when converting audio files into rap3 for saving onto CD-R(W) or CD-ROM, e.g. RockyO&mp3. Do not use any other extension e.g. ,doc, .pdf • Do not use the .rap3 extension for other text or non-audio data files as this may result in serious malfunction and harmful noise interference. • Most commonly available CD creation softwarecan make files compatible for the system but do not forget to finalize your disc after creation.
4.Press SKIP REVERSE on the main unit or CH- on the remote to return to the previous track. Press SKIP FORWARD on the main unit or CH + on the remote to go to the next track. 5. Press STOP on the main unit or STOP on the remote trol to end playback. con- 117 When playback is interrupted, the location at which it stopped wi!! be memorized, stopped. Resume playback does not work with rap3 music. ....
Selecting a track Bookmark Playmodes Disc type 1. Refer to "General !!!!!!!!!!!!!!!i menu. use" to open the track 2. Enter a track number. ber by a 0 (e.g. 9 = 09). Start any single-digit track num- Playmode selection for CD There are several options for this feature. 1. Normal - normal CD playback 2. Program - plays the programmed tracks (usable in stop mode only) 3. Repeat Disc - repeatedly plays the selected or currently playing disc. 4. Repeat Track - plays one track over repeatedly. 5.
Bookmarks (Audio CDs Only) The bookmark feature allows you to mark a point on the disc for quick access. 9 bookmarks can be selected. AddingBookmarks(AudioCDsOnly) 1. Refer to "General bookmark menu. use" on page 32 to open the 2. Use the arrow keys to move the cursor (green frame) to the "Mark" check line, then press OK to add bookmark when you reaching a point of interest.
4.Repeat steps2 and3 to addadditional tracksto theprogram. 5.Moveto highlight"Play"(startprogramplayback) or "Done"(returnto normalplayback withprogramsaved) andthenpress OKto confirmprogramplayback or return to thestopmode. 2.UsetheLEFTorRIGHT arrow to select Playlist, then use the UP or DOWN arrow to select and highlight the .......... programmed track you want to delete from the playlist. i iiiiiiiiiiiiiiiiiii 3. Use the arrow buttons to highlight press OK to delete a track. "Delete" and then 4.
On- screen display for mp3 playback Standard Play File mode 1. In the playmode window, on the remote to select the standard mode. press the UP or DOWN arrow 2. Use the LEFT or RIGHT arrow on the remote to toggle between different mp3 windows. 3. In the file window, use the UP or DOWN arrow buttons on the remote file to select the you wish to begin playing. 2. Press PLAY/PAUSE on the main unit or OK on the remote control to start playback.
4. Onceallthefileshavebeenselected, movethecursorto thefile inthe playlistandpressOK to begin playlist playback. 5. Press STOP to end playlist playback. Delete a specific File from the Program List 1. Use the LEFT or RIGHT arrow to select program list, then use the UP or DOWN arrow to select file to be deleted and move to delete icon and press OK to delete. iii DeleteAll 1. In stop mode, use the LEFT or RIGHT arrow to select the "DELETE ALL" icon and press OK to clear all.
On- screen display for JPEGCD Filemode 1. In the JPEG mode window, use the UP or DOWN arrow to select a directory, and the OK button on the remote to enter different directories. You can use the RETURN button to go up one layer in the directory. 2. Use the UP or DOWN arrow buttons on the remote to select the file you wish to view. 3. Press the OK button, play on the screen. and the picture you select will dis- 4.
5.Tunethea stationbypressingTUNER + or TUNER - on the remote control repeatedly until the desired station is found. Alternatively, you can press and hold the same buttons for about one second to activate the automatic SEARCH function. In this mode the receiver will automatically tune frequencies until it finds a station. 6. Repeat steps 5 to tune to another radio station. Select a sound effect if needed by pressing DSP.
Storing radio stations: The receiver can store up to 40 radio stations in memory. You can enter every single radio station yourself or the receiver can store all available radio stations automatically in an ascending order. Automatic preset storing: 1. Press BAND/AAP on the main unit or TUNER repeatedly on the remote control to select the FM band.
No audiofromone channel. • Check the • Check the speaker speaker level setting. wire or cable connections. Remote control Theremotecontroldoesnot work ? • Load the batteries correctly. • Batteries are low. with their Replace polarities with (+ and -) aligned new ones. • Point the remote control to the front of the player. • Operate the remote control within a 26 ft range from the player. • Remove any obstacles between the remote control and the front display of the player.
Subtitle, language, camera angle etc. Disc menu operation and contents disc. Please refer to the instructions may differ from accompanying disc to the disc. Thereareno subtitles? • check that subtitles • Subtitles disappear display subtitles. are supposed to exist on that disc. from the TV screen. See page 21 to Subtitle(or language)settingcannotbe changed? • The disc being played has been recorded in only one language. • Depending on the type of DVD, some segments limit language selection.
Safety precautions • Never open the cabinet under any circumstances. Any repairs or internal adjustments should be made only by a trained technician. • Never operate this product with the cabinet removed. • Do not touch the player with wet hands. If any liquid enters the player cabinet, take the player to a trained technician for inspection. • This player uses a laser to read the data on the disc. The laser mechanism corresponds to the cartridge and stylus of a record player.
TV CODES Abex Admira Adventura Aiko Akai Aileron Amtron Anam Nationa AOC Audiovox Belcor Bell & Howell Bradford Brokwood Candle Celebrity Centurion Citizen Colortyme Concerto ContedCony Craig Crown Curtis Mathes CXC Daewoo Daytron Dimensia Dumont Electroband Electrohome Emerson Envision Fisher 1172 1001,1173,1211 1174 1016 1002 1046 1038 JCB 1003,1038,1192,1193,1194 1004,1005,1006,1007,1175,1176, 1195 1038 1004 1001,1083,1162 1038 1004 1004,1006,1008,1174 1002 1009 LXI 1004,1006,1008,1016, 1038, 1105
_,adio Shack/Realistic _CA Junco Sampo Samsung Samsux Sansui Sanyo Scotch Scott Sears Sharp Shogun Signature Simpson Sony Soundesign Squareview SSS Starlite Supre-Macy Supreme Sylvania Symphonic Tandy Tatung Technics Techwood Teknika Telecaption TMK Toshiba Totevision Universal Victor Vidtech Viking Wards Yamaha Zenith
Foraudio track andsubtitle selection, seep.25,26.
Limitation of Warranty: • THE WARRANTY STATED ABOVE IS THE ONLY WARRANTY APPLICABLE TO THIS PRODUCT. ALL OTHER WARRANTIES, EXPRESS OR IMPLIED (INCLUDING ALL IMPLIED WARRANTIES OF MERCHANTABILITY OR FITNESS FOR A PARTICULAR PURPOSE) CLAIMED. NO VERBAL OR WRITTEN ARE HEREBY INFORMATION DIS- GIVEN BY THOMSON INC., ITS AGENTS OR EMPLOYEES SHALL CREATE A GUARANTY OR IN ANY WAY INCREASE THE SCOPE OF THIS WARRANTY. • REPAIR OR REPLACEMENT AS PROVIDED UNDER THIS WARRANTY IS THE EXCLUSIVE REMEDY OF THE CONSUMER.
What your warranty covers: • Defects in materials or workmanship. For how long after • One year from date • The warranty period rental or 45 days from whichever comes first. What we will your purchase: of purchase for labor and parts for rental units begins with the first date of shipment to the rental firm, do: • Pay any Authorized RCA Audio Service Center the labor charges to repair your unit.
I!11 ,111 Centro de Servicios M_xico, D.F. Digital Service Av 3A No 12, Local 2 Col. Santa Rosa Mexico DR Tel 01 53889621 55877599 55878971 55673972 Autorizados Express Monterrey. N.L. Audio Est@reo Aguilar GraI. Zuazua 738 Nte Col. Centro Monterrey N.L Tel 01 (8) 3724989 3755440 3755884 Electronica AGUASCALIENTES Electr6nica JIMSA Serv. Elec. Especializado Cuahutemoc No_A AwAdolfo L6pez Mateos No _30 ote Col. Centro CoL Gentro C E_9200 San, Crist6bal de las Casas Chis Aguascalientes Ags C.
!_!_!_!_!_!_!_!_!_!_!_!_!_!_!_!_!_!_!_!_!_!_!_!_!_!_!_!_!_!_!_!_!_!_!_!_!_!_!_!!:l_:_iil ¸i_i_!_i .................................................................................. GUERRERO Nueva Elec. Auditron NUEVO LEON Audio Estereo Aguilar Aquilea Serdan No14B GralZuazua 788Nte COl, Centre Acapulco, Gro. C.P. 039300 Tels. ( 01_74 ) 82 62 42 Col. Centre Monterrey, Nvo. Le6n. CR 64000 Tels. ( 01-8 )372-4989 / 375-5440 Tel.
o o o o o o m ×