USER'S GUIDE RV-9968 RV-9978 AUDIO/VIDEO RECEIVER
Federal Communications Commission (FCC) Information This device generates and uses radio frequency (RF) energy, and if not installed and used properly, this equipment may cause interference to radio and television reception. This equipment has been type tested and found to comply with the specifications in Subpart J of Part 15 of FCC Rules. These rules are designed to provide reasonable protection against radio and television interference in a residential installation.
Table of Contents first things first ................................................. unpack the receiver .................................................................. basic connections...................................................................... connecting, placing & balancing the speakers ........ connecting the antennas ................................................... connecting for power ............................................................ using headphones .....................
first things first Unpack the Receiver VOLUME POWER Unpack the receiver and locate all the accessories.
first things first Connecting, Placing & balancing The speakers Connecting the wires Each speaker - the two main, two surround and one central - has a designated set of terminals on the back panel of the central unit. Uncoil the speaker wires and locate the bare ends. Press and hold down on the tab to open the red terminal, then insert the red (+) wire. Release hold to close tab. Use the same procedure for black (-) wire into black terminal. WARNING: Be sure to follow these instructions carefully.
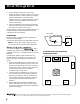
First Things First 2. Aim the speakers directly at the two main speakers, matching height to height. If the room is sparsely decorated, it may be necessary to slightly tilt the speakers down to increase sound quality. If the room is densely decorated, it may be necessary to face the speakers toward the rear wall or at the ceiling. 3. Mount the speakers up on the ceiling. Set them a few feet wide of the listeners and make sure they are facing one another, not the floor.
First Things First Each time you press the + or - button on your remote control to adjust a channel, the receiver provides you with two more seconds of pink noise to that channel before moving on to the next. 4. Sit Back and Listen ... Fine tuning is best performed with the remote control so that adjustments can be made from the viewing or listening area. Press the TEST TONE button again to end the test.
receiver controls & operations VOLUME POWER SPEAKERS TUNING REMOTE SENSOR PRESET SCAN AUTO MIN PRO LOGIC 3 STEREO VIDEO PHONES IN L HALL CENTER MODE TEST TONE BYPASS R FM/AM CD TAPE VCR VIDEO MAX TV BALANCE BASS TREBLE general controls POWER STAND BY/ON The POWER STANDBY/ON button activates or deactivates the system. When the system is activated, the unit will default to the last mode it was in before power was removed.
receiver controls & operations WIDE The WIDE mode can be activated in both the Pro Logic and the 3 Stereo modes. This mode utilizes just the three front speakers - left main, right main and center - with all audio delivered through the center speaker. The center speaker will reproduce the same bass levels as the left and right main speakers. SURROUND MODE Included in the SURROUND MODE category are Dolby Pro Logic, Dolby 3 Stereo, Hall and Bypass.
receiver controls & operations To Store a Station 1. Press the FM/AM button on the receiver (or the AM•FM button on the remote) to turn on the receiver. To Use Swap Audio When you are watching TV and turn on PIP, you can turn on another video source and swap the sound from the large picture coming from the TV to the small picture coming from the other video source. 2. Select the band—FM or AM. 3. Select the station you want to store in memory using the methods described above. 1.
connecting auxiliary components ANTENNA AC-120V 60Hz FM VIDEO VCR MONITOR IN OUT OUT AM LOOP MAIN SPEAKERS (8Ω) + TV IN CD IN TAPE IN L R - - L + VCR OUT IN OUT CENTER SPEAKER(8 Ω) SUB WOOFER R + AUDIO R - - L + before you connect... • Protect components from power surges. • Connect all components before plugging any power cords into the wall outlet. • Always turn off the receiver and/or components before you connect or disconnect any cables.
connecting auxiliary components connecting a satellite receiver Using a paired (red/white) stereo cable, a single (yellow) video cable and two coaxial cables, connect your new audio receiver to your satellite receiver as shown to the right. To watch TV programs in stereo after connection, press TV and tune to the desired channel. To watch satellite programming, press SAT•CABLE and tune to the desired channel. NOTE: Do not stack electronic components or other objects on top of the satellite receiver.
connecting auxiliary components connecting a compact disc player CD PLAYER Using one paired (red/white) stereo cable, connect your new receiver to your compact disc player as shown to the right. L R To play a CD, press CD, put the receiver in CD mode and press PLAY. NOTE: The AUDIO SOURCE connection can be used as input for any stereo audio signal.
connecting auxiliary components the ultimate connection Should you choose to utilize your new receiver to its fullest potential by running all your audio components through it, you will need purchase additional connectors. How many and what kind is purely situational. The following is a complete description of all the jacks on the back of the receiver and how they can be utilized to provide greater enjoyment.
connecting auxiliary components Step 3: Connecting your receiver to your TV AUDIO RECEIVER VIDEO VCR MONITOR Using audio cables, connect the left and right “OUT” audio jacks on the back of your TV to the TV audio jacks on the back of your receiver. IN TV IN CD IN TAPE IN OUT OUT VCR OUT IN OUT L SUB WOOFER R AUDIO TV VIDEO INPUT R OUT CABLE BOX IN L OUT OR IN FROM ANT CH3 CH4 OUT R VCR OUT TO TV L TV VIDEO INPUT when you’re all connected....
using the universal remote control battery installation The remote control operates on four batteries, included with your system. Install them before attempting to operate the remote. 1. Slide the battery compartment cover off the back of the remote. 2. Insert 4 AAA batteries, matching the + and - ends of each battery with the symbols in the compartment. 3. VCR SAT•CABLE TV POW ER LD¥VCR2 DVD TAPE AM•FM PLAY REV Replace the cover.
using the universal remote control DELAY/CH CTRL Selects the amount of Surround Sound delay between the main and rear speakers. Choose from 15, 20 or 30 milliseconds. Press once and the current setting appears. Press again to change the setting. – On some RCA TV models, used to adjust menu controls. SURROUND Lets you select a Surround Mode: Dolby Pro Logic Surround, Dolby 3 Stereo or Hall. Press once to turn on the surround mode last selected. Press again to change the mode.
using the universal remote control CLEAR Resets the tape counter and corrects entries when programming the menus. FWD Fast forwards a tape. Also, searches forward while a tape is playing. PLAYLIST For some DVD models, if programmed, programs the DVD player to playback tracks in a certain order. GO BACK•DISC Returns to the previous channel. POWER Turns the DVD player off. INFO Displays channel, time and counter information on the screen. REW Scans backward on the DVD.
using the universal remote control MENU SELECT Programs the CD changer to play up to 32 tracks in any order you choose. Number Buttons Let you enter numbers when needed. PLAYLIST For some laserdisc models, if programmed, programs to playback chapters on laserdisc in a certain order. POWER Turns the laserdisc player off. PAUSE Pauses the CD. REV Scans backward on the laserdisc. PLAY Plays the CD. STOP Stops the laserdisc. RESET•REP Repeats a track, a CD or an entire program.
using the universal remote control Programming the Remote to Control a VCR To determine whether you need to program the remote, turn on the VCR, point the remote at the VCR’s remote sensor, and press VCR. Then, press the POWER or CH + or CH – button to see if the VCR responds to the remote commands. If not, you need to program the remote. Follow these steps to program your remote to control your VCR: 1. Turn on the VCR. 2.
using the universal remote control PROGRAMMING THE REMOTE TO CONTROL A DVD PLAYER Programming the Remote to Control A Satellite RECEIVER The remote is preprogrammed to control a RCA DVD player. A few of the remote buttons used with a DVD player are shown below. You may want to experiment with other buttons on the remote to see if they work with your DVD player. 1. Turn on the satellite receiver. 2. Look up the satellite receiver brand and corresponding code number(s) in the code list on the right. 3.
Remote TV codes Amtron ......................................... 064 JC Penney ........... 000, 008, 011, 019, 027, 040, 068, 077, 086, 088 Radio Shack ....... 000, 021, 025, 036, 037, 059, 064, 078 Akai ...................................... 002, 103 Jensen .................................. 011, 027 A-Mark ......................................... 102 JVC ...................... 012, 024, 036, 037, 040, 048, 051, 074 RCA .....................
Remote VCR codes Admiral ....................................... 006 Aiwa ............................................ 015 JVC .................... 002, 014, 016, 030, 046, 074 Samsung ........... 007, 013, 022, 032, 042 Akai .................. 003, 017, 022, 023, 063, 066 Kenwood ......... 002, 014, 016, 030, 044, 046 Sansui .................................. 016, 071 Audio Dynamics ................. 014, 016 KLH .............................................. 073 Bell & Howell .....................
AUDIO & CABLE CODES AUDIO Codes ads: Aiwa: Akai: Denon: Dynamic Bass: Emerson: Fisher Hitachi: JVC: Kenwood: Kyocera: Lotte (NEC): Magnavox: Marantz: Mitsubishi: Nakamichi: Onkyo: Panasonic: Philips: Pioneer: RCA: Realistic: Sansui: Scott: Sherwood: Sony: Teac: Technics: Yamaha: 24 AMP CD AMP CD AM/FM CD TAPE PHONO CD AMP CD CD AMP AM/FM CD TAPE AUX AMP AM/FM CD TAPE PHONO AMP AMP AMP AM/FM CD AMP AM/FM CD AMP AM/FM AMP AM/FM CD TAPE PHONO AMP AM/FM CD TAPE AMP AM/FM CD AMP AM/FM CD TAPE AMP A
Care and Maintenance Troubleshooting tips Receiver/Tuner Operation STEREO indicator is off. Cleaning the Exterior • Disconnect the system from AC power before cleaning the exterior of the system with a soft dust cloth. • Adjust the antenna. • The signal is too weak. Connect an external antenna. • The signal is Mono. Severe hum or noise. • The signal is too weak. Connect an external antenna. • Adjust the antenna.
index Symbols I S + button 16, 17 - button 16, 17 INPUT•SEEK button 17 B N BAND button 9 Basic controls on the remote 16 BYPASS button 16 Number buttons 17, 18 SKIP button 17 Speaker terminals, matching 11 Speakers 5 Specifications, equipment 25 Stations preset 9 storing in memory 9, 10 STOP button 17, 18 Storing stations in memory 10 Subwoofer, connecting 11 SURROUND button 16, 17 Surround sound level controls 16 SWAP PIP button 17 P T C P.
limited warranty What your warranty covers: • Any defect in materials or workmanship. For how long after your purchase: • One year. (The warranty period for rental units begins with the first rental or 45 days from date of shipment to the rental firm, whichever comes first.) What we will do: • Provide you with a new, or at our option, a refurbished unit. • The exchange unit is under warranty for the remainder of the original product’s warranty period.
Canadian Service Thomson Consumer Electronics Canada, Inc. warrants to the purchaser or gift recipient that if any manufacturing defect becomes apparent in this product within 1 year from the original date of purchase, it will be replaced free of charge, including return transportation. This warranty does not include damage to the product resulting from accidents, misuse or leaking batteries. Should your product not perform properly during the warranty period, either: 1.
GUIA DEL USUARIO RV-9968 RV-9978 AUDIO/VIDEO RECEPTOR
Informacion la comision federal de comunicaciones Este aparato genera y usa energía en radio frecuencia (RF) y si no se instala y usa adecuadamente este equipo puede causa r interferencia a la recepción de radio y televisión. Este equipo ha tenido prueba-tipo y cumple con los límites con las especific aciones del Inciso J de la Parte 15 de los Reglamentos FCC. Estos reglamentos estan diseñados para proveer la protección razona ble contra la interferencia de radio y televisión en una instalación residencial.
INDICE Introducción ..........................................................................4 Desembale del receptor ..................................................................................... 4 Conexiones básicas ............................................................................................. 4 Conexión, posición y ajuste de los altavoces .................................... 5 Conexión de las antenas ................................................................................
Introducción Desembale del receptor VOLUME POWER Desembale el receptor e identifique todos los accesorios. Usted debería tener; • un control remoto universal RCA (CRK67G) • dos paquetes - un par cada uno - de pilas AAA; • un cable para audio (dos alambres) con conectores rojos y blanco RCA; • un cable de video (un alambre) con conectores amarillos RCA; MIN TAPE una tarjeta de registro/sondeo; • un folleto de seguridad.
Introducción Conexión, posición y ajuste de los altavoces Conexión de los cables Cada altavoz - los dos principales, los de sonorización periférica y el central - tiene un juego definido de terminales en el panel trasero de la unidad central. BLACK 2 Desenrolle los cables de los altavoces hasta encontrar los extremos desnudos. Mantenga oprimida la lengueta que abre el terminal rojo e inserte el cable rojo (+). Suelte la lengueta para que se cierre.
Introducción A continuación se dan algunas sugerencias para instalar el equipo: 1. Instale los altavoces en un muro lateral, uno frente al otro, aproximadamente a unos tres pies (90 cm) por encima de la cabeza del oyente. 2. Oriente los altavoces directamente hacia los dos altavoces principales, igualando alturas. Si el cuarto está poco amoblado, puede ser necesario inclinar los altavoces hacia abajo para mejorar la calidad del sonido.
Introducción 2. Main Left Center Principal izquierdo Centro Main Right TV Principal derecho Opcional, subgraves Haga los ajustes oprimiendo la tecla REAR*CTR (centro*atrás), y luego la tecla + o - del control remoto. La potencia de salida de los altavoces seleccionado(s) se ajusta en consecuencia. Ejemplo de instalación para la mejor sonorización periférica Opt. Subwoofer 3. A medida que se genera el ruido rosado, vaya al lugar de la sala donde probablemente se instale para escuchar su sistema.
Controles y funcionamiento del receptor VOLUME POWER SPEAKERS TUNING REMOTE SENSOR PRESET SCAN AUTO MIN PRO LOGIC 3 STEREO VIDEO PHONES IN L HALL CENTER MODE TEST TONE BYPASS FM/AM CD TAPE VCR VIDEO R MAX TV BALANCE BASS TREBLE Controles generales Encendido/disponible La tecla POWER STAND BY/ON (encendido/disponible) enciende y apaga el sistema. Cuando el sistema se prende, la sistema vuelve al último modo de funcionamiento utilizado antes de apagarse.
Controles y funcionamiento del receptor Wide (completo) HALL Este modo puede activarse en Pro Logic y 3 Stereo. El modo Hall (salón) reproduce la sensación de oir un concierto o ver una obra de teatro como si fuera en vivo. Usa los altavoces principales y los de sonorización periférica. Este modo utiliza los tres altavoces centrales principal izquierdo, principal derecho y central - y todo el sonido sale por el altavoz central.
Controles y funcionamiento del receptor Programación de emisoras en la memoria Usted puede programar hasta 30 emisoras de AM y FM, que pueden guardarse en forma aleatoria. Para programar una emisora 1. Oprima la tecla FM/AM del receptor (o la tecla AM*FM del control remoto) para encender el receptor. 2. Seleccione la banda FM o AM. 3. Seleccione la emisora que usted quiere programar en la memoria, utilizando los métodos descritos arriba. 4.
Conexión de los componentes auxiliares ANTENNA AC-120V 60Hz FM VIDEO VCR MONITOR IN OUT OUT AM LOOP MAIN SPEAKERS (8Ω) + R TV IN CD IN TAPE IN L - L + VCR OUT IN OUT CENTER SPEAKER(8 Ω) SUB WOOFER R + R AUDIO - L + Antes de hacer la conexión... • • - + REAR SPEAKERS (16 Ω) Proteja todos los componentes de los picos de corriente. Conecte todos los componentes antes de enchufar los cables de alimentación al tomacorriente.
Conexión de los componentes auxiliares Conexión de un receptor para satélite SATELLITE DISH Con un cable de estéreo de dos colores (rojo/blanco), uno de un solo color (amarillo) para video y dos cables coaxiles, conecte su nuevo receptor de audio a su receptor para satélite, tal como se indica a la derecha. Para mirar los programas de TV en estéreo, después de la conexión, oprima TV y sintonice el canal deseado. Para mirar los programas en satélite, oprima SAT•CABLE y sintonice el canal deseado.
Conexión de los componentes auxiliares Conexión de un lector de discos compactos CD Lector de discos PLAYER láser L R Con un cable de estéreo de dos colores (rojo/blanco) conecte su nuevo receptor de audio al lector de discos láser, tal como se indica a la derecha. Para escuchar un DC, oprima CD, ponga el receptor en el modo CD y luego oprima la tecla PLAY (reproducción).
Conexión de los componentes auxiliares Ultima conexión Si decidiera utilizar su nuevo receptor al máximo haciendo funcionar todos los componentes de audio, necesitará comprar conectores adicionales. El número y la clase dependerá de las circunstancias personales. Consulte la hoja sobre accesorios que viene con este aparato. A continuación se da una descripción completa de todos los jacks que se encuentran en la parte posterior del receptor y la manera de utilizarlos para que brinden el máximo placer.
Conexión de los componentes auxiliares Tercer paso: conexión del receptor al televisor AUDIO RECEIVER VIDEO VCR MONITOR Con los cables de audio, conecte los jacks de audio derecho e izquierdo OUT e IN de la parte posterior del TV a los jacks de audio TV de la parte posterior del receptor.
Control remoto universal Instalación de las pilas El control remoto funciona con cuatro pilas, que vienen con el aparato. Instálelas antes de usar el aparato. 1. Deslice la tapa del compartimiento de las pilas del dorso del control remoto. 2. Coloque las 4 pilas AAA, de manera que los símbolos + y - de cada pila coincidan con los del compartimiento. 3. VCR SAT•CABLE TV POW ER LD¥VCR2 DVD TAPE AM•FM Vuelva a colocar la tapa.
Control remoto universal DELAY/CH CTRL (retardo/control de canales): selecciona la duración del retardo en sonorización periférica entre los altavoces principales y posteriores. Escoja entre 15, 20 ó 30 milisegundos. Oprima una vez y aparecerá el retardo en curso. Oprima nuevamente para cambiar. Controles del televisor SURROUND (sonorización periférica): le permite seleccionar un modo de sonorización periférica: Dolby Pro Logic, Dolby 3 Stereo, Hall (salón). Oprima una vez y aparecerá el modo en curso.
Control remoto universal TV: enciende el televisor y pone el control remoto en el modo de TV. Teclas numéricas : le permite cambiar a una pista específica. TV MENU (menú de TV): muestra los menús en la pantalla del televisor. PAUSE : detiene temporariamente el DVD. Controles del VCR PLAY LIST (orden de programación): para algunos modelos DVD, si están programados, el aparato reproducirá las pistas en determinado orden.
Control remoto universal Teclas numéricas: sirve para teclear los números, cuando es necesario. Teclas numéricas: permite teclear los números, cuando es necesario. PAUSE : detiene temporariamente el disco compacto. PAUSE : detiene temporariamente la cinta. PLAY (reproducción): reproduce el disco compacto. PLAY : reproduce la cinta. RESET—REP (ajustes originales—repetición): repite una pista, un disco o un programa completo.
Control remoto universal 2. Busque la marca de su VCR y el código numérico en la lista de códigos en la siguiente página o en la hoja de códigos que viene con su control remoto. 3. Mantenga oprimida la tecla VCR del control remoto. 4. Teclee los tres dígitos del código que aparece en la lista de códigos. 5. Suelte la tecla VCR, luego oprima POWER para ver si el VCR responde a los mandos del control remoto. Si no, oprima VCR y luego POWER. 6.
Control remoto universal código el lector de discos láser Pioneer ................................. 033, 037 Programación del control remoto para controlar un receptor de satélite ProScan ................................ 033, 037 1. Encienda el receptor de satélite. RCA ....................................... 033, 037 2. Busque la marca del receptor de satélite y el código numérico correspondiente en la lista de códigos de la derecha. 3. Mantenga oprimida la tecla SAT—CABLE del control remoto. 4.
Codigos para el control remoto de tv Amtron ......................................... 064 JC Penney ........... 000, 008, 011, 019, 027, 040, 068, 077, 086, 088 Radio Shack ....... 000, 021, 025, 036, 037, 059, 064, 078 Akai ...................................... 002, 103 Jensen .................................. 011, 027 A-Mark ......................................... 102 JVC ...................... 012, 024, 036, 037, 040, 048, 051, 074 RCA .....................
codigos para el control remoto del VCR Aiwa ............................................ 015 JVC .................... 002, 014, 016, 030, 046, 074 Samsung ........... 007, 013, 022, 032, 042 Akai .................. 003, 017, 022, 023, 063, 066 Kenwood ......... 002, 014, 016, 030, 044, 046 Sansui .................................. 016, 071 Admiral ....................................... 006 Audio Dynamics ................. 014, 016 KLH ..............................................
CODIGOS PARA AUDIO Y Cajas de cable Códigos de audio ads: Aiwa: Akai: Denon: Dynamic Bass: Emerson: Fisher Hitachi: JVC: Kenwood: Kyocera: Lotte (NEC): Magnavox: Marantz: Mitsubishi: Nakamichi: Onkyo: Panasonic: Philips: Pioneer: RCA: Realistic: Sansui: Scott: Sherwood: Sony: Teac: Technics: Yamaha: 24 AMP CD AMP CD AM/FM CD TAPE PHONO CD AMP CD CD AMP AM/FM CD TAPE AUX AMP AM/FM CD TAPE PHONO AMP AMP AMP AM/FM CD AMP AM/FM CD AMP AM/FM AMP AM/FM CD TAPE PHONO AMP AM/FM CD TAPE AMP AM/FM CD AM
Cuidado Consejos para la detección de fallas Funcionamiento del receptor/ sintonizador El indicador de estéreo está apagado. • Ajuste la antena. • La señal es demasiado débil. Conecte una antena externa. • La señal es monoaural. Ruido o zumbido notables. • La señal es demasiado débil. Conecte una antena externa. • Ajuste la antena. Funcionamiento del control remoto El control remoto no hace funcionar el aparato. • Se seleccionó otra función en el control remoto. Oprima la tecla de función correcta.
Indice temático A Agudos 8 Altavoces 8 Altavoces centrales 5 Altavoces de sonorización periférica 5 Altavoces principales 5 Altavoz para sonidos subgraves 6 Antes de hacer la conexión...
Garantía limitada Su garantía cubre: • Todo defecto de materiales o mano de obra Vigencia de la garantía: • Un año a partir de la fecha de compra (El período de la garantía para los aparatos de alquiler comienza el primer día de alquiler 0 45 días a partir de la fecha de envío a la empresa de alquiler, cualquiera sea la fecha que cae primero.) Responsabilidad de la compañía: • Brindarle un aparato nuevo o, si lo consideramos necesario, un aparato reacondicionado.
©1998 Thomson Consumer Electronics, Inc. Trademark(s)® Registered Model Number RV-9968/RV-9978 15333040 (E/S/F Rev.