HDTV Monitor with DLP technology HDTV Monitor User’s Guide DLP LOGO 1-1/8 inche at minimum
Important Information WARNING To reduce the risk of fire or electric shock, do not expose this product to rain or moisture. The apparatus shall not be exposed to dripping or splashing and no objects filled with liquids, such as vases, shall be placed on the apparatus. CAUTION Caution: To reduce the risk of electric shock, do not remove cover (or back). No user serviceable RISK OF ELECTRIC SHOCK parts inside. Refer servicing to qualified service DO NOT OPEN personnel.
Important Information IMPORTANT SAFETY INSTRUCTIONS 1. Read these instructions. 2. Keep these instructions. 3. Heed all warnings. 4. Follow all instructions. 5. Do not use this apparatus near water. 6. Clean only with dry cloth. 7. Do not block any ventilation openings. Install in accordance with the manufacturer’s instructions. 8. Do not install near any heat sources such as radiators, heat registers, stoves, or other apparatus (including amplifiers) that produce heat. 9.
Introduction Thank you for choosing RCA Scenium Congratulations on purchasing this RCA Scenium High Definition Television (HDTV) Monitor featuring Digital Light Processing™ (DLP™) technology—a true viewing experience. Your purchase decision represents an investment in a new generation of technology— DLP and HDTV. Even though this is a technologically advanced HDTV Monitor, it is the most user-friendly of its kind— with comprehensive on-screen instructions that guide you through all of the monitor’s features.
Introduction Part 2: Why RCA Scenium DLP is better DLP is just part of the story. With your new HDTV Monitor, you can embark on the next generation of TV viewing— HDTV. There are many technological advancements that make HDTV better than analog TV, but there are basically three things about HDTV that bring you a superior viewing experience: (1) resolution, (2) aspect ratio, and (3) digital signal and sound. IMPORTANT: Your HDTV Monitor is capable of displaying high-resolution images.
Introduction Digital Signal and Sound The analog television broadcast system that has been used in the United States for the past 50 years transmits signals as electronic waves. These waves can suffer degradation as the signal travels to your home. Additionally, the analog waves are susceptible to interference from planes passing overhead, weather, and household appliances.
Table of Contents Important Safety Instructions .......................................................................................... 1 Introduction....................................................................................................................... 2 Part 1: DLP— brilliance, in color, design, and technology ....................................... 2 Part 2: Why RCA Scenium DLP is better ....................................................................
Table of Contents Chapter 3: Using the TV's Features........................................................ 33 Channel Banner ............................................................................................................... 34 Autotuning ...................................................................................................................... 34 Why You Should Use the Autotuning Feature .......................................................
Chapter 1 Connections & Setup Chapter Overview: • Things to Consider Before You Connect • Choose Your Connection • Explanation of Jacks • Connection Instructions • Front Panel Buttons • Plug in the TV • Put Batteries in the Remote • How to Use the Remote Control to Complete the Initial Setup • Turn on the TV • Complete the Initial Setup Graphics contained within this publication are for representation only.
Connections & Setup Things to Consider Before You Connect Protect Against Power Surges • Connect all components before you plug any of their power cords into the wall outlet. • Turn off the TV and/or component before you connect or disconnect any cables. • Make sure all antennas and cables are properly grounded. Refer to the Important Safety Instructions on page 1. Protect Components from Overheating • Don’t block ventilation holes on any of the components.
Connections & Setup Choose Your Connection There are several ways to connect your TV. Please use the following chart to determine which connection is best for you. Proceed to the appropriate page and connect your TV. Note for US customers: If you prefer, we can provide you with the name of an Authorized Service Representative who will visit your home for a fee to install your electronic entertainment system and to instruct you in its operation. For details about this service, call 1-888-206-3359.
Connections & Setup Explanation of Jacks This section describes the jacks you can use for connections. There are several ways to connect components to your TV. Back Panel Jacks (in alphabetical order) ANTENNA/CABLE Lets you connect a coaxial cable to receive the signal from the antenna, cable, cable box, or if using the examples on pages 12-17, a VCR.
Connections & Setup COMPOSITE INPUTS S-VIDEO L V R VID1 COMPOSITE INPUTS Lets you connect another component such as a VCR, DVD player, or laserdisc player. Its AUDIO jacks are the same as described for CMP1 above. • VID2 L V R • • • VID1 S-VIDEO Provides better picture quality than the video jacks (VID1 and 2 Video) because the color part of the picture is separated from the black and white part of the picture.
Connections & Setup CABLE O R TV OFF-AIR ANTENNA SATELLITE RECEIVER 1A 1B HDTV TUNER ner V Tu L HDT ANT IN ANT OUT VIDEO L AUDIO R DVI-HDTV AUDIO SAT IN Y PB PR L AUDIO R R DVD PLAYER AUDIO OUT R L DVD Y PR PB S-VIDEO 2A 3A 2B 3B VCR 6A 4A 6B 4B A U DIO/VIDEO OUTPUT COMPONENT INPUTS 4C CMP1 Y PB DVI-HDTV Wired IR CMP2 COMPOSITE INPUTS S-VIDEO Y L PB V L L OUT R VID1 LEFT LEFT L R PR R V L R FOR FACTORY USE ONLY RIGHT RIGHT FIXED VARIABLE AU
Connections & Setup TV + HDTV Tuner + VCR + DVD Player 1. Make sure cable or antenna and/or satellite is connected to your VCR. A. Connect the coaxial cable from your cable outlet or antenna to the antenna input on the HDTV Tuner. B. Connect the satellite dish antenna to the satellite input on the HDTV Tuner. 2. Make the video connection between your HDTV Tuner and the TV. A. Best Connection: DVI-HDTV Connect a DVI-HDTV cable to the DVI-HDTV jack on the back of your HDTV Tuner.
Connections & Setup SATELLITE RECEIVER VIDEO S-VIDEO L AUDIO R TV 3A 3B TV 3C A U DIO/VIDEO OUTPUT COMPONENT INPUTS CMP1 e lit tel Y Sa PB DVI-HDTV Wired IR CMP2 S-VIDEO Y L COMPOSITE INPUTS PB V L V SUB LEFT LEFT RIGHT RIGHT ANTENNA/ CABLE R VID1 L L VID2 PR R PR R V L R FOR FACTORY USE ONLY R FIXED VARIABLE AUDIO AUDIO 1C VCR VIDEO L IN AUDIO OUT AUDIO VIDEO L VCR R 1B R ANTENNA OUT ANTENNA IN 1A CABLE O R 2 14 OFF-AIR ANTENNA Chapter 1
Connections & Setup TV + Satellite Receiver + VCR 1. Connect your VCR to your TV. A. Connect a coaxial cable to the VCR’s antenna output and to the ANTENNA/CABLE Input jack on the TV. B. Connect the audio (white and red) cables to the VID2 L/MONO and R Audio jacks on the back of the TV and to the Audio Output jacks on the VCR. C. Connect the video cable to the VID2 V (Video) jack on the back of the TV and to the Video Output jack on the VCR. 2. Make sure cable or antenna is connected to your VCR.
Connections & Setup DVD PLAYER PB Y PR AUDIO OUT R L S-VIDEO TV 1A TV 1B DVD A U DIO/VIDEO OUTPUT COMPONENT INPUTS CMP1 Y PB DVI-HDTV Wired IR CMP2 S-VIDEO Y L COMPOSITE INPUTS PB V L R VID1 L L PR VIDEO L R PR R AUDIO OUT AUDIO VIDEO L VCR R IN SUB LEFT LEFT RIGHT RIGHT VID2 V L R FOR FACTORY USE ONLY R VCR V ANTENNA/ CABLE FIXED VARIABLE AUDIO AUDIO 2C R ANTENNA OUT ANTENNA IN 2B 2A CABLE 3 16 O R OFF-AIR ANTENNA Chapter 1
Connections & Setup TV + DVD + VCR 1. Connect your DVD Player to your TV. A. Connect the audio (white and red) cables to the CMP1 L and R Audio jacks on the back of the TV and to the Audio Output jacks on the DVD player. B. Connect three video grade cables to the CMP1 Y PB PR jacks on the back of the TV and to the Y PB PR jacks on the DVD player. Notes: If your DVD player does not have Y PB PR jacks, but does have an S-Video jack, connect the player to the VID1 S-VIDEO jack on the TV using an S-Video cable.
Connections & Setup A/V RECEIVER CD IN IN TAPE OUT TV IN IN VCR OUT R These are two different ways your TV uses a component to hear audio. L Connect to either FIXED or VARIABLE Output TV CMP2 Y Wired IR DVI-HDTV COMPOSITE INPUTS S-VIDEO Y L PB PB Connect audio cables to either the FIXED or VARIABLE AUDIO L and R OUTPUT jacks and to the Audio Inputs on the A/V receiver. • FIXED provides fixed-level audio output from the TV.
Connections & Setup Plug in the TV Plug the flat end of the cable into the power jack on the back of the TV. Then plug the other end of the power cord into an appropriate wall outlet. Be sure to insert the plug completely. Do not plug the TV into an outlet controlled by a light switch. Put batteries in the remote • Remove the battery compartment cover from the back of the remote by pushing the tab and lifting off the cover. • Insert 2 “AA” fresh batteries.
Connections & Setup Welcome Screen and Connection Confirmation The next screen welcomes you to your new RCA TV. Press OK to continue with the setup. After the welcome screen, the initial setup asks you to make sure that you've connected the HDTV Monitor to your cable or antenna signal. Once you've confirmed that the HDTV Monitor is connected, press OK. The Channel setup screen appears. Complete Auto Channel Search In the Channel setup screen, you can launch the Auto channel search by pressing OK.
Chapter 2 Using the Remote Control Chapter Overview: • The Buttons on the Remote Control • Programming the Remote to Operate Other Components • The Learning Feature • Remote Control Codes Graphics contained within this publication are for representation only.
Using the Remote Control The Buttons on the Remote Control (0-9) Number Buttons Enter channel numbers and time settings directly through the remote control. To enter a one-digit channel, enter a zero first. To enter a two-digit channel, press the two digits. To enter a three-digit channel, press and hold the “1” button until “1” and two dashes (– –) appear, then add the second two digits. Example: to tune to channel 123, press and hold 1 until “1– –” appears, release the 1 button and then press 2 and 3.
Using the Remote Control Tip The component button corresponding to the mode you're in flickers when the remote batteries are low and you press a button on the remote. A warning message may also appear on the screen when you press a remote button and the batteries are low. Tip To turn off most RCA components that are connected to the TV, press ON•OFF twice within two seconds. This feature only works with most RCA products.
Using the Remote Control Programming the Remote to Operate Other Components The universal remote can be programmed to operate most brands of remote controllable components. The remote is already programmed to operate most RCA components. Also, the AUX/HD button can be programmed to operate most brands of an additional remote-controllable component (such as a VCR, DVD player, CD player, satellite receiver, cable box or audio receiver). Note: The TV button can’t be programmed on this remote.
Using the Remote Control Using Automatic Code Search Tip To stop the automatic code search without programming any components, press and hold CLEAR until the light in the component button turns off. If Direct Entry does not work for your component, try Auto Code Search. The following instructions can be used to program the remote to operate each of your components.
Using the Remote Control The Learning Feature Before using the learning feature, make sure this TV’s remote control is programmed to control other components you have connected to the TV. Programming the remote control erases all learned commands for that component mode. After you program the TV’s remote control to operate the other component, the TV’s remote provides most of the operations you need.
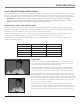
Using the Remote Control • In order to record (learn) a function from one remote to the other, you must make sure the Infrared (IR) transmitter of the original remote is facing the IR receiver on the top of the TV’s remote (see illustration). To accomplish this, you may have to hold a remote in each hand instead of laying both on the table.
Using the Remote Control Clearing a Learned Function To delete a learned button function, use the procedure below. 1. Press and hold the component button (the component button lights). Then press and hold the CLEAR button for 3 seconds. Continue depressing both buttons (the component mode button flashes—turns on and off again). 2. Release the component and CLEAR buttons (the component button being programmed turns on). Remote is now in Clear learned function mode. 3.
Using the Remote Control Volume Punchthrough You may find this feature helpful if you’ve connected your components to an audio/video receiver (A/V receiver) or amplifier, but you want to use the TV’s remote control to operate the volume for a component that is connected to the audio/video receiver. An example follows. Let’s say you’ve connected your HDTV tuner to your audio/video receiver. You’ve also programmed your HDTV Monitor remote control to operate your HDTV tuner.
Using the Remote Control Deleting All Punchthrough Commands To delete all programmed Volume Punchthrough settings and return the remote control back to the factory defaults (TV for all modes except AUDIO), press and hold the VOL- button (LED of the Volume Punchthrough component lights). While holding the VOL- button, enter the code 000, using the number buttons. All component LEDs turn on for 2 seconds and then turn off. The remote returns to the factory settings.
Using the Remote Control Remote Control Codes Audio Codes Cable Box Codes Programmable for the AUDIO and AUX/HD buttons. Programmable for SAT/CAB and AUX/HD buttons. AUX/Dimensia/Lyra Wireless RCA ......................................................................................4004 ABC .............................................. 5002, 5003, 5004, 5006, 5045 Archer.........................................................................5008, 5009 Cableview .......................................
Using the Remote Control VCR Codes Programmable for VCR and AUX/HD buttons. Admiral.................................................................................2068 Aiko ......................................................................................2023 Aiwa .....................................................................................2022 Akai .................................... 2002, 2003, 2004, 2057, 2058, 2059 Audiovox ..................................................................
Chapter 3 Using the TV's Features Chapter Overview: • Channel Banner • Autotuning • Parental Controls and V-Chip • PIP (Picture-in-Picture) and POP (Picture-outside-Picture) Operation Graphics contained within this publication are for representation only.
Using the TV’s Features Channel Banner There are several indicators that might appear when you press the TV or INFO button on the remote. This display is called the Channel Banner. The following list describes the items on the Channel Banner screen (left to right and top to bottom). 4/3 format Current screen format. Mono (or Stereo) Mono appears when the current channel is broadcasting in mono. Stereo appears when the current channel is broadcasting in stereo.
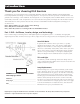
Using the TV’s Features How to Set Up the Autotuning Feature The way you set up the autotuning feature in the TV’s menu corresponds to the component buttons on the remote and the way you have each component connected to your TV. When you set up autotuning, you’re telling the TV what channel/input to tune to when you press the VCR, DVD, SAT/CAB, AUX/HD or AUDIO button on the remote control. 1. Press MENU (the MAIN MENU appears). 2. Highlight Setup and press OK on your remote control. 3.
Using the TV’s Features Parental Controls and V-Chip The choices in the US V-CHIP and Canada V-CHIP menus involve software inside your TV (referred to as V-Chip) which allows you to block TV programs and movies based on violence, sex, or other content you may believe children should not view. Once you block programs, you can unblock programs by entering a password. By default, the software inside your TV is turned “off.” For instructions to turn on V-Chip, go to page 41.
Using the TV’s Features The V-Chip Rating Screen The following is an example of where items are located within the Rating Limit screen. Rating Status Field Lets you select whether the status of the age-based rating limit to Content Themes the left is View or Block. Lists the content themes you can block or view. Rating Field Content Status Fields Lets you select from a Lets you select which content themes to list of age-based ratings view for the selected rating, and whether you can block or view.
Using the TV’s Features Blocking Age-Based Ratings You can automatically block all program ratings above a specified agebased rating level. To block programs with higher ratings: Hierarchy of Age-Based Ratings 1. Press the up or down arrow button to scroll to the rating corresponding with the lowest rating you do not want the child to watch. 2. Press the OK button to toggle between View and Block. The status for the rating listed to the left and all higher ratings automatically changes to Block (and ).
Using the TV’s Features Viewing Specific Content Themes If you block specific content themes, you have the option of going back and changing some of the them back to ( ) View: 1. Determine the content themes you want to change to ( 2. Press the down arrow button to scroll to the rating whose content theme you want to change, such as language (L) corresponding with TV-14. 3. Press the right arrow button to move the yellow highlight to a particular content theme status. 4.
Using the TV’s Features Rating Canadian French V-Chip Rating System 18 ans + Adults. Programming is for adults only. This program contains sustained violence or extremely violent scenes. 16 ans + Viewers 16 and over. Programming is not suitable for those under age 16. This program contains frequent scenes of violence or intensely violent scenes. 13 ans + Viewers 13 and over. Programming may not be suitable for children under the age of 13.
Using the TV’s Features V-Chip Movie Rating Limit Set movie rating limits by blocking movies rated above a specified level. To access the Movie Rating Limit menu: 1. Press MENU on the remote control (the TV's MAIN MENU appears). 2. Select Parental Control. 3. Select US V-Chip. 4. Select V-Chip movie rating. Blocking Movie Ratings Once you are in the Movie Ratings menu, follow the same steps described for blocking TV ratings. Blocking Unrated/Exempt Programs The Unrated/Exempt Prog.
Using the TV’s Features PIP (Picture-in-Picture) and POP (Picture-outside-Picture) Operation The PIP (picture-in-picture) feature lets you display a second, smaller picture on top of the main picture. POP (picture-outside-picture) lets you display two windows side by side. PIP example Note: PIP and POP are not available for DVI or component video sources (CMP1 or CMP2).
Chapter 4 Using the TV's Menu System Chapter Overview: • Sound Menu • Picture Menu • Channel Guide Menu • Time Menu • Parental Control Menu • PIP Menu • Setup Menu Graphics contained within this publication are for representation only.
Using the TV’s Menu System Sound Menu The Sound menu lets you adjust audio output. To access the Sound menu, press MENU on the remote, and then select Sound from the main menu. The following audio items can be adjusted: Sound settings, Sound type, Sound mode, SRS mode, SRS Dialog Clarity, SAP, Sound Logic, Headphone settings, and Graphic equalizer.
Using the TV’s Menu System SRS Mode options. Press the right arrow button to scroll through the available SRS SRS TruSurround Available for multichannel input. Creates a virtual surround sound effect through any two-speaker playback system. SRS TruSurround XT Available for stereo or multichannel input. Like TruSurround, TruSurround XT creates a virtual surround sound effect through any two-speaker playback system. TruSurround XT also lets you activate the SRS Dialog Clarity feature (see below).
Using the TV’s Menu System Picture Menu The Picture menu contains menus and controls to configure the following video settings: Advanced picture settings, Picture presets, Black level, Color, Contrast, Sharpness, Color Warmth, Tint, and Display options. The Picture menu options apply to the video for the main TV and video input selections. Advanced picture settings Contrast expand You can adjust the contrast of the picture to suit the light of the room.
Using the TV’s Menu System Picture preset Displays a choice list that lets you select one of the preset picture settings: Vibrant, Cinematic, Natural, Sports, Videogame, Video Camera or Personal. Choose the setting that is best for your viewing environment. You can set a different picture preset for each input (including one for your regular TV channels). Black Level Adjusts the brightness of the picture. Color Adjusts the richness of the color.
Using the TV’s Menu System Channel Guide Menu Allows you to view and select from the entire channel list and their labels. Press the GUIDE button to bring up the Channel Guide menu. Use the up or down arrow button to scroll through the list. Press OK to select and tune to the highlighted channel. Press the last digit of one of the channels in the guide to tune to that channel and leave the Channel Guide on the screen. Time Menu Sleep Timer Lets you set the TV to turn off after a given amount of time.
Using the TV’s Menu System PIP Menu Display Mode Off No window is displayed. PIP PIP window is displayed. POP POP window is displayed. PIP channel Allows you to choose the channel displayed in the PIP or main POP window. Scroll through channel list as well as the VID1, VID2 and FRNT input channels. PIP size Large. Allows you to choose the size of the PIP window: Small, Medium or PIP position Allows you to choose where the PIP window appears on the screen: Top right, Top left, Bottom right or Bottom left.
Using the TV’s Menu System Preferences Language Displays a choice list that lets you select your preferred language for the menus: English, Español or Français. Maximum TV volume Allows you to set how high volume turns up when you press the VOL+ button. Highlight Maximum volume, then press and hold OK to hear the maximum volume. Make sure the volume has not been muted or turned down all the way. Curtain effect Reveals the picture by "opening" it from the middle of the screen when the TV is switched on.
Chapter 5 Other Information Chapter Overview: • Troubleshooting • Lamp Replacement Instructions • Limited Warranty • Care and Cleaning • FCC Information • Accessory Information Graphics contained within this publication are for representation only.
Other Information Troubleshooting Most problems you encounter with your TV can be corrected by consulting the following troubleshooting list. Note for U.S. customers: If you prefer, we can provide you with the name of an Authorized Service Representative who will visit you home for a fee to install your electronic entertainment system and to instruct you in its operation. For details about this service, call 1-888-206-3359. For additional assistance while using your RCA Scenium product, please visit www.
Other Information TV turns on unexpectedly • Wake up timer might have been activated. Go to page 48 for instructions. • Auto on might have been activated. Go to page 50 for instructions. • You might have pressed CH+, CH- or INPUT on the remote accidentally. Blank screen • Make sure the component connected to the TV is turned on. • Try another channel.
Other Information Volume buttons not adjusting volume louder • Check to make sure volume isn’t limited by the maximum volume feature. Go to page 50 for more instructions. Picture not moving • You have activated the Freeze feature by pressing FREEZE or OK on the remote. Press any button to “unfreeze” the picture. Black box appears on the screen • Closed-captioning might be on. Check Closed Caption in the Setup menu. Go to page 50 for more instructions.
Other Information Lamp Replacement Instructions Replacing the Lamp Unit Your TV’s source of light comes from a lamp – similar to lamps used in film or front projectors. Although this lamp is longlasting, it may need to be replaced eventually. When to replace the lamp You probably need a new lamp if there’s no picture, but you still can hear the audio and the power light on the front of the TV does the following: blinks 5 times every 30 seconds, then double-blinks four times and remains on.
Other Information ___ The correct lamp replacement unit. To order the correct lamp, you’ll need to know your TV’s model number, serial number, and lamp type—this information is listed on the Service Model Number sticker (example of the sticker is shown at right). The sticker is located on the right side of the TV (see picture below for sticker location). ___ The box that the lamp replacement unit came in.
Other Information 9. Loosen the two screws on the lamp unit inside the TV (the screws stay with the unit so just loosen them, don’t remove them). Step 9 10. As you remove the lamp, pay attention to how the lamp fits so that you can use the proper orientation when you’re installing the new lamp. To remove the lamp unit: • grasp the handles and pull straight back to remove the entire lamp assembly unit from the TV. • place the old unit out of the way where it won’t get broken or dropped. Step 10 11.
Other Information Limited Warranty What your warranty covers: • Defects in materials or workmanship. For how long after your purchase: • One year from date of purchase for labor. • One year from date of purchase for parts. • One year from date of purchase for light engine and lamp assembly. The warranty period for rental units begins with the first rental or 45 days from date of shipment to the rental firm, whichever comes first.
Other Information Limitation of Warranty: • THE WARRANTY STATED ABOVE IS THE ONLY WARRANTY APPLICABLE TO THIS PRODUCT. ALL OTHER WARRANTIES, EXPRESS OR IMPLIED (INCLUDING ALL IMPLIED WARRANTIES OF MERCHANTABILITY OR FITNESS FOR A PARTICULAR PURPOSE) ARE HEREBY DISCLAIMED. NO VERBAL OR WRITTEN INFORMATION GIVEN BY TTE TECHNOLOGY, INC., ITS AGENTS OR EMPLOYEES SHALL CREATE A GUARANTY OR IN ANY WAY INCREASE THE SCOPE OF THIS WARRANTY.
Other Information Accessory Information There are various accessories available to complement your HDTV Monitor. Prices are subject to change without notice. All accessories are subject to availability. A shipping and handling fee will be charged upon ordering, and we are required by law to collect the appropriate sales tax for each individual state, county and locality to which the merchandise is being sent.
Index A D M A/V receiver 18 Accessories 60 Age-based ratings 38 Amplifier 44 ANTENNA/CABLE 47 Arrow buttons 22, 42 Aspect ratio 3 Audio/Video cables 60 Audio jacks Outputs (fixed/variable) 10 Authorized service 52 Autoformat 46, 54 Automatic code search 25 Autotuning 34, 35, 50 Auto channel search 20, 49 Auto channel update 49 Auto on 50 Auto skin tone 46 AUX/HD button 22, 35 Digital sound 4 DLP 2 DVD Button 22, 35 Connection 12, 13, 16, 17 DVI input 11, 35 Maximum TV volume 50 Menu Button 19, 22 Channel
Visit the RCA Scenium website at www.rcascenium.com Please do not send any products to the Indianapolis address listed in this manual or on the carton. This will only add delays in service for your product. TTE Technology, Inc. 10330 North Meridian Street Indianapolis, IN 46290 ©2004 TTE Technology, Inc. RCA and associated marks are trademarks of THOMSON S.A. used under license to TCL-Thomson Electronics (TTE).