HDTV Monitor/DVD User’s Guide
Important Information WARNING To reduce the risk of fire or electric shock, do not expose this product to rain or moisture. The apparatus shall not be exposed to dripping or splashing. No objects filled with liquids, such as vases, shall be placed on the apparatus. CAUTION THIS PRODUCT UTILIZES A LASER. USE OF CONTROLS OR ADJUSTMENTS OR PERFORMANCE OF PROCEDURES OTHER THAN THOSE SPECIFIED HEREIN MAY RESULT IN HAZARDOUS RADIATION EXPOSURE. DO NOT OPEN COVERS AND DO NOT REPAIR YOURSELF.
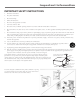
Important Information IMPORTANT SAFETY INSTRUCTIONS 1. Read these instructions. 2. Keep these instructions. 3. Heed all warnings. 4. Follow all instructions. 5. Do not use this apparatus near water. 6. Clean only with dry cloth. 7. Do not block any ventilation openings. Install in accordance with the manufacturer’s instructions. 8. Do not install near any heat sources such as radiators, heat registers, stoves, or other apparatus (including amplifiers) that produce heat. 9.
Introduction Key Features Overview Your TV/DVD is equipped with features that will add to your TV viewing experience. The following information summarizes a few of these features. Chapter 4 provides more information about the rest of the TV/DVD’s features and how to use them. Hi-Pix Picture Enhancement System The Hi-Pix Picture Enhancement System incorporates two of RCA’s most advanced technologies: TruScan Digital Reality and the AVR Picture Projection System.
Table of Contents Important Information ..................................................... 2 Key Features Overview .................................................... 2 Chapter 1: Connections & Setup Things to Consider Before You Connect ......................... 4 Choose Your Connection .................................................. 5 TV/DVD + HDTV Tuner + VCR ........................................... 6 TV/DVD + Satellite Receiver + VCR .................................. 8 TV/DVD + DVD + VCR ...
Connections & Setup Things to Consider Before You Connect Protect Against Power Surges • Connect all components before you plug any of their power cords into the wall outlet. • Turn off the TV/DVD and/or component before you connect or disconnect any cables. • Make sure all antennas and cables are properly grounded. Refer to the Important Safety Instructions on page 1. Protect Components from Overheating • Don’t block ventilation holes on any of the components.
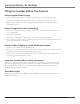
Connections & Setup Choose Your Connection There are several ways to connect your TV/DVD. Please use the following chart to determine which connection is best for you. Proceed to the appropriate page and connect your TV/DVD. Note for US customers: If you prefer, we can provide you with the name of an Authorized Service Representative who will visit your home for a fee to install your electronic entertainment system and to instruct you in its operation. For details about this service, call 1-888-206-3359.
Connections & Setup ����� � � VD /D TV ��������������� ������������������ 1A 1B ���������� ner V Tu � HDT ������ ������� ����� � ����� � �������� ����� ������ � �� � �� ����� � � VCR 2A 3A 2B 3B ������ �������� ������ ������ 4A � � ��������� ����� ���� ����������������� 4B ���������������� 4C ���� � �������� ������ �� ���� ���������������� ������� � �� � �� � �� � �� � � � �������� ����� � � � � � ���� AUDIO/VIDEO OUTPUT � ���� �������� ����� ��
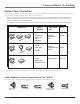
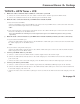
Connections & Setup TV/DVD + HDTV Tuner + VCR 1. Make sure cable or antenna and/or satellite is connected to your VCR. A. Connect the coaxial cable from your cable outlet or antenna to the antenna input on the HDTV Tuner. B. Connect the satellite dish antenna to the satellite input on the HDTV Tuner. 2. Make the video connection between your HDTV Tuner and the TV/DVD. A. Best Connection: DVI-HDTV Connect a DVI-HDTV cable to the DVI-HDTV jack on the back of your HDTV Tuner.
Connections & Setup ��������� �������� ����� ������� � ����� � VD /D TV 3A 3B ������ 3C �������� ������ ������ � � ��������� ����� ���� ����������������� ���������������� ���� lite � tel Sa �������� ������ �� ���� ���������������� ������� � �� � �� � �� � �� � � � �������� ����� � � � � � ���� AUDIO/VIDEO OUTPUT � ���� �������� ����� ����������� �������� ��������� ����������� � � � � � 1C VCR ����� � �� ����� ��� ����� ����� � ��� � 1B � ������
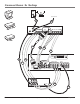
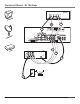
Connections & Setup TV/DVD + Satellite Receiver + VCR 1. Connect your VCR to your TV/DVD. A. Connect a coaxial cable to the VCR’s antenna output and to the ANTENNA/CABLE Input jack on the TV/DVD. B. Connect the audio (white and red) cables to the VID2 L/MONO and R Audio jacks on the back of the TV/DVD and to the Audio Output jacks on the VCR. C. Connect the video cable to the VID2 V (Video) jack on the back of the TV/DVD and to the Video Output jack on the VCR. 2.
Connections & Setup ������ �������� ������ ������ � � ��������� ����� ���� ����������������� ���������������� VD ���� V/D T � �������� ������ �� ���� ���������������� ������� � �� � �� � �� � �� � � � �������� ����� � � � � � ���� AUDIO/VIDEO OUTPUT � ���� �������� ����� ����������� �������� ��������� ����������� � � � � � 1C VCR ����� � �� ��� � ����� ��� 1B ����� ����� � � ����������� ���������� 1A ����� � � 2 10 ��������������� Graphics containe
Connections & Setup TV/DVD + DVD + VCR 1. Connect your VCR to your TV/DVD. A. Connect a coaxial cable to the VCR’s antenna output and to the ANTENNA/CABLE Input jack on the TV/DVD. B. Connect the audio (white and red) cables to the VID2 L/MONO and R Audio jacks on the back of the TV/DVD and to the Audio Output jacks on the VCR. C. Connect the video cable to the VID2 V (Video) jack on the back of the TV/DVD and to the Video Output jack on the VCR. 2. Make sure cable or antenna is connected to your VCR.
Connections & Setup TV/DVD + A/V Receiver or Speakers These are two different ways your TV/DVD uses a component to hear audio. 1. Connect audio cables to either the FIXED or VARIABLE AUDIO L and R OUTPUT jacks and to the Audio Inputs on the A/V receiver. • FIXED provides fixed-level audio output from the TV/DVD. This audio output is ideal for connecting to an A/V receiver that has its own volume control. • VARIABLE provides variable-level audio output.
Connections & Setup The Front of Your TV/DVD Front Input Jacks The TV/DVD has front inputs for convenience: one set of audio/video input jacks, an S-Video jack and a headphones jack. The jacks are ideal for using a video game console or a camcorder. Locate the jacks either on the front of the TV/DVD or on one of the sides. To access the component you connected to the front of the TV/DVD, press the INPUT button on your remote until FRNT appears on the screen.
Connections & Setup Plug in the TV/DVD Plug the end of the power cord into a grounded wall outlet. Insert the plug completely into the outlet. Put batteries in the remote • Remove the battery compartment cover from the back of the remote by pushing the tab and lifting off the cover. • Insert 2 “AA” fresh batteries. Make sure the polarities (+ and -) are aligned correctly. • Replace the cover. Turn on the TV/DVD Press TV on the remote, or press POWER on the TV/DVD’s front panel.
Connections & Setup Complete Auto Channel Search The next screen asks you to make sure you've connected the TV/DVD to a cable, satellite, or off-air signal. When you're sure that a signal is connected to your TV/DVD, press OK on your remote to go to the Channel setup screen. In the Channel setup screen, you can launch the Auto channel search by pressing OK. The Auto channel search allows the TV/DVD to search for all channels viewable through your antenna or cable TV system.
Using the Remote Control The Buttons on the Remote Control (0-9) Number Buttons Enter channel numbers and time settings directly through the remote control. To enter a one-digit channel, enter a zero first. To enter a two-digit channel, press the two digits. To enter a three-digit channel, press and hold the “1” button until “1” and two dashes (– –) appear, then add the second two digits. Example: to tune to channel 123, press and hold 1 until “1– –” appears, release the 1 button and then press 2 and 3.
Using the Remote Control Tip The component button corresponding to the mode you're in flickers when the remote batteries are low and you press a button on the remote. A warning message may also appear on the screen when you press a remote button and the batteries are low. Tip To turn off most RCA, GE, and Proscan components that are connected to the TV, press ON•OFF twice within two seconds. This feature only works with most RCA, GE, and Proscan products.
Using the Remote Control Programming the Remote to Operate Other Components The universal remote can be programmed to operate most brands of remote controllable components. The remote is already programmed to operate most RCA, GE, and Proscan components. Also, the AUX/HD button can be programmed to operate most brands of an additional remote-controllable component (such as a VCR, DVD player, CD player, satellite receiver, cable box or audio receiver). Note: The TV button can’t be programmed on this remote.
Using the Remote Control Using Automatic Code Search Tip To stop the automatic code search without programming any components, press and hold CLEAR until the light in the component button turns off. If Direct Entry does not work for your component, try Auto Code Search. The following instructions can be used to program the remote to operate each of your components.
Using the Remote Control The Learning Feature Before using the learning feature, make sure this TV’s remote control is programmed to control other components you have connected to the TV. Programming the remote control erases all learned commands for that component mode. After you program the TV’s remote control to operate the other component, the TV’s remote provides most of the operations you need.
Using the Remote Control 5. With the remote controls facing each other and no more than 2 inches apart, press and hold the button of the component’s remote control that has the functionality you are recording to the TV’s remote control. Keep pressing the button until the TV/DVD remote’s component button light turns off and back on (the function has been saved to the TV/DVD remote). If all component buttons flash four times, then the function wasn't learned. You can try again starting with step 4. 6.
Using the Remote Control Therefore, after you’ve successfully set up the Volume Punchthrough Feature, whenever the TV/DVD remote is in DVD mode (press the DVD button) and you want to adjust the volume, you only have to press the VOL + or VOL- buttons. Follow the instructions below to set up Volume Punchthrough. IMPORTANT: First, you must program the AUDIO button on the TV’s remote control to operate your audio receiver or amplifier. Go to page 18 for instructions.
Using the Remote Control Cable Box Codes Programmable for SAT/CAB and AUX/HD buttons. ABC .............................................. 5002, 5003, 5004, 5006, 5045 Archer.........................................................................5008, 5009 Cableview ............................................................................5007 Contec ..................................................................................5015 Eastern ...............................................................
Playing DVDs Regional Coding Both the TV/DVD unit and the discs are coded by region. These regional codes must match in order for the disc to play. If the codes don’t match, the disc won’t play. This unit’s code is region 1. Using Different Menus Each disc is programmed with different features. There are three separate menu paths that you can use to access features: • The Disc menu – The disc menu is part of each disc and is separate from the DVD’s menu system.
Playing DVDs Using a Disc Menu A disc is capable of having an on-screen menu that is separate from the DVD’s menu system and on-screen Info Display. The disc menu might only contain a list of the titles and chapters, or it may allow you to change features such as language and playback settings. The content and operation of disc menus vary from disc to disc. Using the On-Screen Info Display The on-screen Info Display contains many playback features.
Playing DVDs Selecting a Chapter Because DVD discs use digital technology, a title can be divided into individual chapters (similar to tracks on a CD). You can skip to a specific chapter by using the Chapter feature in the Info Display. 1. While a disc is playing, press INFO on the remote to bring up the Info Display. 2. Press the left/right arrow buttons to highlight the Chapter icon. 3.
Playing DVDs Using the Repeat Feature The default mode for the Repeat feature is Off. There are four Repeat options: • Disc – repeats the disc that is playing • Title – repeats the title that is playing • Chapter – repeats the chapter that is playing • A•B – Set the beginning (point A) and the end (point B) to make this part of the movie play repeatedly. To Use Repeat: 1. 2. 3. 4. While a disc is playing, press INFO on the remote to bring up the Info Display. Highlight the Repeat icon.
Using the TV’s Features Channel Banner There are several indicators that might appear when you press the TV or INFO button on the remote. This display is called the Channel Banner. The following list describes the items on the Channel Banner screen (left to right and top to bottom). 4/3 format Current screen format. Mono (or Stereo) Mono appears when the current channel is broadcasting in mono. Stereo appears when the current channel is broadcasting in stereo.
Using the TV’s Features How to Set Up the Autotuning Feature The way you set up the autotuning feature in the TV’s menu corresponds to the component buttons on the remote and the way you have each component connected to your TV. When you set up autotuning, you’re telling the TV/DVD what channel/input to tune to when you press the VCR, SAT/CAB, AUX/HD or AUDIO button on the remote control. 1. Press MENU (the MAIN MENU appears). 2. Highlight Setup and press OK on your remote control. 3.
Using the TV’s Features Note: Parental Controls and V-Chip This section describes the Parental Control feature associated with TV broadcasts (cable, satellite and/or off-air). The Parental Control feature used with DVD discs is explained on page 39 (the Lock menu). The choices in the US V-CHIP and Canada V-CHIP menus involve software inside your TV (referred to as V-Chip) which allows you to block TV programs and movies based on violence, sex, or other content you may believe children should not view.
Using the TV’s Features The V-Chip Rating Screen The following is an example of where items are located within the Rating Limit screen. Rating Status Field Lets you select whether the status of the age-based rating limit to Content Themes the left is View or Block. Lists the content themes you can block or view. Rating Field Content Status Fields Lets you select from a Lets you select which content themes to list of age-based ratings view for the selected rating, and whether you can block or view.
Using the TV’s Features Blocking Age-Based Ratings You can automatically block all program ratings above a specified agebased rating level. To block programs with higher ratings: Hierarchy of Age-Based Ratings 1. Press the up or down arrow button to scroll to the rating corresponding with the lowest rating you do not want the child to watch. 2. Press the OK button to toggle between View and Block. The status for the rating listed to the left and all higher ratings automatically changes to Block (and ).
Using the TV’s Features Viewing Specific Content Themes If you block specific content themes, you have the option of going back and changing some of the them back to ( ) View: 1. Determine the content themes you want to change to ( 2. Press the down arrow button to scroll to the rating whose content theme you want to change, such as language (L) corresponding with TV-14. 3. Press the right arrow button to move the yellow highlight to a particular content theme status. 4.
Using the TV’s Features Rating Canadian French V-Chip Rating System 18 ans + Adults. Programming is for adults only. This program contains sustained violence or extremely violent scenes. 16 ans + Viewers 16 and over. Programming is not suitable for those under age 16. This program contains frequent scenes of violence or intensely violent scenes. 13 ans + Viewers 13 and over. Programming may not be suitable for children under the age of 13.
Using the TV’s Features V-Chip Movie Rating Limit Set movie rating limits by blocking movies rated above a specified level. To access the Movie Rating Limit menu: 1. Press MENU on the remote control (the TV's MAIN MENU appears). 2. Select Parental Control. 3. Select US V-Chip. 4. Select V-Chip movie rating. Blocking Movie Ratings Once you are in the Movie Ratings menu, follow the same steps described for blocking TV ratings. Blocking Unrated/Exempt Programs The Unrated/Exempt Prog.
Using the TV’s Features PIP (Picture-in-Picture) and POP (Picture-outside-Picture) Operation The PIP (picture-in-picture) feature lets you display a second, smaller picture on top of the main picture. POP (picture-outside-picture) lets you display two windows side by side. PIP example Note: PIP and POP are not available for DVI sources, component video sources (CMP1 or CMP2), or when you're using the internal DVD player.
Using the DVD Menu The DVD’s Menu System The DVD’s menu system is not the same as the disc menu or the Info Display. The DVD’s main menu comes up when there is no disc playing. If you're playing a disc, press STOP on the remote control to stop playback and bring up the DVD’s main menu. The Play/Resume Play Option To get to the DVD’s main menu, press STOP on the remote control. The first item in the main menu is the Play/Resume Play option.
Using the DVD Menu 5. 6. 7. Highlight the Chapter box and use the up/down arrows or the number buttons on the remote to enter the chapter you want to play first and press OK. The highlight jumps to the Add button. Press OK to add that chapter to the Program List. The highlight jumps back to the Title box so you can add more titles and/or chapters. Make sure the Title box is highlighted and enter your next title and/or chapter.
Using the DVD Menu The Lock Menu The padlock icon is displayed on the DVD’s main menu which shows whether your DVD is locked or unlocked. Locked: A password is needed in order to play discs that aren’t included in the rating limits you have set. When the DVD is locked, no one can access the Lock Menu items without entering the password. Unlocked: A password isn’t required to play discs. Locking Your DVD 1. 2. 3. 4. 6. If the disc is playing, press STOP (the DVD’s main menu appears).
Using the DVD Menu Changing to a Different Country’s Rating System Some countries use different rating systems. The default for this TV/DVD is the United States. You can change to a different country’s rating system through the Lock menu. 1. If the disc is playing, press STOP (the DVD’s main menu is displayed). 2. From the main menu, highlight the Lock option and press OK (the Lock menu appears). 3. Highlight Ratings Limits and press OK (the Ratings Limits menu appears). 4.
Using the DVD Menu System Test There are several tests you can run from the System Test menu. If a problem is found, the text will appear in light gray. 1. Highlight System Test within the Lock menu. 2. Press OK to display the System Test Results screen. 3. Press the left arrow key to return to the main menu. The Display Menu The Display menu contains the settings that affect how disc content looks on your TV/DVD. TV Image The TV Image menu adjusts the way a movie appears on your TV/DVD. 1.
Using the DVD Menu To change the digital output: 1. From the main menu, highlight and select the Sound option and press OK (the Sound menu is displayed). 2. Highlight the Digital Output option and press OK. 3. Highlight the desired output and press OK. 4. Press the left arrow key to return to the main menu. Notes: If you set Digital Output to DTS, you must have your unit connected to a receiver or decoder with the DTS feature and the disc you play must support the DTS audio format.
Using the TV’s Menu System Sound Menu The Sound menu lets you adjust audio output. To access the Sound menu, press MENU on the remote, and then select Sound from the main menu. The following audio items can be adjusted: Sound settings, Sound type, Sound mode, SAP, Sound Logic, Headphone settings, and Graphic equalizer.
Using the TV’s Menu System Second Audio Program (SAP) Plays the program’s audio in a second language, if one is available. The letters "SAP" appear in the channel banner when you tune to a program that is broadcast with SAP information. SAP audio is broadcast in mono. SAP is also used to broadcast a program’s audio with descriptions of the video for the visually impaired. Sound logic Reduces the annoying blasts in volume during commercial breaks, and also amplifies softer sounds in program material.
Using the TV’s Menu System Autoformat When enabled (box checked) the TV automatically detects the screen format the signal is sending for each channel, as well as input channels. Video noise reduction Reduce picture “static” or any type of interference. This feature is especially useful for providing a clearer picture in weak analog signal conditions.
Using the TV’s Menu System Channel Guide Menu Allows you to view and select from the entire channel list and their labels. Press the GUIDE button to bring up the Channel Guide menu. Use the up or down arrow to scroll through the list. Press OK to select and tune to the highlighted channel. Press the last digit of one of the channels in the guide to tune to that channel and leave the Channel Guide on the screen. Time Menu Sleep Timer Lets you set the TV/DVD to turn off after a given amount of time.
Using the TV’s Menu System Setup Menu The Setup menu lets you configure the TV/DVD to fit its surroundings and your preferences. To access the Setup menu, press MENU on the remote, and then select Setup from the main menu. Channel setup Note: Signal Type The TV chooses the signal type during the initial setup. If you change how you receive broadcasts through the antenna input, you must change the Signal type setting. Choose Cable if you are using cable or a cable box for TV signals.
Using the TV’s Menu System Closed Caption Many programs are encoded with closed-captioning information, which lets you display the audio portion of a program as text on the TV screen. Closed captioning is not available on all channels at all times. Only specific programs encoded with closed-captioning information. When a program is closed captioned, CC is displayed in the channel banner. See Chapter 4 for more information about the channel banner.
Information Displays Using the Info Display Your TV/DVD gives you many options when playing different types of discs. You can access these features through the onscreen Info Display. To access the Info Display while a disc is playing, press INFO on the remote. The Info Display appears across the top of the screen. Each of the playback features is represented by an icon. To access a feature, use the arrow buttons on the remote to highlight the icon.
Information Displays Selecting a Specific Index (Available only on Video CDs) 1. Press INFO on the remote. 2. Highlight the Index icon from the Info Display. 3. Use the number(s) on the remote to enter the index number you want to play, or use the up/down arrows to scroll through the index numbers. When a new index number is entered, that index will begin playing.
Information Displays TKGIVING.MP3 WOODS.MP3 To edit an MP3 disc: Standard Playlist Standard Playlist Add Delete TKGIVING.MP3 00:04:01 WOODS.MP3 00:06:35 UP SUBDIRECT ANGEL.MP3 BELLS.MP3 CODANCE.MP3 Play Done Path : /WOODS.MP3 Type : MP3 Size :6325 K Title : Woods Total: 2 00:10:36 Bit Rate : 128 Kb/s Artist : George Winston This is where the two lines of context sensitive help will be located. 1. If the disc is playing, press STOP to stop playback (the DVD’s main menu appears). 2.
Information Displays A•B Repeat (Available only on Audio CDs) A•B Repeat lets you define a specific segment on the disc that you want to repeat: 1. Find the spot on the disc that is a few seconds before the beginning of the part you want to repeat (this gives you time to access the Info Display and the Repeat feature). 2. Press INFO on the remote and select the Repeat icon from the Info Display. 3.
Other Information Troubleshooting Most problems you encounter with your TV/DVD can be corrected by consulting the following troubleshooting list. Note for US customers: If you prefer, we can provide you with the name of an Authorized Service Representative who will visit your home for a fee to install your electronic entertainment system and to instruct you in its operation. For details about this service, call 1-888-206-3359 or visit www.rcascenium.com.
Other Information Camera angle cannot be changed • Some discs don’t have the multi-camera angle system, and some discs only have it in certain parts of the movie. Picture is too tall and thin • Change the aspect ratio using the TV Image setting in the Display menu (see Chapter 5). Picture is too short and wide • Change the aspect ratio using the TV Image setting in the Display menu (see Chapter 5).
Other Information No sound, picture okay • • • • Maybe the sound is muted. Try pressing the volume up button to restore sound. If using S-Video or Y, PB, PR, remember to also connect the component’s left and right audio output jacks to the TV/DVD’s L and R Audio Input jacks. If you're using the TV/DVD's internal speakers, make sure the INT/EXT switch on the back of the TV is put on “INT”. The sound settings may not be set correctly. Go to page 43 for more information.
Other Information Explanation of Jacks (in alphabetical order) This section describes the jacks you can use to make connections. There are several ways to connect components to your TV. ANTENNA/CABLE Lets you connect a coaxial cable to receive the signal from the antenna, cable, cable box, or if using the examples on pages 5-11, a VCR.
Other Information DVI-HDTV Input Lets you connect an HDTV Tuner with a DVI output. �������� • DVI (Digital Visual Interface) Provides an uncompressed, digital video interface developed for high-bandwidth digital connection. It supports the overlay of high-resolution graphics needed by some electronic program guide navigation and other interactive services. DVI, when combined with HDCP (High bandwidth Digital Content Protection) technology, creates a protected digital connection.
Other Information FCC Information This equipment has been tested and found to comply with the limits for a Class B digital device, pursuant to Part 15 of the FCC Rules. These limits are designed to provide reasonable protection against harmful interference in a residential installation. This equipment generates, uses, and can radiate radio frequency energy and, if not installed and used in accordance with the instructions, may cause harmful interference to radio communications.
Other Information SCENIUM by RCA HDTV Monitor/DVD Limited Warranty What your warranty covers: • Defects in materials or workmanship. For how long after your purchase: • One year from date of purchase for labor. • One year from date of purchase for parts. • Two years from date of purchase for the picture tube. The warranty period for rental units begins with the first rental or 45 days from date of shipment to the rental firm, whichever comes first.
Other Information Accessory Information There are various accessories available to complement your HDTV Monitor. Prices are subject to change without notice. All accessories are subject to availability. A shipping and handling fee will be charged upon ordering, and we are required by law to collect the appropriate sales tax for each individual state, county and locality to which the merchandise is being sent.
Index A D M A•B Repeat 27, 51 Accessories 60 Age-based ratings 32 Amplifier 43 Angle, camera 27 Arrow buttons 16, 36 Audio/Video cables 5, 60 jacks 56, 57 Audio CD creating a program 37 playing 49 Audio language 26 Autoformat 45, 55 Automatic code search 19 AutoPlay menu 38 Autotuning 28, 29, 48 Auto channel search/update 47 Auto convergence 48 Auto on 47 Auto skin tone 45 AUX/HD button 16, 29 Digital output 41 Disc menu 25 Display menu 41 DVD button 16 programming 37 unrated titles 40 DVI input 29 Edi
Visit the RCA Scenium website at www.rcascenium.com Please do not send any products to the Indianapolis address listed in this manual or on the carton. This will only add delays in service for your product. Thomson Inc. 10330 North Meridian Street Indianapolis, IN 46290 ©2003 Thomson Inc.