USER’S GUIDE tv/vcrtv/vcrtv/vcrtv/vcrtv/vcrtv/v crtv/vcrtv/vcrtv/vcrtv/vcrtv/vcrtv /vcrtv/vcrtv/vcrtv/vcrtv/vcrtv/vcr tv/vcrtv/vcrtv/vcrtv/vcrtv/vcrtv/v crtv/vcrtv/vcrtv/vcrtv/vcrtv/vcrtv /vcrtv/vcrtv/vcrtv/vcrtv/vcrtv/vcr/ tv/vcrtv/vcrtv/vcrtv/vcrtv/vcrtv/v crtv/vcrtv/vcrtv/vcrtv/vcrtv/vcrtv /vcrtv/vcrtv/vcrtv/vcrtv/vcrtv/vcr/ tv/vcrtv/vcrtv/vcrtv/vcrtv/vcrtv/v crtv/vcrtv/vcrtv/vcrtv/vcrtv/vcrtv /vcrtv/vcrtv/vcrtv/vcrtv/vcrtv/vcr/ tv/vcrtv/vcrtv/vcrtv/vcrtv/vcrtv/v crtv/vcrtv/vcrtv/vcrtv/vcrtv/vcrtv /vcrt
Important Information WARNING To reduce the risk of fire or electric shock, do not expose this product to rain or moisture. WARNING RISK OF ELECTRIC SHOCK DO NOT OPEN To reduce the risk of electric shock, do not remove cover (or back). No user-serviceable parts inside. Refer servicing to qualified service personnel. This symbol indicates "dangerous voltage" inside the product that presents a risk of electric shock or personal injury.
Table of Contents Setup and Connections .......................................................... 3 Step 1: Unpack the TV/VCR and Remote Control ........................... 4 Step 2: Insert Batteries in the Remote ............................................ 4 Step 3: Place your TV/VCR on a Stable Surface ............................... 4 Step 4: Choose a Hookup ................................................................. 4 How to Hook Up a VCR or Camcorder .....................................
Table of Contents Express Recording .................................................................... 29 Timer Recording ....................................................................... 30 Copying and Editing Tapes ...................................................... 31 Features and Controls ......................................................... 33 Using On-Screen Displays ............................................................... 34 Calling Up On-Screen Displays .......................
Setup and Connections Getting started Well…ify started. ourT V/VCR’ souto 1 Setup and connections 2 Using the Remote 3 Operating Instructions Using the remote 4 Using theand Menu System Features Controls 5 Reference ➣ Thereferencesectioninthebackofthebook containstroubleshootingtips,careandcleaning instructions,accessoryorderinginformation,andyour warrant y. y.
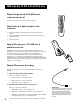
Setup and Connections Step 1: Unpack the TV/VCR and remote control ON•OFF VCR1 DVD TV AUX SAT•CABLE VCR2 MUTE SEARCH Contact your dealer if your remote control is missing. VOL VOL CH + CH SPEED GO BACK GUIDE INFO OK MENU Step 2: Insert batteries in the remote CLEAR 1 2 3 4 5 6 7 8 9 INPUT ANTENNA 0 REVERSE PLAY FORWARD REC•VCR+ STOP PAUSE - TRACKING + 1. Remove the battery compartment cover from the back of the remote. 2. Insert fresh batteries.
Setup and Connections HOW TO Hook up a VCR or Camcorder To hook up a VCR or camcorder for copying tapes, use Connection E or F. Antenna Base Connection A: Attaching to a Dipole Antenna (With No Cable Box) Antenna Slot Follow these steps to connect a dipole antenna to your TV/VCR. Do not connect a dipole antenna if you plan to connect a different type of indoor or outdoor antenna or cable system. Optional accessories may be required for this connection. 1.
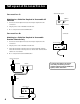
Setup and Connections Cable from Cable System Connection C: Attaching to a Cable Box Required to Unscramble All Channels 1. Connect as shown. Optional accessories may be required for this connection. 2. Plug in power cords of TV/VCR and cable box. 3. Go to “Step 5: Connect the G-LINK Cable.” Cable Box IN Connection D: OUT Coaxial Cable Attaching to a Cable Box Required to Unscramble Premium Channels Only 1. 2. Connect as shown. Optional accessories may be required for this connection.
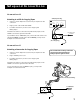
Setup and Connections Connection E: VCR (Playback Only) Attaching to a VCR for Copying Tapes 1. IN FROM ANT. Connect as shown. Optional accessories may be required for this connection. VHF/UHF AUDIO IN OUT OUT TO TV VIDEO IN OUT 3 CH. 4 2. Plug in power cords of VCR and TV/VCR. 3. For further instructions, see the section “Copying and Editing Tapes.” Audio/Video Cables Press 00 on the remote to select the line (audio/video) inputs on the TV/VCR to receive the signal from the VCR.
Setup and Connections Step 5: Connect the G-LINK Cable This is an important step because the G-LINK cable enables your TV/VCR and the GUIDE Plus+ system (the on-screen guide that lists what shows are on TV) to work with your cable box. The G-LINK cable will not work until the GUIDE Plus+ system is set up. (Setting up the GUIDE Plus+ system is explained in “Step 8: Set Up the GUIDE Plus+ System,” later in this section.
Setup and Connections Step 6: Plug in the TV/VCR Plug the power cord into the wall outlet, matching the wide blade of the plug with the wide slot in the outlet. Be sure to insert the plug completely. Step 7: Turn on the TV/VCR Press POWER on the front of the TV/VCR or press TV or VCR on the remote. The indicator in the POWER button on the front of the TV/VCR will light when the TV/VCR is on. The first time you turn on the TV/VCR, you will be asked to set up the GUIDE Plus+ system.
Setup and Connections To complete GUIDE Plus+ setup, the G-LINK cable must be properly attached to your cable box if you have one. See “Step 5: Connect the G-LINK Cable,” later in this section. Select your country and enter your ZIP or Postal code. For Canada, use CH ^ and v to select letters. The next series of screens asks you about your cable TV setup. If you have a cable box, you must set the GUIDE Plus+ system to control it. Otherwise, it will not be able to locate and download program information.
Setup and Connections Once the correct model of cable box has been identified, you need to set the cable box’s output channel. Enter the channel you use to view channels through your cable box— usually 3 or 4. Consult your cable box’s instruction book or your cable company if you are not sure. Choose 0 to use VIDEO INPUT. The last screen comes up when you’ve successfully finished the GUIDE Plus+ setup. Remember: • Leave your cable box turned ON to download program information.
Setup and Connections TV/VCR MAIN MENU Step 9: Set Up the rest of the TV/VCR Select the Language This feature lets you select English, Spanish, or French as the language for your on-screen displays. 1. Press MENU on the remote to display the TV/VCR Main Menu. 2. Press 1 to display the Screen menu. 3. Press 3 to toggle the menu language between English, Spanish and French. The default menu language when you first turn on the TV/VCR is English.
Setup and Connections Set the Signal Type (Optional) Note that if you have set up the GUIDE Plus+ system, Signal Type will not be available. The TV/VCR automatically selects the signal type (cable or antenna) when you run the Auto Channel Search. If you want to change the signal type, follow the directions below. 1. Press MENU on the remote to display the TV/VCR Main Menu. 2. Press 5 to display the Setup menu. 3. Press 5 to toggle the Signal Type between Antenna and Cable.
Setup and Connections Set the Time and Date (Clock) Note that if you have set up the GUIDE Plus+ system, the Time menu will not appear. Note that the only time you need to set the clock is when you’re not using cable (or a cable box). To set the clock: 1. Press MENU on the remote to display the TV/VCR Main Menu. 2. Press 2 to display the Time menu. 3. Press 1 to display the Set Time and Date screen. 4. Use the number buttons on the remote to enter the time. • 5. 6.
Using the Remote Using your Universal Remote Theuniversalremotecanbeprogrammedtocontrolmost brandsofremotecontrollableVCRs,satellitereceivers,and cableboxes.IfyouhaveanRCA,GE,orPROSCAN component ,youpro babl ydon’ tneedt oprogramita 1 Setup and connections 2 Using the Remote 3 Operating Instructions Using the remote 4 4 4 Using the Menu System Features and Controls ➣ Thissectiondefinesthebuttonsoftheremoteandhowto programittocontrolothercomponents. tall.
Using the Remote Remote Control Buttons LED ON•OFF When in TV/VCR mode, turns the TV/VCR on and off. If in another device mode (VCR, DVD, Satellite, etc.) and programmed, will turn the device on and off. When pressed twice within two seconds, all devices that are on will be turned off (this feature only works with most RCA, GE, and PROSCAN products). TV DVD ON•OFF VCR1 VCR1 Puts the remote in VCR mode. Turns on the TV/VCR and puts the remote in TV/VCR mode.
Using the Remote CLEAR Removes any menu or display from the screen and returns you to TV viewing. Also exits the GUIDE Plus+ menu system. Allows you to change menu entries or clear a timer recording. Resets time counter to 0:00:00 when displayed. Number Buttons (0-9) Enters channel numbers, digits for programming the remote, and time settings directly though the remote control. To enter a two-digit channel, press the two digits.
Using the Remote Programming the Remote The universal remote can be programmed to control most brands of remote controllable VCRs, satellite receivers, and cable boxes. The remote is already programmed to control most RCA, GE, and PROSCAN TVs, VCRs, DVD players, laserdisc players, and satellite receivers. Testing the Remote To determine whether the universal remote needs to be programmed, turn a device ON, such as a DVD player, point the remote at the DVD player, and press the DVD button.
Using the Remote Using Direct Entry 1. Turn on the component to be programmed. 2. Look up the brand and code number(s) for the component on the code list on the last page of this section, “Using the Remote.” 3. Press and hold the appropriate component button (VCR1, DVD, VCR2, AUX, SAT•CABLE). 4. While holding the component button, enter the code from the code list. 5. Release the component button, and then press ON•OFF to see if the component responds to the remote commands.
Using the Remote VCRs Admiral ................................................................................. 2131 Adventura ............................................................................. 2026 Aiko ....................................................................................... 2027 Aiwa ............................................................................ 2002, 2026 Akai ............ 2003, 2004, 2005, 2007, 2008, 2111,2112, 2113 American High .................................
Operating Instructions Using your TV/VCR Playingatape. • Usingtheplaybackfeatures. • Recording. • Copyingandeditingtapes. 2 Using the Remote Interactive Setup 3 Operating Instructions Usingthe theremote remote Using 4 4 4 Using the Menu System Features and Controls ➣ • Setup and connections Setup and connections ➣ ThissectionwalksyouthroughallthethingsyourTV/VCRcan do.
Operating Instructions How to Play a Tape 1. Insert a tape in the TV/VCR. PLAY 0:00:00 The TV/VCR automatically turns on. The tape automatically begins to play if the safety tab on the cassette has been removed and the Auto Play feature has been turned on. 2. Press PLAY, if necessary. The word Play and the time counter appear on the screen. 3. If necessary, while the tape is playing, press TRACKING + or - on the remote or CH ^ or v on the TV/VCR to remove any streaks from the picture. 4.
Operating Instructions Using the Playback Features Pause This feature pauses the tape during playback and allows you to examine the details of the scene. Pause works best with tapes recorded in SLP speed. 1. Press PAUSE during playback to pause the action. The TV/VCR will automatically switch from pause to stop after a few minutes to prevent tape wear. 2. Press PAUSE or PLAY to return to normal playback.
Operating Instructions Automatic Tracking The TV/VCR has automatic tracking which adjusts the picture when playing a tape that was recorded on another VCR. Automatic tracking is turned on whenever a tape is inserted or the TV/VCR’s power is turned on. DVD Manual Tracking AUX SAT•CABLE VCR2 When streaks or snow appear in the picture during normal playback or slow motion, press TRACKING + or - on the remote or CH ^ or v on the TV/VCR for the best possible picture.
Operating Instructions Auto Play Feature This feature enables the TV/VCR to automatically start playing a tape when it is inserted. (The safety tab on the tape must be removed.) 1. Press MENU to display the TV/VCR Main Menu. 2. Press 5 to display the Setup menu. 3. Press 4 to change the Auto Play setting. The Auto Play feature is set to On at the factory. • Select On if you want a tape with its safety tab removed to start playing automatically.
Operating Instructions Index Search The TV/VCR automatically records index marks on the tape each time you begin recording. During playback you can locate the program you want to play by the number of index marks. Your TV/VCR has two index playback features. You can select a specific index number or search by scan and play. To Select Scan and Play Index Playback: Press REW or FF to begin search OR Enter a specific Index Number -- 1. Insert the pre-recorded tape and press STOP. 2.
Operating Instructions Zero Search This feature allows you to quickly return to a time counter reading of 0:00:00. This is especially convenient when you want to watch a segment of the tape several times. 1. Insert the pre-recorded tape and press STOP. 2. Press INFO on the remote twice to display only the time counter. 3. Use PLAY, FORWARD, or REVERSE on the remote to locate the start of the segment you want to repeat. 4. Press CLEAR to reset the time counter to 0:00:00. 5.
Operating Instructions Recording Features Recording Speeds Press SPEED to select a recording speed. • SP (Standard Play) gives the best quality recording; consequently, fewer programs can be recorded on the tape. Most pre-recorded, rental tapes are recorded in SP. • LP (Long Play) gives twice the recording time of tapes recorded in SP. Special effects such as pause, slow motion, picture search, and frame advance are not recommended in this speed.
Operating Instructions Basic Recording The GUIDE Plus+ system recording timer will override the VCR eight-event timer, and Sleep or Wake-up timers if you have set conflicting timed events in the GUIDE Plus+ system. If the VCR-timed recordings are already in progress, they will be interrupted and the GUIDE Plus+ system-timed recording will begin as scheduled. 1. Insert a tape with safety tab in place. The TV/VCR will turn on. 2. Press SPEED to select a recording speed. The tape speed indicator appears.
Operating Instructions To stop an express recording in progress: • Press and hold STOP/EJECT on the TV/VCR or STOP on the remote to stop the express recording. — OR — • Repeatedly press REC•VCR+ until Record Length: 0:00 appears. The recording stops after a few seconds. Timer Recording The GUIDE Plus+ system recording timer will override the VCR eight-event timer, and Sleep or Wake-up timers if you have set conflicting timed events in the GUIDE Plus+ system.
Operating Instructions • If you turn the TV/VCR off, the TIMER indicator will flash if there is no cassette in the TV/VCR or the safety tab is missing from the cassette. 10. If using a cable box, turn it on and tune it to the channel you want to record before time for the recording to begin. To check or clear a timer recording: TV/VCR MAIN MENU 1 2 3 4 5 6 Screen Time Timer Recordings Parental Controls TIMER RECORDINGs Setup GUIDE Plus+ 1 Create a Menu New Program 2 Review Existing Programs 0 Exit 1.
Operating Instructions 6. Press PAUSE on both the VCR or camcorder and the TV/VCR’s remote at the same time to begin copying the tape. 7. Edit out segments that you do not want to copy by pressing PAUSE on the TV/VCR’s remote to pause the tape. Then, locate the next segment you want to copy on the playback VCR or camcorder by using FORWARD, REVERSE, or PLAY. Press PAUSE on the playback VCR or camcorder. Press PAUSE at the same time on both the VCR or camcorder and the TV/VCR’s remote to resume copying.
Features and Controls USING the Features and Controls • On-screen displays. • The GUIDE Plus+ Menu system. • Parental controls, including V-Chip rating limits. 1 Setup and connections 2 Using the Remote 3 Operating Instructions 4 Features and Controls 5 Reference ➣ This section introduces you to the features and controls with which your TV/VCR is equipped.
Features and Controls Using On-Screen Displays When you change channels, adjust volume, or use a VCR feature, on-screen displays appear to let you know the status of the TV/VCR. Ch 08 Pressing INFO with no tape inserted: 2/12/00 Sat 08:43AM SLP Calling Up On-Screen Displays 1. 2. Press INFO to display the function, time counter, date, time, and tape speed. If you do not press INFO again, these displays will time out and disappear.
Features and Controls About Closed Captioning The closed captioning feature displays the audio portion of a program as text on the TV screen. This is useful to the hearing impaired or anyone who wants to watch a program without sound. There are four types of closed captions: Caption 1, Caption 2, Text 1 and Text 2. Caption 1 displays the full translation of the primary language in your area. Caption 2 may be used as a second source for secondary languages.
Features and Controls Ch 08 Sleep Timer Using Sleep Timer 0:30 The sleep timer automatically turns the TV/VCR off after 30, 60, 90, or 120 minutes. 1. Press MENU on the remote to display the TV/VCR Main Menu. 2. Press 2 to display the Time menu. 3. Press 1 to display the Sleep Timer screen. 4. Press CH ^ or v to select 30, 60, 90, or 120 minutes. While watching a program, press INFO to check the amount of time remaining before the TV turns off. 5.
Features and Controls 5. Press MENU to set the timer. • The wake-up timer will turn on the TV/VCR every day. The WAKE-UP indicator light on the front panel is illuminated when the wake-up timer is set. • Once the TV/VCR is turned on by the wake-up timer, the unit automatically turns off after 60 minutes if no buttons are pressed. Note: When the wake-up timer turns on the TV/VCR, the volume level does not change from when the TV/VCR was last turned off. 6.
Features and Controls Parental Controls and V-Chip The Parental Controls menu allows you to program your TV/VCR so that children cannot see certain programs. The first three choices in the Parental Controls menu involve a feature inside your TV/VCR called V-Chip which allows you to “block” TV programs and movies based on violence, sex, or other content you may believe children should not view. In other words, it lets you program your TV so it will not display certain programs.
Features and Controls Setting TV Rating Limits TV/VCR MAIN MENU 1 2 3 4 5 6 1. Press MENU on the remote to display the TV/VCR Main Menu. 2. Press 4 to display Parental Controls menu. 3. Press 1 to display the V-Chip TV Rating Limit screen. 4. Use the number buttons (1-7) to change the status of a TV program rating.
Features and Controls Blocking Age-Based Ratings You can automatically block all program ratings above a specified age-based rating level. For example, if you only want your child to watch programs that have a TV-G rating and lower (in other words, you want the child to watch TV-G, TV-Y7, and TV-Y), then you need to block out other programming with higher ratings. To block programs: 1. Determine the lowest level rating you do not want the child to watch. 2.
Features and Controls Blocking Specific Content Themes You can block programs based on their content. (Content is represented by the D, L, S, V, and FV on your screen.) When you block a content theme for a particular rating, you automatically block that content theme for higher-rated programs as well. For example, if you do not want your child to watch programs that have adult language (L) rated TV-PG or higher, then you would also block out all programming TV-PG and above containing adult language.
Features and Controls Setting Movie Rating Limits You set movie rating limits by blocking movies rated above a specified level. To access the V-Chip Movie Rating Limit menu: 1. Press MENU to access the TV/VCR Main Menu. 2. Press 4 to display the Parental Controls menu. 3. Press 2 for the V-Chip Movie Rating Limit screen. 4. Use the number buttons (1-2) to change the status of a movie rating. Remember: You must lock your Parental Controls settings for rating limits to take effect.
Features and Controls TV/VCR MAIN MENU Blocking Unrated TV Programs Some TV programs are not rated but may contain material you do not want your children to see. These programs must be blocked separately. 1. Press MENU to display the TV/VCR Main Menu. 2. Press 4 to display the Parental Controls menu. 3. Press 3 to select Unrated Programs from the menu and to toggle between View and Block.
Features and Controls Using the Guide PIUS+ system The GUIDE Plus+ system is an interactive on-screen program guide that lists TV schedules for your area and allows your TV direct control of a cable box and VCR. You must first set up the GUIDE Plus+ menu in order to view it. To bring up the GUIDE Plus+ screen, press GUIDE.
Features and Controls Getting In & Out of the Guide PiUS+ System ON•OFF VCR1 TV To enter the GUIDE Plus+ system, press GUIDE on the remote. DVD AUX SAT•CABLE VCR2 There are three ways to exit the GUIDE Plus+ system: Press OK to exit the GUIDE Plus+ system and tune to the channel highlighted in the Channel listing. • Press GUIDE to exit the GUIDE Plus+ system and tune to the channel displayed in the background.
Features and Controls Grid Guide Grid Guide Action Buttons The Grid guide appears each time you enter the GUIDE Plus+ system. It displays the current programming for each channel. The live program is displayed in the video window. • Use the up and down arrows to browse Channel listings and CH ^ and v to page through listings. Use the right and left arrows to browse future Program listings. • To tune to a channel, highlight the program you want to view in the Channel listing and press OK.
Features and Controls Sort Sort Menu Action Buttons The Sort menu lets you browse programs by category. The channel to which you are currently tuned is displayed in the background. To sort: 1. Press MENU to highlight the Menu bar. 2. Use the arrows to highlight Sort. When Sort is highlighted for the first time, the Movies category is displayed. Thereafter, the last category used becomes the default. A listing of subcategories is displayed below the category name. Sort Menu Selection Categories 3.
Features and Controls News The News menu lets you browse current news stories by headline. 1. Press GUIDE (the GUIDE Plus+ system appears). Then press MENU to select the menu bar. 2. Use the arrows to highlight News. 3. Use the up and down arrows to highlight a story. • Use the up and down arrows to browse one list at a time. • Use CH ^ and v to browse through the list one page at a time. 4. Press the right arrow button to see full text. 5.
Features and Controls Schedule Menu Action Buttons When viewing the Schedule menu the following Action buttons will appear on the bar: • Remove/Stop Highlight the Watch or Record timer you wish to remove from the Schedule and press 1 on the remote. • Change Highlight the Watch or Record timer you wish to change and press 3 on the remote to toggle the frequency between the following choices: Daily Records the same program each day Monday-Friday. Once Records only on that day.
Features and Controls Editor You may customize the Channel listing by enabling or disabling the display of certain channels. For instance, you may disable channels that you never watch. You can restore disabled channels at a later point in time. 1. Press GUIDE to bring up the GUIDE Plus+ system. 2. Press MENU to highlight the Menu bar. 3. Use the right and left arrows to highlight the Editor menu selection. 4. Use the up and down arrows to select a channel.
Reference Getting Assistance 1 Setup and connections 2 Using the remote 3 Operating Instructions 4 Features and Controls 5 Reference ➣ This section provides information you may need for guidance while using your TV/VCR. It gives you specific information about the front panel and back panel, care and cleaning information, a limited warranty, and an index.
Reference Front Panel 4-HEAD A U D IO IN W A K E U P V ID E O IN T IM E R P O W E R S TO P / E JE C T R E C R E W P LA Y F F W D V O L- V O L+ C H C H P A U S E 4-HEAD W A K E U P T IM E R P O W E R S TO P E JE C T R E C R E W P LA Y F F W D V O L- V O L+ C H C H P A U S E A U D IO IN V ID E O IN AUDIO IN and VIDEO IN Jacks Receives audio and video signals from another component (such as a VCR or camcorder) that is connected to these jacks.
Reference Back Panel To view the device you have connected to the AUDIO/VIDEO jacks, press 00 once to display VIDEO 1. VIDEO and AUDIO INPUT Jacks Receive signals from another component (such as a VCR or camcorder) that is connected to these jacks. Be aware that the back panel’s Audio/Video jacks are disabled when you connect a device to the front panel’s Audio/Video jacks. IN FROM ANTENNA Jack Receives the signal from an antenna or cable system.
Reference No sound • Press VOL ^ to increase the sound. • Sound has been muted. Press MUTE or VOL ^ on remote. Snow or streaks in picture or no picture during tape playback • Check tape — it may be worn out or of poor quality. Try another tape. • Some snow/streaks are normal during search, pause, frame advance, and slow-motion playback. • Press one of the TRACKING buttons on the remote or CH ^ or v on the TV/VCR to move the streaks up or down and out of the picture.
Reference TV/VCR makes noise when stopped • TV/VCR is removing tape from heads. This is normal. The head cylinder inside the TV/VCR will continue to rotate for a few minutes after you put the VCR in the stop mode. Will not Auto Channel Search active channels correctly • Check antenna or cable connections. • You cannot add or remove channels from the TV/VCR’s memory if you’re using a cable box and have set up the GUIDE Plus+ system.
Reference Parental Control password does not work • Reset Parental Control password. Front panel buttons won’t work • When the GUIDE Plus+ system is recording, front panel buttons are inoperative. Not receiving all cable channels • Make sure you have set up the GUIDE Plus+ menu to recognize your cable box. Select GUIDE Plus+ Menu from the Main Menu, then select Setup from the GUIDE Plus+ menu. Choose Yes when asked if you have a cable box. Then select Setup from the Main Menu and run Auto Search.
Reference Limited Warranty What your warranty covers: • Any defect in material or workmanship. For how long after your purchase: • Ninety days for labor charges. • One year for parts. • Two years for picture tube. (The warranty period for rental units begins with the first rental or 45 days from date of shipment to the rental firm, whichever comes first.) What we will do: • Pay any Authorized RCA VCR Service Center the labor charges to repair your TV/VCR.
Reference Accessory Information Antenna (or cable-TV) connections are made with either coaxial antenna cable or twin-lead cable. Coaxial cables are shielded so they are less susceptible to hum or interference from adjacent cables. The following accessories are available from most dealers and electronics supply stores in case you want to position your components farther apart or need additional cables.
Reference ON•OFF VCR1 DVD Accessory Order Form TV AUX SAT•CABLE VCR2 MUTE SEARCH VOL VOL CH + CH SPEED GO BACK GUIDE INFO Remote Control replacements or spares can be ordered as needed. Description Screw-on antenna cable (3-ft) Part No. VH81 Price Qty $3.95 Screw-on antenna cable (6-ft) VH82 $5.95 Push-on antenna cable (6-ft) VH89 $5.95 Monaural VCR Dubbing Cable (6-ft) VH83 $5.95 Stereo VCR Dubbing Cable (6-ft) VH84 $9.95 S-Video Cable (6-ft) VH976 $7.
Reference Charge your order on your VISA, MasterCard, or Discover Card by filling in below Placing an Order To place your order by phone, have your Visa, MasterCard, or Discover Card ready and call the toll-free number listed below. USE YOUR CREDIT CARD ® IMPORTANT: Copy complete account number from your VISA card Use this number only to place an order for accessory items listed on this order form.
Reference Index A F P Accessories 58 Advance Finding the sensor 8 First time TV/VCR is turned on 9 Frame advance 23 Front panel 52 Parental controls 38 G Play G-LINK cable 4, 8 GUIDE Plus+ system 9, 44 Play a tape 22 Frame 23 Advertisement GUIDE Plus+ system 50 Age-based ratings 40 AUDIO IN jacks 52 Auto play 25 Auto repeat 25 Autodisplay Automatic Tracking 24 Automatic head cleaner 28 B Back panel 53 Basic recording 29 Batteries for the remote 4 Blank search 27 Cable box 6 Camcorder 7 Camcor
Please do not send any products to the Indianapolis address listed in this manual or on the carton. This will only add delays in service for your product. The following materials were used in printing this publication: 10330 North Meridian Street Indianapolis, IN 46290 ©2000 Thomson Consumer Electronics, Inc.