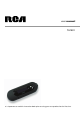
user manual TH1401 It is important to read this instruction book prior to using your new product for the first time.
Table of Contents Quick reference ........................................................................................................................................... 3 Important Information ............................................................................................................................... 4 End User License Agreement ..................................................................................................................... 6 Before You Begin ....................
Advanced Features ................................................................................................................................... 34 Upgrading your Player ................................................................................................................... 34 Formatting the player .................................................................................................................... 35 Additional Information .....................................................
Important Information CAUTION RISK OF ELECTRIC SHOCK DO NOT OPEN THE LIGHTNING FLASH AND ARROWHEAD WITHIN THE TRIANGLE IS A WA R N I N G S I G N ALERTING YOU OF "DANGEROUS VOLTAGE" INSIDE THE PRODUCT. CAUTION: TO REDUCE THE RISK OF ELECTRIC SHOCK, DO NOT REMOVE COVER (OR BACK). NO USERS E RV I C E A B L E PA R T S I N S I D E . R E F E R S E RV I C I N G TO QUALIFIED SERVICE PERSONNEL.
Important Information FCC Regulations state that unauthorized changes or modifications to this equipment may void the user’s authority to operate it. FEDERAL COMMUNICATIONS COMMISSION INFORMATION This device complies with Part 15 of the FCC Rules. Operation is subject to the following two conditions: (1) This device may not cause harmful interference, and (2) this device must accept any interference received, including interference that may cause undesired operation.
End User License Agreement IMPORTANT: READ CAREFULLY BEFORE DOWNLOADING OR INSTALLING THIS SOFTWARE! THIS END USER LICENSE AGREEMENT (THIS “EULA”) IS A LEGAL AGREEMENT BETWEEN YOU AND THOMSON INC., OR ANY THOMSON GROUP ENTITY, AS DEFINED BELOW (COLLECTIVELY “THOMSON ENTITY”), FOR THE RCA OR THOMSON BRANDED PORTABLE DIGITAL AUDIO/VIDEO DEVICE APPLICATION/DRIVER SOFTWARE PROGRAM AND ASSOCIATED DOCUMENTATION, IF ANY (COLLECTIVELY, THE “PROGRAM”).
End User License Agreement NOT ALLOW THE EXCLUSION OR LIMITATION OF LIABILITY OF CONSEQUENTIAL OR INCIDENTAL DAMAGES, THE ABOVE LIMITATION MAY NOT APPLY TO YOU. (b) YOU ASSUME RESPONSIBILITY FOR THE SELECTION OF THE APPROPRIATE PROGRAM TO ACHIEVE YOUR INTENDED RESULTS, AND FOR THE INSTALLATION, USE, AND RESULTS OBTAINED. 7.
Before You Begin Dear RCA Customer, Thank you for purchasing the RCA Player. This player will play open mp3 and Windows Media™ audio (WMA) content as well as content purchased from most online music download services. After purchasing and downloading music to your PC, you are now ready to move content to your player. To transfer the music to your player, you may use Windows Media Player or the application recommended by the online music download service.
Before You Begin Things to consider before you get started... Computer system requirements • • • • • • • • • Pentium III 500MHz or higher recommended Microsoft Windows® XP or Windows® 2000 Internet Explorer 6.0 or higher Internet access (broadband recommended) 250MB free hard disk space for the software 128MB RAM (256MB recommended) CD drive capable of digital audio extraction USB port (2.0 recommended) Sound card Warning Use of this player is for your personal use only.
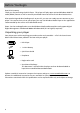
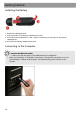
Getting Started Installing the Battery 1. Remove the USB port cover. 2. Push and slide out the battery compartment cover. 3. Install the battery. Match the + and - signs on the battery to the signs on the battery compartment. 4. Re-install the battery compartment cover. Connecting to the Computer Caution: BEFORE YOU START • Make sure that the player is off and disconnect the earphones. • Make sure the player is not locked.
Getting Started 1. 2. 3. 4. Remove the USB port cover and disconnect the earphones. Connect the player to one of your computer’s USB ports. The screen displays “USB Connected”, indicating that the player is in USB mode. On your computer’s desktop, right-click on the My Computer icon and select Explore. The player will be automatically recognized as a removable media device (Microsoft® Windows® 2000 and XP). 5. Transfer files to or from the player using Windows Explorer.
Getting Started Powering ON/OFF Caution: Before turning on the player, make sure the player is not locked. If your player is locked when you power it on, the screen displays “Locked” and your player automatically turns off after a few seconds. To unlock it, simply slide the hold switch backwards. • To power on your player, press briefly . • To power off, press and hold until the progress bar is full and the screen turns black.
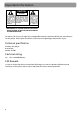
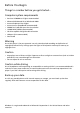
Controls and Display Controls 3 1 4 2 5 6 9 7 10 11 8 12 13 1. HOLD (hold switch) • Slide to lock the controls and prevent any accidental operation while recording or playing. • Slide backward to unlock. 2. MIC Microphone Play / Pause / Power On 3. • Press to turn the player on. • In playback mode, press to play a track. During playback, press to pause and again to resume playback. • In browsing mode, slide up/down/right/left to scroll. 4.
Controls and Display 7. – Volume down • Slide the button to – to decrease the volume level. 8. USB Port Cover 9. M Menu button • Press to access the Main Menu (Music, Record, Voice, Navigation, Settings). 10. Stop / Power Off • Press to stop playback. Press and hold to turn the player off. 11.Battery compartment 12.Headphone jack 13.Neck strap hole Display 1. Play/Pause/Stop/Rec status 2. File number / Total files 3. Repeat mode 4. Equalizer mode 5. Synchronous lyric display 6. Battery indicator 7.
Transferring Music Installing Windows Media Player It is recommended that you install Windows Media Player to enjoy all the features of your player: Download the appropriate version from Microsoft’s website: 1. In “Select Download”, choose Windows Media Player. 2. In “Select Version”, select the appropriate version: Player 10 (for Windows® XP) Player 9 Series (for Windows® 2000) 3. Follow the instructions to finish the download. 4.
Transferring Music Note: The instructions below apply to Windows Media Player 10. If you are using another version, please refer to the Help section on your program. Adding Audio Files to your Media Library Windows Media Player will automatically gather all mp3 and/or wma files on your computer into a media library, where they can be played, edited, burned to CD, or copied to your digital audio player. 1.
Transferring Music Converting CD tracks to MP3 Converting CD tracks to mp3 is often called “ripping a CD”. Use Windows Media Player to build your music library by encoding your audio CDs to music files. 1. On your computer, open Windows Media Player 10 and click on the small triangle in the upper right corner. From this menu, select Tools and then Options.... 2. In the Options dialogue box, click on the Rip Music tab. Under Rip settings, set the Format to mp3.
Transferring Music Note: WMP10 is now properly set up to convert audio tracks from CD to mp3 files. WMP10 can also retrieve the album, title, artist name and track names from the Internet. This kind of information, also called ID3 tag, will automatically be added if you have an active Internet connection, or you can add it manually. This information, which will be embedded in the mp3 or wma files, will be used to store the files in their own folders with clear names. 4.
Transferring Music 7. Once all the tracks are “Ripped to library”, the CD can safely be taken out from your drive. 8. When finished, Windows Media Player will automatically add the new tracks to your library. You can change your track encoding options by selecting Tools > Options > Rip Music. Converting CD tracks to WMA By default, Windows Media Player 10 will convert your audio tracks to WMA file format (Windows Media Audio).
Transferring Music Transfer Audio Files to your Player Caution: BEFORE YOU START: • Make sure that your player is off and disconnect the earphones. • Make sure the player is not locked. If the player is locked when you power it on, the screen displays “locked” and the player will automatically power off after a few seconds. • The instructions below apply to Windows Media Player 10. If you are using another version, please refer to the Help section on your program. 1.
Transferring Music Lyrics Edit The player supports lyric files in LRC format. 1. Prepare the mp3 or wma music file you want to edit, for example “happymusic.mp3”. 2. Download the corresponding lyric file from the Internet. The file must be in the LRC format, for example “happymusic-2004.lrc”. 3. Rename the lyric file in its original mp3 name (“happymusic.lrc”) and copy both files and lyrics to the player. 4.
Using your Player as Mass Storage Device Instead of using Windows Media Player, you can simply drag and drop files to the player, which appears as a removable hard drive on your computer. Using this method, any type of file (homework, presentations, pictures, etc.) can be placed on the player as if it were a portable drive. However, only mp3 and wma files will playback while stored on the player. 1. Connect the player to your computer. 2. Double-click on the My Computer icon on your Windows desktop.
Using your Player as Mass Storage Device Performing a backup It is recommended that you regularly backup your player’s contents to a different location (on your computer, CDs, DVDs...). In that way, you will be able to use the backup copies of your files if you loose them accidentally, format your player or perform a firmware upgrade. 1. Repeat steps 1 to 3 in the previous section. 2. Drag and drop the files stored on your player to the disk or drive where you want to store the duplicate copy. 3.
Creating Playlist Folders Before transferring your music files to your player you can organize them into folders and create your own playlists. 1. In My Computer, click on File. Point to New and click on Folder. You can also create a new folder by clicking a blank area in the window, pointing to New, and then clicking Folder. 2. 3. 4. 5. Type a folder name and press Enter. Copy your music files to the folder. Repeat these steps to create folders and sub-folders.
Playback Listening to your mp3/wma Music Files 1. Follow the instructions for the transfer of data to and from the player to copy your music files to your player. 2. Install the supplied battery into the battery compartment and connect the supplied earphone(s) to the earphone jack. 3. Press to power on the player and press again to start the playback. 4. Slide to or to skip to the previous or next file. Slide and hold during playback to fast rewind or forward a file.
Playback Synchronizing Lyrics Display The player supports lyric files in LRC format. Refer to page 21 for more information. When lyrics are available for music files, the LRC icon displays and the lyrics display synchronously on the screen while the music is playing. Note: Make sure the music and lyric files are saved in the same directory and under the same file name.
File Browsing • • • • To enter the Menu, press M. To browse the menu items, slide to or . To enter a menu or apply a choice, press . Press and hold M briefly and release it to return to the normal playback screen. Menu Structure Menu Screen display For details: Music page 24 Record page 28 Voice page 30 Navigation page 27 Settings page 31-33 Navigation The navigation menu allows you to browse and manage the folders and files stored in your player. 1.
File Browsing Warning: Erased files cannot be recovered. Make sure you have a backup before you proceed. Note: You can create up to 50 directories organized in up to 19 sub-folders, and store up to 300 music files on your player. If you create or store more files and folders, the extra items will be ignored. You can store up to 254 files in one directory. If you store more than 254 files in one directory, you will only be able to view the first 254 in navigation mode.
Recording 2 3 4 1 5 6 1. 2. 3. 4. 5. 6. Recording status Elapsed time Total time Remaining time Folder name File name Recording from the Built-in Microphone The player allows you to record from the built-in microphone. Note the location of the built-in microphone. 1. Press M and select Record from the Menu. 2. Slide to or to highlight Yes and press to confirm. The recording starts automatically. 3. Press or M to stop recording and enter the voice mode.
Recording 3. Select the sampling frequency of your recording. A higher recording sampling frequency brings better recording quality but will use more storage space. Sampling Frequency 8000 Hz 11025 Hz 16000 Hz 22050 Hz 32000 Hz Maximum recording time TH1401 64 hours 46.4 hours 32 hours 23.2 hours 16 hours Maximum recording time TH1402 128 hours 92.8 hours 64 hours 46.4 hours 32 hours Playback of Microphone Recordings 1. Select Navigation from the menu and browse for the VOICE folder. Press 2.
Settings Adjust Settings To navigate in the Settings menu: 1. Press M to enter the menu. 2. Select settings from the menu and press . 3. Slide to or to select the setting you wish to adjust and press to confirm. 4. Press and hold M briefly and release it to return to the normal playback screen. Equalizer The Equalizer (EQ) setting is used to adjust the music playback effect. 1. To change the equalizer setting, select Equalizer from the settings menu. To navigate, follow the steps described above. 2.
Settings Contrast To adjust the display contrast: 1. Select Contrast from the settings menu. To navigate, follow the steps described above. 2. Slide to or to adjust the level. Press to apply and return to the settings menu. Backlight - Timer Adjustment After being idle for a few seconds, the device can automatically turn off the backlight to save power. To wake the backlight up, just press any button. 1. Select Backlight from the settings menu. To navigate, follow the steps described on page 31. 2.
Settings Default Settings You can reset all settings to factory default settings. 1. Select Default from the settings menu. To navigate, follow the steps described on page 31. 2. Press or M to load the default settings to your player. Language You can display the interface of your player in several languages. 1. Select Language from the settings menu. To navigate, follow the steps described on page 31. 2.
Advanced Features Upgrading your Player (Firmware update) Should you encounter problems with your player, you may be able to repair it yourself by updating its firmware. Firmware updates can fix bugs in the player and improve its performance. You should regularly check the RCA Website www.rcaaudiovideo.com for the latest Firmware updates available. Downloading the upgrade and installing it on your player is easy and will only take a few minutes.
Advanced Features Formatting the Player 1. Connect the player to the computer. 2. Right-click on the player icon in My Computer and select Format. 3. Click on Start in the format window, and then click on OK to start formatting the mp3 flash memory. Warning: Formatting will erase all files on your player. Make sure you have a backup before you proceed.
Additional Information Troubleshooting • The display shows nothing after turning on the player. – Check to see if the battery has been inserted. – Check to see if the battery needs replacement: Try reinserting the battery correctly or replace it.If it still does not work, put the player in recovery mode: 1. Take out the battery from the battery compartment. 2. Press and hold . Do not release it until step 4. 3. Plug the player into the USB port of your computer. once the computer has detected the player. 4.
Additional Information Specifications Hardware • Dimensions: 82mm H, 27 mm W, 20 mm D / 3.3 (H), 1.1 (W), 0.8 (D) inches • Unit Weight: 24 g / 0.85 oz • Battery Operated: 1 x AAA battery.
Additional Information Signal to Noise Ratio • >85 dB, A-weighted Frequency Response • 20 Hz ~ 20 kHz Total Harmonic Distortion Output • => THD (<0.1%) Check for updates Visit http://www.rcaaudiovideo.com for the latest news and firmware upgrades for our digital media player.
Additional Information Limited warranty (US) What your warranty covers: • Defects in materials or workmanship. For how long after your purchase: • One year from date of purchase. The warranty period for rental units begins with the first rental or 45 days from date of shipment to the rental firm, whichever comes first. What we will do: • Provide you with a new, or at our option, a refurbished unit. The exchange unit is under warranty for the remainder of the original product’s warranty period.
Thomson Inc. P.O. Box 1976 Indianapolis, IN 46206-1976 © 2007 Thomson Inc. Trademark(s) ® Registered Marca(s) ® Registrada(s) Marque(s) ® Deposée(s) www.rcaaudiovideo.com v2.