---------.
Important Information 1 WARNiNG 1 To reduce the risk of fire br shock hazard, do not expose this VCR to rain or moisture. TO REDUCE THE RISK OF ELECTRIC SHOCK, DO NOT REMOVE COVER (OR BACK). NO USER SERVICEABLE PARTS INSIDE. REFER SERVICING TO QUALIFIED SERVICE PERSONNEL. psKoFmsKac p!!!!!y This symbol indicates “dangerous voltage” inside the product that presents a risk of electric shock or personal injury. A I A This symbol indicates important instructions accompanying the product.
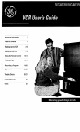
Table of Contents Important Information Warnings, Cautions, Note to Cable TV Installer, and Product Registration- Hooking i Up the VCR Choosing a Hookup Antenna or Cable System Without a Cable Box Cable System With Cable Box to Unscramble All Channels Cable System With Cable Box to Unscramble Pay Channels _ Connecting Two VCRs for Copying Tapes Setting Up the VCR Startup Check Accessories with VCR Insert Batteries in Remote Turn on the TV and VCR Place Channels in the VCR’s Memory Add or Remove Chan
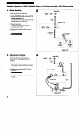
Choosing a Hookup The hookups on pages 3 through 5 are divided into two hookup types: Basic (A) and Advanced (B). The basic hookup shows the backs of TVs that have only an antenna/cable connection. It is the easier of the two and additional accessoriesmay not be needed. The advanced hookup shows the VCR hooked up to a monitor/receiver (TV with audio and video jacks) using a signal splitter. This connection may improve the picture quality as well as convenience of operation.
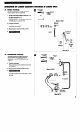
3 AntermaorCableSystem WthoutaCable Box A. Basic hookup. Use this hookup for a simple connection which requires fewer accessories. 1. Set the CH3 CH4 switch on back of VCR to either’ channel 3 or 4. You will tune the TV to this channel and use the lV*VCR button to watch the VCR. 2. Connect as shown. This connection may require additional accessories not provided. 3. Plug in power cords of VCR and TV.. RF Coaxial Cable (supplied) ‘X.“, _ ;, 2: .,.‘j ,, ., I ,: Back of TV B. Advanced hookup.
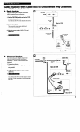
Cable System With Cable Box to Unscramble A. Basic hookup. Use this hookup for a simple connection which requires fewer accessories. 1. Set the CH3 CH4 switch on back of VCR to either channel 3 or 4. You will tune the TV to this channel and usethe TWVCR button to watch the VCR. Cable From Cable All Channels Box RF Coaxial cable of VCR 2. Connect as shown. This connectionmay require additional accessories not provided. 3. Plug in power cords of VCR, TV, and cable box. RF Caaxlal Cable (supplied) 4.
Cable System (such as HBO, ShowWe, With Cable Box to Unscramble Pay Channels Pay-Per-View, eta) A. Basic hookup. Use this hookup for a simple connection which requires fewer accessories. Cable Cable Box x”II,~,II”I”I.xII x-, 1. Set the CH3 CH4 switch on back of VCR to either channel 3 or 4. You will tune the TV to this channel and use the TVWCR button to watch the VCR. RF Coaxial cable Back of VCR 2. Connect as shown. This connection may require additional accessories not provided. 3.
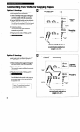
Connecting Option Tbo VCRs for Copying A hookup. Tapes From Use this hookup for a simple connection which requires fewer accessories. Antenna, Cable or Cable Box 1. Select a hookup from pages 2 through 5 and then modify with this connection. Playback 2. Set the CH3 CH4 switch on the playback VCR to either channel 3 or 4. VCR You will tune the recording VCR to this channel to receive’the signal from the playback VCR. RF Coaxial Cable 3. Connect as shown.
Startup I. Check accessories with VCR. Coptact your dealer if any items are missing. 2 “AA” Batteries Remote (Stock No. 221298) 2. Insert batteries RF Coaxial Cable (Stock No. 207417) in remote. 3. Tlurn on the TV. A. Turn on the TV. B. If you used one of the basic hookups, tune the TV to the channel selected with the CH3 CH4 switch on back of VCR. If you used one of the advanced hookups, tune the TV to the TV‘s video input. (See TV owner’s manual for details.) 4. IUrn on the VCR. A.
Startup 5. Place dhannels in the VCR’s memory. Channels 2 through 13 including line input (L) are in the VCR’s memory when you first turn it on. Pressing CHANNEL up or down stops on these channels. To get additional channels available on your antenna or cable system, you must use the Auto-Search Channels feature of the VCR. If you ever change cable or antenna signals, you may need to Auto-Search channels again. A. PressVCR1 to set remote to control VCR. B.
Startup 7. Use TVeVCR button. Skip this step if you used one of the advanced hookups. When using one of the basic hookups, the TWVCR button lets you switch between the picture coming from the VCR or television channels. This button allows you to record a program on the VC.R while watching another channel on the TV. Details are on page 18. A. Press VCR1 to set the remote to control the VCR. B. Press TVWCR to see the picture from the VCR. The VCR indicator lights in the display panel. C.
Buttonis Component Buttons Press one of the buttons TV Turns on a compatible GE, RCA, or ProScan TV and sets the remote to control the TV. OFF 0 Seepage 12. Tv*VCR to operate that component. VCR2 Turns on a compatible GE, RCA, or ProScan VCR and sets remote to control the VCR when it has been setup. See page 12. VCR 2 ‘00 PLAY REW. to set the remote 0 .bb D b F.FWD VCR1 Turns on a compatible GE, RCA, or ProScan VCR and sets remote to control the VCR. STOP El 0 REC-OTR F.
Buttons VCR Function Buttons (continued) PAUSE Pauses action for viewing during playback. REW (Rewind) Rewinds the tape when the VCR is stopped. Pauses recording to prevent recording of unwanted scenes. Searches the picture in reverse motion during playback. PLAY SEARCH Plays a tape. Displays INDEX, TIME and GOTO SEARCH menus on TV. Lets you manually reduce the streaks that may appear on the picture during play or pause. Advances tape 60 or 120 seconds during playback.
Controlling a VCR The VCR’s remote controls two compatible GE, RCA, or ProScan VCRs with the VCR1 and VCR2 buttons. Most compatible VCRs automatically respond to VCR1 without being programmed. If you own two compatible VCRs, test them to see if VCR1 turns on both VCRs. If it does; then you may want to program this VCR to respond to the VCR2 button on the remote. Program the VCR for remote control Set the Remote Control feature of the VCR to the VCR1 or VCR2 position.
Operating Instructions To play a tape 1. Turn on the TV and tune it to channel 3,4, or TV‘s video input to see the picture from the VCR. 2. Insert a tape in the VCR. VCR automatically turns on. Tape automatically begins playback if the safety tab on the cassette has been removed and the Auto Play feature is turned on. Press PLAY, if necessary. Press CHANNEL@TRACKING on the VCR or TRACKING up or down on the remote to remove any streaks from the picture if necessary. Details qre on page 15.
Using the Playback Features Auto Play Feature VCR This feature lets you tell the VCR whether you want it to automatically start playing a tape that is inserted with the safety tab removed. 1. Press MENU*PROG on the remote to see the VCR MAIN MENU on -the TV screen. 2. Press 5 to display the SETUP OPTIONS l SETUP Select ON to have a tape with its safety tab removed start playing automatically. Select OFF if you do not want a tape with its safety tab removed to start playing automatically.
Using the Playback Features DISPLAY Button 1. Press DISPLAY to display the status of the VCR, channel number, time counter, date, time, and tape speed on the TV screen. The time and date must be set before they are displayed. If you do not press DISPLAY again, this display will time out. 2. Press DISPLAY again to continually display the time counter on the TV screen. The time counter will appear instead of the time in the VCR’s display panel (VG4039 only). 3.
Using the Playback Features Time Counter Seconds The time counter shows the actual time it takes to record a program or play back a segment of a prerecorded tape. It helps locate the beginning or end of programs you taped. The time counter resets to 0:OO:OOwhenever the tape is ejected from the VCR. For example, if a 30-minute program was recorded at the beginning of the tape, you would: 1. Insert the prerecorded tape. 2. Press DISPLAY screen. twice to display only the time counter on the TV 3.
Using the Playback Features Time Search The VCR will search forward or reverse the amount of time you select from the location you are on the tape. 1. Insert the prerecorded tape and press STOP. 2. Press SEARCH on the remote twice to display the TIME SEARCH menu on the TV screen. 3. Press number buttons to enter the amount of time in hours and minutes you want the VCR to search. Press CLEAR on the remote to correct an entry. 4. Press F.
Types of Recordings Your VCR provides different types of recording. These types are explained in the following sections: Basic Recording - Operating Instructions One Touch (OTR) Recording Recording While You’re Away VCR Plus+ Recording Timer Recording Using Two VCRs for Copying Tapes Basic Recording To make a recoiding - Operating Turn on the TV and tune it to the VCR viewing Watch channel, either Instructions 3,4, or TV’s video input 1. Insert a tape with safety tab in place. 2.
Recording Recording Features Speeds Press SPEED on the VCR or remote to select a recording select appears on the TV screen. speed (SP, LP, or SLP). The speed you SP (Standard Play) gives the best quality recording: That is why most prerecorded, rental tapes are recorded in SP. Fewer programs can be recorded on the tape. Special effects such as pause, slow motion, picture search, and frame advance work well in this speed. LP (Long hay) gives twice the recording time of tapes recorded SF’.
One Touch Recording (OTR) One touch recording lets you record up to four hours without using the timer program feature. The VCR will turn off automatically at the end of the recording. SPEED Operating I / REC*OTR Instructions 1. 2. 3. 4. 5. 6. Turn on the VCR. Insert a tape with safety tab in place. Select the channel you want to record. Select the desired recording speed using SPEED on the VCR or remote. Press f?EC*OTR to activate recording.
Recording While You’re Away Select Cable or Satellite Box Viewing Channel (Required Onlv if All Channels Are Received From a Cable or Satellite Box) After you select the cable or satellite receiver box viewing channel, the VCR will automatically enter the out&t channel of your cable or satellite box in the VCR PLUS+ and Timer Programming menus as the channel to be recorded. No VCR Plus+ setup is required when you use a cable or satellite receiver box. Operating Instructions 1.
Recording While Away You’re VCR Plus+ Setup for Antenna (Not Requiring a Ca’ble Box) (VCR Plus+* or Unscrambled Recording) Cable Systems A VCR Plus+ channel number is assigned for each broadcast or cable channel. These numbersare listed in most publications that list PlusCode numbers. 1. Prepare a worksheet for the VCR Plus+ channels that are different than the channels you receive them on. Refer to the chart below for standardized VCR Plus+ channel numbers.
Recording While You’re Away (VCR Plus+ Recording) The VCR Plus+ and timer program features let you program the VCR to record up to eight different programs within a one year. period. Before using VCR Plus+ to record a program, make sure that: l The clock is set correctly. l A tape with safety tab has been inserted with enough tape to record the programs. l The remote is set, to control the VCR - using VCR1 (VCR2). l The VCR is setup for VCR Plus+ programming.
Recording While You’re Away (Timer Recording) The timer program and VCR Plus+ features lets you program the VCR to record up to eight different programs within a one year period. Before setting the timer, make sure that: The clock is set correctly. A tape with safety tab has been inserted with enough tape to record the programs. The remote is set to control the VCR - using VCR1 (VCR2). If you receive all channels through a cable box, select a cable box viewing channel on page 21.
Recording Checking While or Clearing Away (Timer Press MENU*PROG on remote to display VCR MAIN MENU on TV screen. 2. Press 3 for Review Programs. Each entered program is displayed for a few seconds in sequence. 4. Recording) VCR Plus+ and Timer Recordings 1. 3. Timer Recording You’re Press MENU*PROG or 3 to display information at a faster pace.
Using Operating ‘Fwo VCRs for Copying InStructions (Refer t0 hookup 0n page and Editing ~Tapes 6.) Use one VCR as the playback VCR and the other as the recording VCR. If you have two compatible VCRs, use the AutoEditTM feature describedbelow. 1. Turn on the TV and VCRs. recording of television programs and other materials may inhinge the rights of 2. Tune TV to the VCR viewing channel, either 3,4, or TV’s video input. 3. 4.
Specifications Format: VI-IS Record/Playback System: Video: Audio: Video Signal System: EIA standard: NTSC color Antenna: 75-ohm external VHF/ UHF combined antenna terminal Tuner: USA: Type: AutoProgramming Power Requirement: 120V AC, 60 Hz Power Consumption: 21 watts Dimensions: 3.5 inches high (89.5 mm) 15.43 inches wide (392 mm) 12.1 inches deep (307.5 mm) Weight: 9.
Location of Controls Front Panel Tape Compartment Remote Sensor REC*OTR (Up or Down) Selects next higher or lower channel in the VCR’s channel memory. Adjusts tracking when a tape is playing. CHANNEL*TRACKING Starts VCR recording. Used for one touch recording (OTR). Remote Sensor Receives signals from the remote control. Aim the remote at this.sensor with no objects between them. EJECT Press when the VCR is stopped to eject the cassette. REWIND Rewinds the tape when the VCR is stopped.
Location of Controls The display panels for two VCRS are shown below. VCR model VG4038 has LED indicators that light according to the status of the VCR. It is not equipped with a clock or channel indicator on the front display panel. VCR model VG4039 has a flourescent digital display that indicates the status of the VCR. This model comes equipped with a clock and channel indicator on the front display panel. Display Panel for VG4038 8I POWER 0 VCR 0 TIMER 0 RECORD i - : 1.-.-.-------...----..-..
Double Checks Sometimes problems can be easily solved by checking a few basic things. Check below before you call for help or take your VCR to an Authorized GE VCR Servicenter. Trouble No power Here’s what to try: -,-_^I__x__._ y_m.,msw-----Pm_*__ -“ex*-* II--II-- __Ix.I-_III,_,-,III1”~~,~~-,~ ^___ j_ _.._, ____^II_y Plug VCR into an operating outlet. Check connections. “~“*~~.,_,_-1___-,,“_^ -,..I,IIQ,mw*-y” ..I.-_--lll*~a”~*~-~“~. __.A1*._“,ml** “,l.,vl”l, I _._. .yI~_.~~,“-I”~.xm,l,” ,--^_-,,,,_.
Trouble Checks Here’s what to try: Trouble Timer recording not made or wrong program recorded 1 1 j 1 f i Cable box was not turned on at time recording was to begin. Program entered incorrectly (wrong channel or times). Power interruption. Reset clock. Seepuge 9. Check-to see if time and date are correct - including AM/PM. Program exceeded tape’s length or tape was not rewound beforehand. VCR was not turned off at the time recording was to start. No tape in VCR or cassette’s safety tab broken off.
Limited Warranty What your warranty covers: Any defect in material or workmanship. l For how long after your purchase: l Ninety days for labor charges. l One year for parts. l The warranty period for rental units begins with the first rental. What we will do: Pay any Authorized GE VCR Servicenter the labor charges to repair your VCR. l Pay any Authorized GE VCR Servicenter for the new or, at our option, refurbished replacement parts required to repair your VCR.
index Accessories, Included.. ............................ .7 Add or Remove Channels From Memory ........................................ .8 ADD/REMOVE CHANNEL Menu ...........8 Antenna Connections ........................... .2,3 AUDIO/VIDEO IN Jacks ..................6,25,28 AUDIO/VIDEO OUT Jacks.. .........3-6,25,28 Auto Play Feature ............................. .13,14 Auto-Search Channels Feature ..............8 AutoEditTM.. ............................................ .26 Backhanel....................
For your nearestHome Entertainment Dealer or Authorized Servicenter call toll-free in the U.S.A.