VideoCassette Recorder Owner's Manual
Wai, ranty Registration No other RCA Video Cassette Recorder has the same serial number as yours. It is important that you record the number and other vital information here, in case your VCR is stolen or in case you need a complete description for any other reason. You will find the model and serial numbers on the back of the VCR. You will also find both numbers recorded on your registration form.
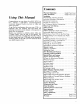
Contents Using This Manual Congratulations on your choice of an RCA VCR. You have selected a high-quality, precision-engineered instrument designed to give you years of video and audio enjoyment, To get the best performance from your new VCR, it is important that you carefully read and follow the operating instructions in this manual in the sequence in which they are presented. Should you experience a problem, please follow the "Trouble Checks" near the end of this manual.
Installation Unpacking When you removed all recommend in case you unpack your new VCR, be sure you have the accessories and information sheets. We that you save the packing materials and box ever need to ship or store your VCR. The accessories supplied for connecting your antenna, VCR, and TV set are shown here. The remote control unit and its batteries are also packed in with the VCR.
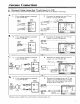
Antenna Connections Disconnect Existing Antenna from TV and Connect it to VCR. resemble those in one of the diagrams on this page.) • (Your antenna connections will probably A. 1. If your existing antenna is connected to your TV like this: CASLe(S) Disconnect the antenna from your TV and connect it to your VCR like this: , BACK OF TV FROM SUPPLIED _ ADAPTER FROM ANTENNA FROM _. _ . _N"_ ANTENNA BACK 1 OF VCR 1 [ --OF-B! If your existing antenna to your TV like this: 2.
Antenna Connections 2. Connect (Continued) VCR to back of TV. (The antenna connections on the back of your TV will probably resemble those in one of the diagrams below,) A. |. If the antenna connection on the back of ,our TV looks like this: @ _ _ 3P ®_ UHF Connect BACK OF VCR__ @v VHF 2. I_ __F_ _-® _=[]""_ _H _ the VCR to your TV like this: vc.
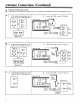
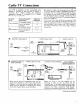
Cable- TV Connections Your VCR is designed to receive unscrambled cable channels 1 through 48 plus 98 and 99 without a "converter box". (These channels are sometimes designated 2 through 13, A through W, W+ 1 through W+I2, A-2, A-I and A-8.
Cable- TV Connections C. (continued) When you use these connections the A*B switch is as a "remote-controlled converter box" when you are used to select either the converter output or the VCR not recording, as explained below the diagram. output. This arrangement will let you use your VCR G) Disconnect Cable-TV from converter. @ Connect splitter to converter. (_) Connect VCR to A-B switch. (_) Disconnect TV from converter cable. @ Connect splitter to VCR. ® Connect A-B switch to TV.
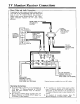
TV Monitor/Receiver Connections - Direct Video and Audio Connections Connecting the video output and audio output jacks of your VCR to the corresponding video and audio input jacks of your TV monitor/receiver may produce a slightly better picture during playback. This "direct" signal connection bypasses the TV tuner during playback.
What Your VCR Broadcast/Cable Will Do Frequency-Synthesis Tuner Provides accurate selection of VHF/UHF or up to 50 unscrambled cable channels.* Quartz-controlled electronics automatically lock the system onto the signal, eliminating the need for fine tuning. Bright, easyto-read channel display. *Local systems may vary; check your cable company's compatibility requirements. Infrared Remote Control Provides wireless VCR control from the comfort of an easy chair.
Video Cassettes RCA recommends that RCA cassettes be used with this unit. The tape in RCA cassettes is of high-quality formulation, intended for use with multi-speed VHS video cassette recorders. It has been manufactured to RCA's critical specifications for excellent performance with RCA VCR's. Use of tape not meeting these specifications could considerably reduce the performance of your VCR. Use of poor quality tapes or tape_ that have been damaged or mishandled can contaminate the VCR heads.
Basic Operation Basic Operating Controls and DispLays ® Now that you have connected your VCR to your TV and antenna or cable-TV system, you are ready to turn it on. You don't need to know all the details about the controls and display before you begin using your new VCR. so only, those you will use for basic recording and playback are discussed here. (Additional information about the controls is on page 16.
Basic Turning Operation (continued) on Your VCR for the First Time-- When you have finished connecting the cables to your antenna and TV, plug in the VCR's power cord and press POWER. The light above the STOP button should come on. If it flashes, too much moisture has collected inside the unit for it to operate. Leave the VCR turned on until the internal heat dries it and the light stops flashing. Proceed below when the light above the STOP button is on and not flashing.
Basic Setting Operation Your "IV to the VCR (continued) Channel Simplified The "VCR Channel" is the TV channel you use for viewing what the VCR is recording or playing, and for viewing the signal from the VCR tuner when it is stopped. Your TV must be set to this channel, and the light above the VCR/TV switch on your VCR must be on. ] Make sure your VCR is connected explained on pages 2.7. ] Press POWER properly as to turn on VCR.
Remote Control Before you use the remote control unit supplied with your VCR, install the batteries (instructions below). Several of the remote's buttons do the same things as buttons with the same names on the front of your VCR. and you can use whichever one is more convenient at the moment. The remote control has additional buttons for controlling some of the VCR's Special Effects and Features. and it is also used for setting the clock and programming the timer.
Setting the Clock Here are some things you should know before you set the clock: • When you first plug in your VCR, the clock will read • The buttons hand unit. for setting the clock are on the remote • While you are setting the clock, the display on the VCR will prompt you through the procedure. • If you press a wrong digit, press CLEAR repeatedly uniil the incorrect digit flashes, and then enter the correct digit.
First Recording This page gives the playback. You should them without referring suggest you record for Making and Playback basic steps for recording and practice them until you can do to the manual. To save time, we only two or three minutes. The first drawing shows how the second one shows how to the VCR.
Operating Controls (Detailed The uses of the controls for basic operation are given on page 10. Now that you are familiar with the basic procedure for recording a TV program and playing it back. you are ready to learn the rest of the control functions. The controls of your VCR are designed so that: • Accidentally pressing a wrong button will not damage the VCR or the cassette. • Nun-essential buttons are disabled during recording to help you avoid accidental interruptions.
XPR: Complete information ns on page 23. button when the VCR is playing. Picture Search is explained on the next page. @ CHANNEL: and 12. STOP: The STOP button will stop the normal functions of Record, Play, Rewind and Fast Forward and the SpeicaI-Effects functions described below and next page. ® RECORD: Press the RECORD button recording when the VCR is stopped. to start ® COUNTER: Press this button once to turn on the tape counter and press nt again to restore the normal clock display.
Special Effects and Features (continued) • Frame Advance is designed for use at the SLP speed. It may be used on tapes recorded at other speeds, but the picture quality will not be as good as that at SLP. Slow Motion • If a tape is playing, press SLOW on the remote control to begin slow-motion viewing. When you are using Stop-Action viewing (Pause during Play), you can also press PLAY to begin Slow Motion. Sound is turned off during slow motion.
Quick Reference Guides TV Viewing Normal Follow the two steps in the drawing for viewing. To view UHF stations, just tune the channel, regardless of what the VCR you have a TV Monitor/Receiver and Q TURN \ POWER OFF OR TURN audio and video outputs are connected to it, switch the TV to "Tuner Input" and select the channel you want, regardless of what the VCR is doing. normal TV your TV to is doing. If the VCR's VCR LIGHT / OPERATE TV AS USUAL.
Quick Reference Recording and Viewing _I, Different Guides (continued) Programs NSERT CASSETTE VCR LIGHT OFF , SET SPEED SET TO TUNER / / /' (7_OPERATE _RESS TV AS USUAL RECORD @SELECT CHANNEL STOP WHEN FINISHED Note: If you ',','ant to view what is being recorded, press the VCR/TV switch to turn on the light and then tune your TV to the VCR channel (3 or 4).
Recording from Another VCR To copy (dub) tapes, connect the two VCR's as shown below. Use shielded audio/video cables (such as RCA =AH002 or =AH005). CAUTION: The unauthorized programs and other materials of others. recording of television may infringe the rights The connections from the recording VCR to your TV are the ones you normally use. h is preferable to play the original tape on the same machine that was used to record it.
Camera Recording In addition to the camera itself, you will need a Camera AC Power Supply (such as RCA Model CPS03 for use with RCA cameras). Plug the camera cable into the power supply and then connect the cables from the power supply to the VCR as the drawing shows. The connections from the VCR to your TV are the same ones you normally use. To start recording press RECORD on the VCR. Use the PA USE button on the VCR to start and stop recording.
Express Recording Express Recording (XPR) lets you record up to four hours without programming the timer. It also allows you to start (or continue) recording immediately or to delay recording up to 24 hours. When the recording is finished, the VCR will turn off automatically. Note: Although you do not have to program the timer, the clock must be set before you can Express Record. Simplified Instructions Immediate t.
Programming the Timer The programmable clock/timer permits unattended recording of up to four different TV programs. The timer is actually a small computer which will turn on the VCR at the time you select, record for a selected length of time, and then turn off the VCR... all automatically without you being there. You can program the timer Simplified Programming 1. Press PROGRAM Instructions on remote hand unit.
Programming the Timer (continued) f 151 The display will prompt AM or PM. Press "1'" for AM or "2" for PM. you to select either ON C" J--I [] NORM The display will prompt stopping time. [6] OFF ,,I/ NORM ] Press "1" for AM or "2" for PM. you to select either oFF LI" U_I ;or cH 181 Press four digits, two for the hour and two more for the minute. For example, press 0 8 0 5 for 8:05. (Always press "0" before a single-digit hour or minute. The "0 +' will not appear in the display.) I"_ J...
Timer Recording The information on this page tells you how to set up your VCR for Timer Recording after you have programmed the timer. (The programming instructions are on pages 24-25.) When you have finished programming the timer, follow the steps in the drawing to prepare for timer recording. We suggest that you Q PROGRAM THE TIMER. (_ make one or more short timer recordings for practice so you won't be disappointed later on.
Alternate Remote Control Selected models of RCA color TV receivers and monitor/receivers feature infrared hand units that will also remotely control your VCR. Only the buttons that are used for controlling your VCR are described here. These buttons have generally the same functions as the ones with the same names on the front panel of the VCR, but there are some differences. • Any VCR tuner channel may be selected by pressing two of the Digit buttons on the hand unit.
Cabinet Cleaning Cleaning Dust exposed surfaces as required, using a soft cloth or the dusting attachment of your vacuum cleaner. Occasionally use the vacuum cleaner to remove dust from the ventilation holes on the top, back, sides, and bottom of the cabinet. Some of the plastic surfaces are easily scratched and they can be marred by alcohol and various solvents.
Index A/B Switch ...................... Accessories (Included) ............ ADD Button .................... 6 2 I1 Adding Channels to Scan List .... 11 Alternate Remote Controls ....... 27 Antenna Connection ........... 2,3,4 AUTO PROG Button ............ 11 Basic Operation ................. 10 Basic Playback (Quick Guide) .... 20 Battery Installation (Remote) ..... 13 Cabinet Cleaning ................ 28 Cable-TV Connections ........... 5,6 Cables (Types of Antenna Cables) . 2 Camera Recording ..........
Specifications Format Reeord/Playback VHS System: Cable-TV 3-Head: Midband A-1 and A-2 (99, 98); A-8 (Ol) Midband A through I (14-22) Superband J through W (23-36) Hyperband W+ 1 - W+ 12 (37-48) 2 video record/ playback heads, l special effects head Video Signal: EIA standard: Antenna 75-ohm external VHF antenna terminal 300-ohm external UHF antenna Tuner Channels: NTSC color 120-channel Type Frequency synthesis Broadcast Channels: VHF 2 - 13, UHF 14 - 83 Power Requirements 120V AC, 60Hz