
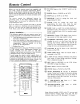
VCR User Manual
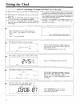


First Recording and Playback
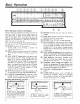
This page gives the basic steps for recording and
playback. You should practice them until you can do
them without referring to the manual. To save time, we
suggest you record for only two or three minutes.
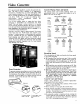
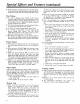
The first drawing shows how to make a recording and
the second one shows how to play it back and turn off
the VCR. The operating notes at the bottom of the page
arc keyed to the step numbers for quick reference if you
have a problem or need more information.
Making a Recording
TURN ON TV
@TUNE TV TOVCR CHANNEL (3 OR 4)
LNSERT CASSETTE _4) SET SPEED _ SELECT
(See page 10) CHANNEL
WHEN FINISHED PRESS RECORD ' SET TO TUNER
Pla3ing It Back
BEGIN PLAYBACK
) REWIND TAPE
STOP WHEN FINtSHED
EJECT CASSETTE
TURN OFF VCR @ TURN OFF TV
REWIND TAPE
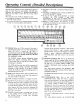
Operating Notes
(_) The channel switch on the back of the VCR and the
channel selector on your TV must be set to the
same channel in order to see the picture from the
VCR.
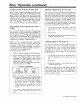
The VCR is automatically turned on when the
cassette is inserted. If the light above the STOP
button flashes, wait until it lights continuously.
(This is nnt a problem with the VCR). A flashing
light indicates too much internal moisture is
present. The VCR automatically enters playback
mode when a cassette without a tab is inserted. Be
sure to check its tab before inserting a cassette.
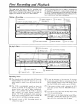
(_ Normally record at SLP. Recording speeds are
compared on page 9.
®
@
®
@
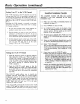
It may be necessary to fine tune the TV for best
picture and sound. If there is no picture on the TV
and no channel numbers in the VCR display, check
that the TUNER/LINE switch is set to TUNER.
if the cassette without a tab is inserted, the VCR
ejects the cassette when the RECORD button is
pressed.
If you don' _ant to play back the tape, skip to Step
12 in the second drawing.
REW appears in the display during rewind. When
rewinding is finished this display goes off and the
tight above the stop button turns on again.
[5