USI- R'b GUIDE VIDEO CASSETTE
Important Information WARNING To reduce the risk of fire or shock hazard, do not expose this VCR to rain or moisture. RISK TO REDUCE THE RISK OF ELECTRIC SHOCK, DO NOT REMOVE COVER (OR BACK). NO USER SERVICEABLE PARTS INSIDE. REFER SERVICING TO QUALIFIED SERVICE PERSONNEL.
Table of Contents important Information Warr.ng_., Hooking Up the _aut_on-,, ,_,._tc tu k_aL,lc I \ haMallct, .m,...I l'tL,._lu,_l, l'4,..
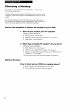
Choosing a Hookup The hookups on pages 3 through Basic (A) and Advanced (B). 5 are divided into two hookup typca: The basic hookup shows the backs of TVs that have only an antenna/cable connection. It is the easier of the two and additional accessories may not be needed. The advanced hookup shows the VCR hooked up to a monitor/receiver (TV with audio and video jacks) using a signal splitter. This connection improve the picture quality as well as convenience of operation.
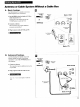
Antenna A. Basic or Cable System hookup. W'dhout a Cable Box [_ Use this hookup for a simple connection which requires fewer accessories. Set the 3CH.4 switch on back of VCR to either channel 3 or 4. 1, Tune the TV to this channel and use the TV,VCRbutton to watch the VCR. Connect 2. as shown. This connection accessories may require additional not provided. 3. Plug in power cords of VCR and TV. I[,}*iilii![; i (1] bi_'._IP Back of TV Ell Advanced hookup.
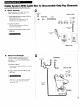
Cable System A. Basic With Cable hookup. Box to Unscramble All Channels [_ Use this hookup for a simple connection which requires fewer accessories. From Cable Back of VCR 1. Set the 3CH.4 switch on back of VCR to either channel 3 or 4. Tune the TV to this channel and use the TV,VCR button to watch the VCR. J_ Cable Box nFCoaxial i Cable VHF/LIHF AUDIO1 2. Connect may require OUT TO TV additional not provided. , .... • 3. VIDEO1 as shown.
Cable System W dh Cable Box to Unscramble Only Pay Channels (such as HBO, Showtime, Pay-Per-View, etc.) A. Basic ;] hookup. Use this hookup for a simple connection which requires fewer accessories. From Cable Back of VCR Set the 3CH.4 switch on back of VCR to either channel 3 or 4. Tune the TV to this channel and use the TV.VCR button to watch the VCR. Connect 2. Cable Box RFc0a×,a, ............i Cable • IN FROM" ANT VHF/UHF AUDIO1 VIDEO1 OUT TO TV as shown.
Connecting Option Two VCRs for Copying A hookup. Playback Use this hookup for a simple connection which requires fewer accessories. 1° Tapes Select a hookup from pages 2 through and then modify with this connection. From Antenna, Cable or Cable Box j ......................................................... ,NFROM "K_'_ 5 VHF/UHF AUDIO1 VIDEO1 IN OUT ' I1_ Set the 3CH.4 switch on the playback VCR to either channel 3 or 4.
Startup 1. Check accessories with Contact VCR. your dealer if any item_ ,n c missing. o@o 2 "AAA" Batteries '0 '0 _0 _'0 '0 'O O" 'O '0 "0 °0 o o *O_O" 2. Insert 3. Turn batteries on the RF Coaxial Cable (Stock No. 221346) Remote (Stock No. 221347) in remote. TV. A. Turn on the TV. B. If you used one of the basic hookups, 3GH.4 switch on back of VCR. tune the TV to the channel If you used one of the advanced hookups, (See TV owner's manual for details.) 4.
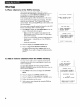
Startup 5. Place channels in the VCR's memory• The first time you turn ou the VCR or after a powc_ interruption, the VCR displays a message on the TV slrecn prompting you to AUTO-SEARCH CHANNELS. If the message does not appear, go to step A below. If the message appears, follow the directions on the screen. AUTO-SEARCH CONNECT THEN CHANNELS ANTENNA PRESS CABLE... UP CH Wait until the channel numbers stop changing. This takes about one to two minutes. The TV tunes to the lowest channel found.
Startup 7. Use TV°VCR button• Skip this step it yt, u u,_cd o,c ot the advanced llookups. When using one of the basic hookups, the TV-VCR button lets you switch between the picture coming from the VCR or television channels. This button lets you record a program on the VCR while watching another channel on the TV. Details are on page 17. A. Press TV,VCR to see the picture from the VCR. The VCR indicator lights in the display panel. B. Press CHAN up or clown to change channels on the VCR.
VCR Function Buttons CHAN Up or Down Selects next higher or lower channel the VCR's channel memory. f CLEAR Resets time counter POWER ©©© O TV°VCR PREV CH DISPLAY PAUSE PLAY REC o@0 DISPLAY o@o Displays STOP 'o o 'o o ©. °o 0CHAN MENU © 0 on the TV the time counter. o F. ADV © FF (Fast Forward) Fast forwards the tape when the VCR is stopped. Searches the picture in forward motion during playback. CLEAR o SPEED displays SEARCH '0 _0 °0 °0 INPUT to 0:00:00.
VCR Function Buttons (continued) Numbers (0 through 9) Select a channel up to 99 by pr_sing two numbers. Select a cable channel over 99 by pressing and holding 1 until 1-- appears on the screen. Then press the other two numbers. SEARCH Displays ZERO SEARCH menu on rlv. Advances playback. tape 60 seconds during SLOW Used for slow-motion playback. PAUSE Pauses action for viewing playback. Pauses recording to prevent of unwanted scenes.
Operating To play Instructions a tape 1. Turn on the TV and tulle it to channel picture from the VCR. 3, 4, or tl_e 1V's video input to sue tile 2. Insert a tape in the VCR. The VCR automatically turns on. The POWER and VCR indicators light. "lhe tape automatically begins playback if the safety tab on the cassette has been removed and the AUTO PLAY feature is turned on. 0 ®® Safety Tab 3, Press PLAY, if necessary. 4.
Using Auto the Play Playback Features Feature This feature lets you tell the VCR whether to automatically when you insert a ta _e with its safety tab removed. VCR MAIN start playing MENU TIMER PROGRAMMING REVIEW PROGRAMS CHANNEL SETUP VCR SETUP OPTIONS SETUP -- OPTIONS 1 2 REMOTE CONTROL: AUTO PLAY: 0 EXIT TO 1. Press MENU on the remote 2. Press 4 to display MAIN VCR1 ON MENU to display the VCB MAIN MENU. the SETUP OPTIONS menu. 3. Press 2 to select AUTO PLAY: ON or OFF.
Using the DISPLAY Button Playback Features Press DISPLAY to display the status of the VCR, channel number, time counter, date, time, and tape speed on the TV screen. You must set the time and date before they can be displayed. If you do not press DISPLAY again, this display times out. 2, Press DISPLAY again to continually counter on the TV screen. display the time 3. Press DISPLAY again to return to status displays. These displays Time automatically time out.
Using Zero the Playback Features Search The zero search feature lets you quickly return to a counter reading of 0:00:00 at any spot on the tape. This is especially convenient when you want to watch a segment of the tape several times. 1. Insert the prerecorded tape. 2. Press DISPLAY twice to display TV screen. only the time counter 3. Use PLAY, FF, or REW to advance where you want to return quickly. playing SEARCH TAPE 2:17:25 COUNTER IS on the to the place on the tape 4.
Using Pause the for Stop Playback Features Action This feature stops the tape in action and lets you examine the details of the scene on the screen. Stop action works best for tapes recorded in the SLP speed. 1. Press PAUSE during playback to stop the action. 2. Press PAUSE or PLAY to return to playback. The VCR automatically switches from stop-action playback to stop after a few minutes. Frame Advance Frame advance Frame advance (F.
Types of Recordings Your VCR provides Recording different recording features. The tollo_ing _'ctions describe these l_:aturc_. Speeds Press SPEED on the remote to select a recording the TV screen. speed (SP, LP, or SLP). The speed you select appears SP (Standard Play) gives the best quality recording. prerecorded, rental tapes are recorded in SP. Fewer on the tape. LP (Long Play) gives twice the recording on This is why most programs can be recorded time of tapes recorded in SP.
Express Recording Express recording lets you record up to four hourb without ubing the timer program feature. The VCR turns off automatically at the end of the recording. STOP,EJECT Operating PLAY Instructions 1. Turn on the VCR. 2. Insert a tape with its safety tab in place. 3. Select the channel 4. Use SPEED speed. 5. Press RECORD and PLAY together on the VCR or REG on the remote to activate express recording. 6.
Recording Select cable are received While box viewing from a cable You're Away channel box.) (Required 1. Press MENU on the remote to display VCR MAIN MENU. 2, Press 3 to display menu. 3, 4. 5. (Timer only Recording) if all channels the / VCR the CHANNEL SETUP I 2 3 TIMER REVIEW CHANNEL MAIN MENU | I PROGRAMMING PROGRAMS SETUP Press 4 to display the CABLE BOX SETUP menu. Press 1 when the CABLE BOX SETUP menu appears.
Recording While You're Away (Timer Recording) The timer program feature lets you program the VCR to record up to eight different programs within a one year period. Before setting the timer, make sure that: • The clock is set correctly. • A tape with a safety tab has been inserted with enough tape to record the programs. • If you receive all channels from a cable box, you completed GABLE BOX SETUP. See page 19. Setting a Timer Recording VCR 1. Press MENU on the remote to display 2.
Recording Checking While or Clearing 1. You're Timer Away (Timer Recordings Press MENU on the remote MAIN MENU. to display the VCR VCR I 2 3 Press 2 for REVIEW PROGRAMS. 2, Recording) Each entered program is displayed for a few seconds in sequence. Press MENU or 2 to display information faster. 3. Press CLEAR on remote when the program want to erase appears on the screen.
Using Operating Two VCRs Instructions Use one VCR as the playback Caution: The unauthorized recording of television programs and other materials may infringe the rights of others. for Copying (Refer to hookup on page VCR and the other as the recording Turn on the TV and VCRs. 2. Tune the TV to the VCR viewing video input. 3. and Tapes 6.
Specifications Format: VI:t5 Record/Playback System: Video: 2-Head Audio: Mono record/playbaLk Video Signal System: EIA standard: Antenna: 75-ohm external VHF/UHF antenna terminal Tuner: USA: Canada: system NTSC color combined 181 channels capability* (125 cable channels) 178 channels capability* (122 cable channels) Type: AutoProgramming Power Requirement: 120V AC, 60 Hz Power Consumption: 18 watts Dimensions: 3.
Location Front of Controls Panel Tape Compartment _,r oi,.[ j[ ® {:1 r V.VCH (;[IANNI / I HLW PLAY _(SD FW[) f,Aut+t GE) a+t{:oF_[, ®(9 // I--- ,......,J Remote Sensor CHANNEL or TRACKING Selects next higher VCR's channel Adjusts tracking Up or Down or lower channel in the to start the VCR recording. memory. when Used for express a tape is playing, recording. FWD (Fast Forward) Remote Sensor Fast forwards stopped. Receives signals from the remote control.
Location Back of Controls Panel IN ANT. FHOM (_ VHF/UHF AUDIO OUT 1 IN VIDEO OUT 1 OUT "fO TV .,,.-_:_ IN Selects the channel to which you tune the TV to see the VCR picture if you connect the VCR using one of the basic hookups. VIDEO1 IN and AUDIOI IN Jacks Receives signals from another compo,cnt, like a VCR or camcorder, when it is connected to these jacks. Use INPUT on the remote to select. IN FROM ANT. (Antenna) VIDE01 3CH.
Trouble Checks Sometimes problems can be easily solved by chv, km b att ,, basic throb:,. Check below before you call for help or take your VCR to an Authorized RC_* VCR Servicenter. Trouble Here's w/lat No power • Plug VCR into an operating • Check connections. VCR does not respond to remote • Remove batteries to try. outlet. and hold down one or more buttons for several seconds to drain the microprocessor inside the remote and reset it. Re-install the batteries and try remote again.
Trouble Checks Trouble Rewind Here's • Tape already does not operate Timer recording not made or wrong program recorded Incorrect • • • • • • • time or date t what to try: rewound. Cable box was not turned on at time recording was to begin. Program entered incorrectly (wrong channel or times). Power interruption. Reset clock. See page 9. Check to see if time and date are correct -- including AM/PM. Program exceeded tape's length or tape was not rewound beforehand.
Limited What Warranty your warranty covers: • For how long Any defect in mdtt'ridl ol _,_,oikm,mship. after your purchase: • Ninety days for labor charges. • One year for parts. The warranty What we will period for rental units begins with the first rental. do: Pay any Authorized your VCR. RCA VCR Servicenter the labor charges to _cpair Pay any Authorized RCA VCR Servicenter for the new or, at our option, refurbished replacement parts required to repair your VCR.
Index 3GH.4 b'a lt_ h ........ IN }-HUM AN I. Lo_u_ccl{}_ ........... :_-0,/,7_ 3-b,Z5 Accessories, Included ............................... 7 Add or Remove Channels INPUT Button .......................... It),19,20-21 LANGUAGE MENU .................................. 9 from Memory ........................................ 8 ADDIREMOVE CHANNELS Menu ........8 Limited Warranty ................................... 28 Line Input, Recording From .................. 21 Location of Controls Remote Control ...
_of youl- llCalCS[ l-lonle Entertainment Dealer or Authorized Servicenter call toll-free in the U.S.A.