VCR User’s Guide Changing Entertainment. Again.
Important Information WARNING To reduce the risk of fire or electric shock, do not expose this product to rain or moisture. CAUTION Caution: To reduce the risk of electric shock, do not remove cover RISK OF ELECTRIC SHOCK. DO NOT OPEN. (or back). No user serviceable parts inside. Refer servicing to qualified service personnel. This symbol indicates "dangerous voltage" inside the product that presents a risk of electric shock or personal injury.
Table of Contents Chapter 1: Connections & Setup ........................................................................................................ 3 Things to Consider Before Connecting Components .......................................................................... 3 Choose Your Connection ....................................................................................................................... 4 Cables Needed to Connect Components to Your VCR .....................................
Table of Contents Chapter 3: On-Screen Menus (Continued) Preferences ........................................................................................................................................... 19 Remote Control ............................................................................................................................................... Auto Play ..................................................................................................................................
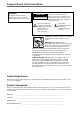
Chapter 1: Connections & Setup Things to Consider Before Connecting Components This Book Covers Two Models (VR546 and VR637HF) • Model VR546 (mono) • Model VR637 (hi-fi) The graphics in this user’s guide show the VR637HF, so the jacks on the front and back of the VCR are different from those on the VR546. The VR546 also does not have the Audio menu. Protect Components From Power Surges • Connect all components before plugging any power cords into the wall outlet.
Chapter 1: Connections & Setup Choose Your Connection There are several ways to hook up your VCR, depending on the components connected. Please use the following chart to determine which connection is best for you and proceed to the appropriate page. Note: If you prefer, we can provide you with the name of an Authorized Service Representative who will visit your home for a fee to install your electronic entertainment system and to instruct you in its operation.
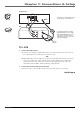
Chapter 1: Connections & Setup TV (back panel) VIDEO AUDIO R L / MONO IN The back of your TV might not look exactly like the one shown here. L OUT TV CABLE/ ANTENNA S-VIDEO VCR 1B 1A ANT. IN AUDIO VCR R L OUT IN VIDEO RF OUT 2 The VCR pictured here is model VR637HF and shows stereo audio jacks. Model VR546 is mono and will not have separate left and right audio jacks. Use connection 1A for model VR546. From Cable or Antenna TV + VCR 1. Connect the VCR to the TV A.
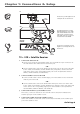
Chapter 1: Connections & Setup TV AUDIO VIDEO R L / MONO IN The back of your TV might not look exactly like the one shown here. L OUT TV CABLE/ ANTENNA S-VIDEO 1B VCR 1A ANT. IN AUDIO VCR R L OUT RF OUT IN VIDEO 2A 2B SATELLITE RECEIVER IN FROM ANT CH3 CH4 OUT OUT TO TV VIDEO S lli ate te R L The VCR pictured here is model VR637HF and shows stereo audio jacks. Model VR546 is mono and will not have separate left and right audio jacks. Use connection 1A and 2A for model VR546.
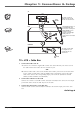
Chapter 1: Connections & Setup TV VIDEO AUDIO R L / MONO IN L OUT TV CABLE/ ANTENNA The back of your TV might not look exactly like the one shown here. S-VIDEO VCR 1B 1A VCR ANT. IN AUDIO R L OUT RF OUT IN The VCR pictured here is model VR637HF and shows stereo audio jacks. Model VR546 is mono and will not have separate left and right audio jacks. Use connection 1A for model VR546.
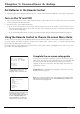
Chapter 1: Connections & Setup Put Batteries in the Remote Control 1. Insert the batteries matching the polarities (+ and –) on the batteries with the diagram in the battery compartment. Turn on the TV and VCR 1. Turn on the TV (if the TV you’ve connected to the VCR is an RCA, GE, Proscan, or Scenium TV, press the TV button on the remote packed with your VCR). 2. Tune the TV to the correct Video Input Channel. • If you used a coaxial cable to connect your VCR to your TV, tune the TV to channel 3.
Chapter 1: Connections & Setup CHANNELS menu – submenus are listed below. Auto Channel Search – automatically searches for channels so that they are stored in the VCR’s channel list (the list of channels that are accessed when you press the CH +/– buttons. Add/Remove Channels – allows you to manually add or remove channels from the channel list. This is helpful if the channel’s signal is weak. See Auto Channel Search on page 18.
Chapter 1: Connections & Setup VCR Basics Once your initial settings are complete, you can begin using your VCR. In order to begin, you must first understand some basic concepts. Playing a tape 1. Tune the TV to your VCR viewing channel (03, 04, or the Video Input Channel). 2. Insert a tape in the VCR. If the Auto Play feature is set to ON, the tape automatically begins playback (the safety tab on the tape must be removed). • Press FWD or REV to cue the tape to the desired position during Play mode.
Chapter 1: Connections & Setup Using the Remote Control The remote control is capable of controlling more than just your VCR. If you have a compatible RCA, GE, Proscan, or Scenium TV, you may be able to control it. In order for the VCR’s remote control to operate a desired TV, you must first press the TV button on the remote control. Similarly, to control the VCR, press the VCR button on the remote control.
Chapter 1: Connections & Setup ON•OFF PAUSE PLAY REC Turns the power of the active device (either the TV or VCR) on or off. Pauses playback and recording in VCR mode. Starts tape playback in VCR mode. Starts recording in VCR mode. REV Rewinds a tape. In Playback mode, pressing and holding REV starts reverse scan playback. In Stop mode, pressing REV fast-rewinds. SEARCH In stop mode, displays Index Search and Go-To Search menus on-screen.
Chapter 2: VCR Features Recording Features Your VCR provides many ways to record programming. Basic recording is explained in detail on page 10. The following recording techniques are also available. • Recording – lets you press one button to record a program. • Express Recording (XPR) – allows recording to start while a program is being watched. This feature automatically stops recording after a designated period of time.
Chapter 2: VCR Features Timer Recording You can set up to 8 different TV programs to be recorded. Before a Timer Recording will work, the VCR needs to be set up correctly. • VCR’s clock must be set correctly. • If you’ve set up the VCR for a cable box for all channels, the output of your cable box appears in the channel item of the Timer Recordings menu. • PROGRAMS OVERLAP appears if two programs whose times overlap are entered.
Chapter 2: VCR Features Index Search The VCR has a “VHS Index Search System” that automatically records index marks on the tape every time you start a recording. During playback you can locate the program you want to play by the number of index marks or by scanning. The VCR will search forward or reverse from the location you are at on the tape. INDEX SEARCH Press REV or FWD to begin scanning OR enter a specific index number _ _ To Activate Index Search: 1.
Chapter 2: VCR Features Time Counter The time counter shows the actual time used when recording or playing back a tape. The time counter helps locate the beginning or end of recorded events. It resets to 0:00:00 whenever a tape is ejected from the VCR. For example, if you record a 30–minute program at the beginning of a tape, rewind it, and then want to go to the end of the first program to start another recording: Hours Minutes 0:30:00 Seconds 1.
Chapter 3: On-Screen Menus 1 2 3 4 5 6 7 0 VCR MAIN MENU Timer Recordings Time Channels Setup Preferences Audio Language Exit If you ever need to change some of the settings in any of the menus that appear in the setup procedure, choose Setup (press 5 on the remote) from the VCR MAIN MENU. Note that the VR546 does not have the Audio menu, as it is a mono model. 1 2 3 4 TIME Set Time and Date Auto Clock Set: ON Set Time Zone Set Daylight Saving Time Data was found on channel 20.
Chapter 3: On-Screen Menus CHANNELS 1 2 3 4 5 Auto Channel Search Add/Remove Channels Signal Type: CABLE Cable Box Setup VCR Output Channel: 3 0 Exit Channels Channels tells the VCR where to find channels and stores them in the VCR’s channel list. Auto Channel Search Use Auto Channel Search to place all available channels in memory. If you ever change cable or antenna signals, you may need to run the Auto Channel Search feature again. Select one of the three options: Cable TV searches for cable stations.
Chapter 3: On-Screen Menus If you press MENU, the VCR output channel switches to channel 4. 1 2 3 4 5 6 7 0 VCR MAIN MENU Timer Recordings Time Channels Setup Preferences Audio Language Exit 1 2 3 4 5 6 7 PREFERENCES Remote Control: Auto Play: Auto TV/VCR: EnergySaver: Front Panel: Tape Speed: Set Auto Repeat VCR Output Channel Use this option to change the VCR’s output channel. The default is channel 3. To change the output channel to channel 4, press the MENU button.
Chapter 3: On-Screen Menus Front Panel You can change the brightness level of the VCR’s front panel display. In the PREFERENCES menu, press the 5 button repeatedly to toggle between options: • AUTO means the display brightens when the VCR is on and dims when the VCR is off. • BRIGHT keeps the display bright whether the VCR is on or off. • DIM keeps the display at a low brightness level whether the VCR is on or off.
Chapter 4: Additional Information Troubleshooting In this section, you will find answers to common recording, playback, and general VCR questions. Consulting with this section first when there is problem may help you answer common questions. General VCR Problems No power • Make sure the VCR is plugged into a working outlet. • Make sure connections between devices are correct and snug. The VCR does not respond to the remote control • To put the remote control in VCR mode, press the VCR button first.
Chapter 4: Additional Information The time did not adjust for Daylight-Saving Time • Make sure the Daylight-Saving Time feature is set correctly in the TIME menu. The VCR makes noise when it is stopped • This is normal. The VCR removes the tape from the playheads when stopping. The cylinders inside the VCR will continue to rotate for a few minutes after stopping.
Chapter 4: Additional Information Streaks in picture during normal playback • Press one of the TRACK buttons to move streaks up or down for the best picture. • Make sure the tape is of good quality and not worn out. Time counter not working or time counter not working in search modes • The time counter does not advance during unrecorded portions of tape. When an unrecorded segment of tape is encountered, the time counter will hold its count until recorded material is detected again.
Chapter 4: Additional Information Display Panel Clock/Counter Displays current time or time counter. . Tape In indicator ( ) Appears when a tape is in the VCR. Timer indicator Appears when an Express Recording (XPR) or timer recording is under way, or when the VCR is set for a timer recording and the power is turned off. The timer indicator flashes when a timer recording is set but no tape is in the VCR. VCR indicator Indicates that the VCR’s tuner is on.
Chapter 4: Additional Information Limited Warranty What your warranty covers: • Defects in materials or workmanship. For how long after your purchase: • 90 days - Unit exchange, with Thomson at no charge. • 91 days to 1 year - Unit exchange, for a payment of $29.95. The warranty period for rental units begins with the first rental or 45 days from date of shipment to the rental firm, whichever comes first.
Chapter 4: Additional Information What your warranty does not cover: • Customer instruction. (Your Owner’s Manual describes how to install, adjust, and operate your VCR. Any additional information should be obtained from your dealer.) • Installation and setup service adjustments. • Batteries. • Cleaning of audio / video heads. • Damage from misuse or neglect. • Products which have been modified or incorporated into other products. • Products purchased or serviced outside the U.S.A.
Chapter 4: Additional Information How to Find Your TV’s Video Input Channel You must tune your TV to the video input channel if you are using the VCR’s Audio/Video (A/V) OUT jacks to connect to the TV’s A/V input jacks. You must select the TV’s video input channel before you can see the VCR’s menus, the cable/antenna reception, and the content that’s on a tape. The video input channel for TVs varies by brand and model.
Chapter 4: Additional Information Index A I Audio 20 Audio/Video (A/V) jacks 9 Audio/video cables 4 Auto Channel Search 18 Auto clock feature 17 Auto Play 10, 19 Auto TV/VCR 19 Automatic rewind 10 Index search 15 Indicators (display panel) 24 INFO button 16 INPUT button 12, 27 B L Language 20 Limited warranty 25 Locking feature 15 Basic recording 10 M C Mono 20 MUTE button 11 Cable box setup 9, 18 Cables Audio/Video 4 coaxial 4 positioning 3 Channel buttons 11, 18 Channels, adding/removing 18 CLEA
Visit the RCA website at www.rca.com Please do not send any products to the Indianapolis address listed in this manual or on the carton. This will only add delays in service for your product. Thomson multimedia Inc. 10330 North Meridian Street Indianapolis, IN 46290 ©2002 Thomson multimedia Inc.