USER'S GUIDE VID O CASSETTE
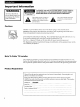
Important Information WARNING To reduce the risk of fire or shock hazard, do not expose this VCR to rain or moisture. _/:_,KOF TO REDUCE THE RISK OF ELECTRIC SHOCK, DO NOT REMOVE COVER (OR BACK). NO USER SERVICEABLE PARTS INSIDE. REFER SERVICING TO QUALIFIED SERVICE PERSONNEL. ELECTRIC SHOCK_ DO NOT OPEN / This symbol indicates "dangerous voltage" inside the product presents a risk of electric shock or that personal injury. instructions accompanying This symbol product.
Table of Contents Important Information Warnings _ Cautions Note to Cable TV Installer i i i Product i Registration Hooking Up the VCR Choosing a Hookup .........
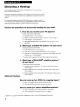
Choosing a Hookup The hookups on pages 3 through Basic (A) and Advanced (B). 8 are divided into two hookup types: The basic hookup shows the backs of TVs that have only an antenna/cable connection. It is the easier of the two and additional accessories may not be needed. The advanced hookup shows the VCR hooked up to a monitor/receiver (TV with audio and video jacks) using a signal splitter. This connection improve the picture quality as well as convenience of operation. Answer the questions 1.
Antenna A. or Cable System Basic which for a simple requires a Cable Box Q hookup. Use this hookup Without fewer connection From Antenna or Cable accessories. 300/75 Ohm Adapter 1, Set the 3 CH. 4 switch either channel 3 or 4. '"%_ OR Tune the TV to this channel and use the TV.VCR button to watch the VCR. 2. Connect = as shown.
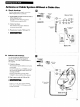
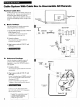
Cable System With Cable Box to Unscramble Position Cable Box Position the remote-controllable cable box on top of the VCR. You may need to position it at different angles before the VCR can control it. Make sure the cable box does not cover the transmitting window on top of the VCR. AI Basic All Channels Cable RemoteSensor I Transmitters hookup. Use this hookup for a simple connection which requires fewer accessories• Set the 3 CH. 4 switch on back of VCR to either channel 3 or 4. 1.
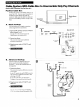
Cable System W'dh Cable Box to Unscramble Only Pay Channels (such as HBO, Showtime, Pay-Per-View, etc.) Position Cable Position Box the remote-controllable cable box on top of the VCR. You may need to position it at different angles before the VCR can control it. Make sure the cable box does not cover the transmitting VCR. A. Basic window on top of the ..._ Cable Transmitters Set the 3 CH. 4 switch on back of VCR to either channel 3 or 4. D ..................................
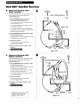
RCA DSS Position Satellite Receiver RCA Position DSS ® receiver. the receiver on top of tile VCR. may need to position it at different angles before the VCR can control it. Make sure receiver does not cover window on top of the VCR. You the the transmitting Satellite Receiver Remote Sensor Trans m itters J . [_ A. Basic ... .... ..vG L._= ....................................................] hookup.
RCA DSS Satellite Advanced hookup basic receiver. Use this hookup jacks and your if your receiver Receiver From Cable, Cable Box or Antenna with TV has audio/video _tl has one set of From Satellite Dish Back of Satellite Receiver 4_ i..... AUDIONI 1. DEO jacks. Set the CH3 CH4 switch receiver channel to either on back of N_OM*_ o..o. 3 or 4. You will tune the VCR to this channel to record from the satellite receiver.
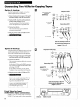
Connecting Option Two VCRs for Copying Tapes D A hookup. Playback Use this hookup for a simple connection which requires fewer accessories. 1. Select a hookup from pages 2 through and then modify with this connection. 2. ANT 5 AUD)O1 (supplied) Recording as shown. I IN FROM accessories OUT VCR I ANT may require _ RF Coaxial Cable Tune the recording VCR to this channel to receive the signal from the playback VCR. This connection VIDEO1 ...........
Connecting Record on the a Stereo VCR from Amplifier/Receiver an Back of VCR amplifier/receiver. Connect your VCR to a stereo amplifier/ receiver to record stereo audio. 1. 2. Select a hookup from pages 2 through 7 and then modify with this connection. Connect as shown. This connection requires additional accessories not provided. 3. 4, AudioNideo Cables Plug in power cords of amplifier/ receiver, VCR, and TV. Turn to page 32 for "Recording Back of Amplifier/Receiver Audio Only.
Startup 1. Check accessories with Contact VCR. your dealer if any item_ arc missing. E(+ -0_ + 2 "AAA" -0 Batteries S-VHS Connecting Cable (Stock No. 219748) ,0 _0 30 ,0 _0.0 ,O .0,0 _o 0 _Y Remote (Stock No. 221321) 2. Insert 3. Turn batteries on the in remote. TV. A Turn on the TV. B. If you used one of the basic hookups, 3 OH. 4 switch on back of VCR. tune the TV to the channel If you used one of the advanced hookups, (See TV owner's manual for details.) 4.
Startup 5. Place channels in the VCR's memory. The first time you turn on the VCR or after a power interruption, the VCR displays a message on the TV screen prompting you to perform an AUTO CHANNEL SEARCH. If the message does not appear, go to step A below. If the message appears, follow the directions on the screen. AUTO CHANNEL CONNECT THEN SEARCH ANTENNA PRESS CABLE... UP CH Wait until the channel numbers stop changing. This takes about one to two minutes.
Startup 7. Use TVoVCR button. Skip this step it you used one of the advanced hookups. If you are using one of the basic hookups, the TVoVCR button lets you switch between the picture coming from the VCR and the picture from the TV channel. This button lets you record a program on the VCR while watching another channel on the TV. Details are on page 30. A. Press VCR1 to set the remote to control the VCR. B. Press TV°VCR to see the picture The VCR indicator from the VCR. lights in the display C.
Startup . Set the time and date. When you first tuJn on tile V(ZR, -:-- appcar_ the VCR's display panel. in the clock area ot VCR Display Panel VCR I 2 3 MAIN MENU VCR PLUS+ TIMER RECORDINGS SET CLOCK SET TIME A. Press MENU'PROG VCR MAIN MENU. on the remote to see the DATE --/--/-- PRESS PRESS B. Press 3 to display SET CLOCK. C. Enter the time and date with the number remote. buttons CLOCK _:-(_H:MM) CLEAR MENU TO CORRECT TO EXIT on the • Press 0 before single-digit numbers.
Buttons Component Buttons Press one of the buttons £oV4ER VCR1 DSS.CABLE VCR2,LD AUX <21> L> REC SEARCH CHAN ? 40 70 INPUTo CHAN 50 80 0 Q PREV + to Turns on a compatible RCA, ProScan, or GE VCR and sets remote to control VCR when it See page 16. TV Used with POWER button Turns on a compatible RCA, ProScan, or GE TV and sets the remote to control the TV. turn on compatible ProScan LaserDisc RCA or player. to 60 VCR 90 Press VCR1 (VCR2.LD) function buttons.
Buttons VCR Function Buttons (continued) REW (Rewind) STOP Pauses recording to prevent recording of unwanted scenes. Rewinds the tape when the VCR is stopped. Searches the picture in reverse motion during playback. Stops the normal lun__tion_ such as record, playback, rewind, fast forward, and pause of the VCR. PLAY SEARCH Plays a tape. Displays INDEX, ZERO, and BLANK search menus on TV. PAUSE Pauses action for viewing playback. during POWER Turns off VCR when remote to control the VCR.
Controlling a VCR The VCR's remote controls compatible RCA, l'robc,m, or _,E VCRs with the VCR1 and VCR2oLD buttons. Most compatible VCRs automatically respond to VCR1 without being programmed. If you own two compatible VCRs, test them to see if VCR1 turns on both VCRs. If it does, then you may want to program this VCR to respond to the VCR2.LD button on the remote. Program the VCR for Remote Control Set the REMOTE CONTROL feature of the VCR to the VCR1 or VCR2 position.
Controlling a TV The VCR's remote is preprogrammed to control the basic tunctlon> ot a ,tm_patible RCA, ProScan, or GE TV. The remote can also be set up to control other manufacturer's brands. To program the remote, enter remote code numbers that correspond to your brand. Program the Remote 1. 2. 3. for a TV Turn on the TV. Point the VCR remote at the TV. Hold the TV button and press two number buttons to enter the code for your brand.
Controlling a Cable Box or an RCA DSS ® Receiver* The CABLE button on the VCR's remote is preprogrammed to control either a compatible RCA cable box or satellite receiver. If your cable box is another manufacturer's brand and has its own remote, you will probably be able to program the VCR's remote to control your cable box. To program the VCR's remote, enter the code that corresponds to your brand. Program the remote 1.
Controlling an Auxiliary RCA Component The remote that came packed with your VCR is also capable of controlling one compatible RCA audio component, such as an AM/FM radio, CD player, tape player, or phonograph. The remote must be programmed for the specific component it is to control. To program the remote, use the code that corresponds to your component. Program the Remote for an Auxiliary Component 1. Turn on the component. 2. Point the VCR remote at the component. 3.
Operating To Play Instructions a Tape I. Turn on the TV and tuJ_c it t_ ch,m_ul picture from the VCR. J, 4, _,_ thu I 'J _ _Id¢'o ull.)c_L to ._uu lhu 2. Insert a tape in the VCR. VCR automatically turns on. The cassette-in indicator ( _ ) lights, and the, VCR indicator lights if the AUTO TVA/CR feature is set to ON. The tape automatically begins playback if the safety tab on the cassette has been removed and the AUTO PLAY feature is turned on. [ 0 1 o 0 Safety Tab 3.
Using TAPE the Features Playback PLAYBACK: HI.FI/MIX/LINEAR Feature The VCR records the same audio on both tile Hi-Fi and linear tracks on the k tape. The Hi-Fi sound is recorded on separate left and right stereo channels. Monaural sound is recorded on the linear track. To enjoy Hi-Fi sound, connect your VCR to a stereo television or amplifier/receiver using the audio/video jacks. The TAPE PLAYBACK: HI-FI/MIX/LINEAR feature lets you select which audio you play back. To Select Playback 2.
Using AUTO the PLAY Playback Features Feature This feature lets you tell the VCR whether to start playing when you insert a tape with its safety tab removed. 1, Press MENU.PROG VCR MAIN MENU. automatically VCR on the remote to see the 2. Press 5 to display the PREFERENCES I 2 3 4 menu. MAIN MENU VCR PLUS+ TIMER RECORDINGS SET CLOCK CHANNELS PREFERENCES 3. Press 2 again to select AUTO PLAY: ON or OFF.
Using the Playback DISPLAY Button Features 1. Press DISPLAY to display the status of the VCR, channel number, time counter, date, time, and tape speed on the TV screen. The time and date must be set before they can be displayed. you do not press DISPLAY again, this display times out. 2. Press DISPLAY again to continually on the TV screen. The time counter time in the VCR's display panel. display appears If the time counter instead of the 3.
Using Pause the for Stop Playback Features Action This feature stops the tape in action and lets you examine details of the scene on the screen. Stop action works best for tapes recorded in the SP and SLP speeds. 1. Press PLAY-PAUSE on the VCR or PAUSE on the remote during playback to stop the action. The pause indicator (11)appears in the VCR's display panel. 2. Press TRACKING up or down to reduce any picture jittering. 3. Press PLAY.
Using the Playback Variable SHUTTLE Speed Ring Picture Search on the VCR The Shuttle lets you forward and reverse. Sound recorded is turned search off during a picture during Features Using playback the at variable speeds in both RECORD SI OpoEJEC] • picture search. The picture is best | • , for tapes in the SP or SLP speed. 1. Turn the SHUTTLE Ring start a forward or reverse on the VCR search.
Using the Commercial Playback Scan This is useful for scanning Features (SEARCH commercials Button) or short program 1. Press SEARCH once during playback the tape approximately 60 seconds. Index segments. to advance Search The VCR has a "VHS Index Search System" that automatically records an index mark on the tape every time you stop and start recording. You can locate the program you want to play by the number of index marks. The VCR automatically locates the index number you select.
Using Zero the Playback Features Search The zero search feature lets you quickly return to a counter reading of 0:00:00 anywhere on the tape. This is especially convenient when you want to watch a segment of the tape several times. 1. Insert the prerecorded CURRENT tape. 2. Press DISPLAY twice to display TV screen. only the time counter 4. Press STOP. 5. Press CLEAR to reset the time counter playing SEARCH TAPE 2:17:25 COUNTER IS on the 3. Use PLAY.
Types of Recordings Your VCR provides Basic To Make different types of recording. Recording- These typc,s ,u c explained Operating in tile following sections. Instructions a Recording Turn on tile TV and tune it to the VCR viewing channel, either 3, 4, or the TV's video input channel. 1. Insert a tape with its safety tab in place. 2. Press VCR1 (VCR2.LD) to set the remote to control VCR. 3.
Recording Recording Features Speeds Press SPEED on the remote to select a recording the VCR's display panel and on the TV screen. speed (hi', LI', or bLl'). Recording Time SP LP Cassette I hc speed ),ou select appears in SLP T-120 2Hr 4Hr 6Hr T-160 2Hr 40Min 5Hr 20Min 8Hr SP (Standard Play) gives the best quality recording. This is why most prerecorded, rental tapes are recorded in SP. Fewer programs can be recorded on the tape.
Express Recording Express recording lets you record up to four houi.s without using the timer program teaturc. The VCR turns off automatically at the end of the recording. RECORD .Loom, (ooo) ........ ii aEWGFWL' II Oo Pu_L_ w.vcR _a Display showing 30 minutes remaining Operating Instructions 1. Turn on the VCR. 2. Insert a tape with its safety tab in place. 3. Select the channel you want to record. 4. Select the desired recording 5.
Recording (Second Broadcast Stereo Audio Program) TV or SAP Some TV programs are broadcast with stereo audio or a second audio language (SAP). The RECEPTION: STEREO/MONO/SAP feature lets you select the type of audio you want to record. To Record Stereo Broadcast TV or SAP Turn on the TV and tune it to the VCR viewing channel, either 3, 4, or the TV's video input. 1. Insert a tape with its safety tab in place. 2.
Recording Audio You can record audio only from another and R) jacks on the back of the VCR. To Record Audio Only 1. Only audio source connected (Refer to hookup to the AUDIO1 or AUDIO2 IN (L on page 9.) Press the INPUT button on remote until the line indicator "L1 (Rear connection)" or "L2 (Front connection)" appears in the VCR's display panel. Then, the VCR records audio from the audio equipment connected to the AUDIO1 or AUDIO2 IN jacks. 2.
Recording Setup Received Cable While Box From or RCA a Cable You're Satellite Box Away Receiver (Required Only if All Channels are or Receiver) CABLE BOX SETUP tells the VCR the output channel of your cable box or RCA satellite receiver. If your cable box can be controlled by a remote, the VCR may be able to tune it to the channel you want to record during VCR Plus+ and timer recordings. Position the remote-controllable cable box on top of the VCR as shown on page 4 or 5. 1.
Recording VCR Plus+ Box) Cable While Setup You're for Antenna, Systems, or Cable Away (VCR Unscrambled (Not Box Control VCR Can Plus+* Requiring Recording) a Cable A VCR Plus+ channel number is assigned for each broadcast or cable channel. numbers are listed in most publications that list PlusCode numbers. 1. These Prepare a worksheet for the VCR Plus+ channels that are different from the channels you receive them on.
Recording While You're Away (VCR Plus+ Tile VCR Plus+ and timer program features let you program the VCR to record up to eight different period. Before using VCR Plus+ to record a program, make sure that: • • • • Recording) programs within a one year The clock is set correctly. A tape with safety tab has been inserted with enough tape to record the programs. The remote is set to control the VCR -- using VCR1 (VCR2oLD). The VCR is setup for VCR Plus+ programming if you.
Recording While You're Away (Timer The timer program feature lets you program the VCR to record up to eight different within a one year period. Before setting the timer, make sure that: • The clock is set correctly. • A tape with its safety tab in place has been inserted and has enough the programs. • The remote is set to control the VCR-- using VCR1 (VCR2-LD). • If you receive all channels through a cable box or RCA satellite box or receiver as described on page 33.
Recording Checking While or Clearing 1. You're VCR Plus+ Away or Timer Recordings Press MENU,PROG on remote to display MAIN MENU on TV screen. VCR VCR 2. Press 2 to display the TIMER RECORDINGS menu. 3. Press 2 to display the REVIEW EXISTING PROGS. 4. Press MENU,PROG faster. 5, Press CLEAR when the program appears on the screen. or 2 to display the information I 2 MAIN TIMER 1 2 RECORDINGS CREATE REVIEW A NEW PROGRAM EXISTING PROGS.
S-VHS S(Super)-VHS Recording Recording (Refer to hookups on pages 3-9.) The VCR is capable of recording in VHS or S-VHS format. To record in S-VHS, use cassettes labeled with the S_ symbol. It is not possible to record in S_ S-VHS using a standard VHS tape. S_ tapes must be played back in a VCR with S-VHS. S-VHS recordings cannot be played back in VCRs that do not have the S[_t_ symbol. The 8-VHS indicator lights when playing back an S-VHS tape.
Using Operating Two VCRs Instructions Use one VCR as the playback Caution: The unauthorized recording of television programs and other materials may infringe the rights of others. for Copying (Refer to hookup and on page VCR and the other as the recording Editing 8.) VCR. 1. Turn on the TV and VCRs. 2. Tune TV to the VCR viewing video input. 3. If you have connected your VCR using Option A (page 8), tune recording VCR to channel 3 or 4 -- the one selected on the back of the playback VCR.
Audio and Video Dubbing Audio dubbing records new audio in place of the audio formerly recorded on the linear (mono) track of the tape. Audio dubbing does not affect the audio recorded on the Hi-Fi tracks or the recorded video. To playback the dubbed audio, set the RECEPTION: HI-FI/MIX/LINEAR feature to LINEAR. To hear the original audio, set the RECEPTION feature to HI-FI. Video dubbing records new video in place of existing video segments.
Audio and Video Dubbing (continued) To Video Dub (Refer to hookup on page 8, Option B.) the two VCRs and turn them on. 1. Connect 2. Tune TV to the VCR viewing TV's video input. blank tape, the video will "break 3. up" and flash during playback. Record something on the blank tape, and then video dub. Press INPUT on recording VCR to select the line input (L1 or L2). "El" or "L2" appears in the VCR's display panel and "VIDEO 1" or "VIDEO 2" appears on the TV screen. 4.
Location Front of Controls Panel Tape Compartment VIDLU IN [ ,AUiglU IN.H (ooo) n ,EwQFwO I---MONOJ _*_HS S)_HS AUIO Q9 ...... CHAN_EL _ Remote Sensor CHANNEL or TRACKING Up or Down S-VHS (Indicator) Selects next higher or lower channel VCR's channel memory. Lights during Adjusts tracking during in the playback. viewing Pauses the tape during recording to prevent recording unwanted material. POWER Turns the VCR on or off. RECORD Starts the VCR recording. Used for express recording.
Location Back of Controls Panel IN FROM ANT. AUDIO1 VHF/UHFouT@ OUT TO TV @ VIDEO1 @OUT @ @ IN .@ @ @ SVD O R L 3 CH. 4 Switch VIDE01 Selects the channel to which you will tune the TV to see the VCR picture if you connect the VCR using one of the basic hookups. Receives signals from another component, _uci_ ,_ a VCR or camcorder, when it is connected to these jacks. Display L1 in the VCR's display panel using INPUT on the remote to select these jacks. IN FROM ANT.
Location Display of Controls Panel Hi-Fi A.DUB Casse,,o-,n Recor0T'Ter 70SAPSLP SiP :... O,STEREO Status Indicators • .:" - A.DUB_ V.DUB 9n Repeat VCR Indicator Cassette-in Indicator /-10 Time Counter or Time A. DUB Indicator A.DUB lights during Tape Speed V.DUB ChannelNumber or LineInput STEREO Indicator audio dubbing. Lights when the station you are tuned to is broadcasting stereo. (_l) Lights when a tape is in the VCR.
Specifications 5-VI lb Format: Record/Play back Video Video: Signal System: EIA standard: 75-ohm external VHF/UHF antenna terminal Tuner: USA: AutoProgramming Power Requirement: 120V AC, 60 Hz Power Consumption: 28 watts Dimensions: 3.5 inches high (89 mm) 15 inches wide (380 mm) 11.5 inches deep (292 mm) Weight: 9.5 pounds (4.
Trouble Checks Sometimes problems can be easily solved by dlecki]L S a lew basle thrash. Check below before you call for help or take your VCR to an Authorized RCA VCR Servicenter. Trouble i Here's No power what • Plug VCR into an operating to try: outlet. • Check connections. VCR does not respond Remote no longer to remote • Remove batteries and hold down one or more buttons for several seconds drain the microprocessor inside the remote and reset it.
Trouble Checks Trouble Here's what to try: Will not record • Safety tab removed from cassette. • Make sure the line indicator ("LI" or "L2") is turned off in VCR's display panel for normal recording from the VCR's tuner. Press INPUT on remote to turn off the line indicator. Stereo or SAP sound not recorded • RECEPTION: STEREO/SAP/MONO feature must be set to STEREO to record broadcast stereo. See page 31.
Trouble Checks Trouble Here's Cassette with safety tab removed play automatically does not start to No stereo sound during playback ..................................... ................................ ÷............... not made or no sound during Tape plays over and over Jog shuttle arrow buttons Tape continues forward jog shuttle operation 48 • TAPE PLAYBACK" HI-FI/MIX/LINEAR feature must be set to HI-FI to hear stereo sound during playback. See page 21. • Stereo signal is weak.
Limited What Warranty your warranty covers: • For how long Any defect in material after your purchase: • Ninety days for labor charges. • One year for parts. The warranty What we will or workmanship. period for rental units begins with tlle first rental. do: Pay any Authorized your VCR. RCA VCR Servicenter the labor charges to repair Pay any Authorized RCA VCR Servicenter for the new or, at our option, refurbished replacement parts required to repair your VCR.
Index GH. 4 bwitch ........................ 3-8,43 A.DUB Indicator ....................... 40-41 A.V DUB Button ..................... 14,40-41 Accessories, Included ..................... 10 Add or Remove Channels Memory .......... 11 ADD/REMOVE CHANNEL Menu ........... 11 Amplifier/Receiver Connections ............. 9 Antenna Connections ..................... 2,3 Arrow 4_ Buttons ..................... 14,25 Audio and Video Dubbing .............. 40-41 AUDIO and VIDEO IN Jacks ........
Index PLAY'PAUSI- Buttun TAPE PLAYBACK: ...... 2U,24-25,27,29,39-42 HI-FI/LINEAR/MIX Feature ........... 21,32 Playing a Tape ......................... 20-27 POWER Button ......... 14-15,17-19,30,35,36,42 PREFERENCES Menu ............ 12,13,16,22 PREV CH (Previous Channel) Button ..... 14-15 Product Registration ........................ i Programming Remote for Cable Box ......... 18 Programming Remote to Control VCR ....... 16 Programming Remote to Control TV ........ 17 RCA Digital Satellite System ...
Index VL;H P'LU.,_%+ L;HANNLL LISq Menu ...... VCR PLUS+ Menu ..................... 52 34 35 VCR2 Button ................ 14,10,30,35,30 VCR1NCR2 Feature ................... 16 VCR Plus+ Recording Checking .......................... 37 Clearing ........................... 37 Setting ............................ 35 Setup ............................. 34 Stopping .......................... 35 VCR, Cleaning ......................... 45 VCR, Turn On ......................... 10 VCR1 Button ........
53
For your nearest tlome Entertainment Dealer or Authorized Servieenter call toll-free in the U.S.A.