Most Valuable Creation of New Life with "R-COM" USER'S MANUAL DIGITAL EGG INCUBATOR R-COM PRO 50 R-COM PRO 50 USB WATE R PULL OP EN R-COM PRO50 / USB 1002 A
Contents How to use R-COM PRO 50 / R-COM PRO 50 USB 1. Introduction (1) R-com PRO 50 Introduction 4 (2) Safety Precautions 5 (3) Identification of Parts 6 (4) Basic Components 7 (5) Basic Screen / Explanation of Digital Display 8 (6) SET UP(Other Functions) / Easy Function Operation 9 Introduction 2. Before use (1) How to Assemble the Incubator / Egg-Turning plate 10 (2) What is an incubation room? / Preparation for Incubation 11 Before use 3.
Contents How to use R-COM PRO 50 / R-COM PRO 50 USB 5. Incubation (1) Humidity & Air Maintenance during Incubation / Maintenance after Hatching Introduction 19 (2) Dew Condensation 19 6. How to Clean (1) How to Disassemble 20 (2) How to Clean 21 How to Clean 7.
1. Introduction (1) R-com PRO 50 Introduction R-COM PRO 50 Thanks for choosing the Rcom PRO 50 incubator. The Rcom PRO 50 incubator is the first incubator with creditability to have a superior design and function which help in controlling optimum incubation conditions. It has two sensors, one for detecting surrounding environments and the other for internal incubator conditions.
1. Introduction Electrical hazards Do not use a damaged power cord or loose outlet. Risk of electric shock or fire. Be careful the details below when you use. Do not pull the cord when taking out the power cord, and keep wet hands away from connecting plug. Risk of electric shock or fire. Never pull the plug out of the outlet during the incubation period. Risk of damage or fire within the incubator. Do not cover the ventilating opening. Do not install under the direct sunlight.
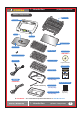
1. Introduction (3) Identification of Parts Identification of Parts Handle View Window For a clear view of the incubation process. ( Double Skin Viewing Window ) Product Serial No. Power Connecting (the rear) For connecting power cord. Vents for air circulation For circulating warm air Egg Tray Small, Standard, or Large egg tray according to egg size. Universal Tray (Sold Seperately) Air inlet vent For inlet of air from outside Water hole WATER To facilitate water top-up for the humidity control.
1.
(5) Basic Screen / Explanation of Digital Display 1. Introduction R-COM PRO 50 Menu Button Up Button Select Birds Incubation Termination Temp. & Humidity UP Setting Value Change Select Button Down Button Select Auto/Manual Pass to next stage Temp.
(6) SET UP(Other Functions) / Easy Function Operation 1. Introduction SET UP(Other Functions) T.CAL Temperature Calibration WARNING Be sure to read CAUTIONS. ( Calibration available after 5 Sec. ) Fatal Damage ! with Incorrect Calibration H.CAL Humidity Calibration Temp. calibration limits : -9.9℃ ~ +9.9℃ WARNING Be sure to read CAUTIONS. ( Calibration available after 5 Sec.
(1) How to Assemble the Incubator / Egg-turning plate 2. Before use How to Assemble 6 WATE R 5 PULL OP Lock the four locking buttons at the front and rear of the incubator. View Window 4 7 Back Standard Tray 110V~120V 3 Insert the power cord in the socket at the back of the main body. * Fit the water cap. Be careful when you assemble egg turning plate.
(2) What is an incubation room? / Preparation for Incubation 2. Before use What's an Incubation Room? / Preparation for Incubation The Incubation Room is a confined space for setting and operating an incubator. Because the incubation room environment has a considerable effect on hatch rate, it's recommended to control the environment for setting up an incubator; there should be little noise and vibration around and temperature ranging 20℃-25℃(68-77˚F) with small variation in temperature.
3. Function Setting (1) Incubation Modes / Incubation start with Automatic Mode * Rcom Pro20 incubator has two modes as automatic and manual mode, and Rcom Pro20USB incubator has three modes as automatic, manual, and PC connecting mode. Incubation Modes Auto incubation MANUAL button (Selection of birds) ENTER button (Auto incubation starts after two seconds) ① Setting of temperature of early and middle stages of incubation ② Setting of temperature of final stage of incubation.
(2) Incubation start with Manual Mode 3. Function Setting Incubation start with Manual Mode MENU This mode helps users to set temp. humidity, and egg turning etc. according to their needs. This mode is ideal for those persons who are experienced in incubation. ▶ Press MENU button on basic screen. ▶ Select the species of birds with UP/DOWN button and press ENTER button then it goes to incubation conditions setting mode.
(2) Incubation start with Manual Mode 3. Function Setting Egg-turning angle setting ⑦ Setting of egg turning angle of early and middle stages of incubation. ⑧ Setting of date of egg turning angle change in the final stage of incubation. ▶ The egg turning angle showing on LCD screen Turning Angle may be different from the setting angle depending on egg tray (based on standard egg tray) and ⑦ size of eggs.
3. Function Settings (3) Incubation Start for Other Birds Incubation Start for other birds This function is used when user wishes to incubate other birds which are not memorized in the incubator menu setting. User can change incubation conditions according to needs. MENU ▶ Press MENU button in basic screen. ▶ Select Other Birds by UP/DOWM button and then press ENTER to go to setting.
(4) Incubation start with PC connection Mode (5) Incubation Termination / Change Cels.& Fahr. / Incubator Initialization (Factory Setting) 3. Function Settings Incubation start with PC connecting mode With this function, you can share incubation process, optimum incubation setting by building a database. 60 90˚ ▶ Refer to the PC Software Manual for starting incubation in PC connecting mode.
(6) Incubation conditions reset / How to Set Egg Turning Test / Turn ON, OFF Humidification Function 3. Function Settings Incubation Condition Reset during Incubation ▶ This is used when you want to change incubation setting mode again during incubation. Press MANUAL button during incubation, then Temp. display will blink. If you want to change Temp. reset with UP/DOWN button and then press ENTER to save. Using this method, you can also reset humidity, egg turning angle, and egg turning interval.
4. Other Functions (1) Egg Turning Check / Alarm for water supplement / Abnormal High or Low temperatue Alarm / Power Failure Alarm Function Egg Turning Check Function ▶ When starting egg turning, animation showed on display with melody. Water Shortage Detecting Function ▶ When water is short, humidification icon is changed Chicken Chicken and water supplement 37.5 55 60 90˚ alarm sounds after 5 min. This alarm continues every 30 sec. It takes about 1min.
(1) Humidity & Air Maintenance during Incubation / Maintenance after Hatching (2) Dew Condensation 5. Incubation Humidity & Air Maintenance During Incubation ▶ When hatching, humidity should be relatively high to prevent the thin membrane from drying out or hardening before hatching. ▶ When hatching, it's recommended not to open the lid often. This is because if you open the lid often humidity will be rapidly decreased and it will take a long time to regain the proper humidity.
6. How to Clean (1) How to Disassemble ▶ Pull out the electric cord from the connecting jack and also take out the plug from the outlet. Don't turn off the power soon after using the incubator, as this may cause a break down due to moisture left inside the main controller.
6. How to Clean (2) How to Clean 4 Start the vacuum cleaner to remove the dust as shown on the right and thoroughly shake out the minute dust with a fine brush. If the incubator goes through incubations several times, feather, dust, shell, etc. accumulate inside the main body, which may cause a break down, so be sure to clean the product before storage. EX OEL AUT EX OEL AUT EX OEL AUT EX OEL AUT AUTOELEX 5 If you finish cleaning the incubator, reassemble it in the reverse order of disassembly.
7. Product Information (1) Servicing / Frequently Asked Questions (FAQ) Servicing All our R-Com digital incubators of Autoelex Co., Ltd. are made by precision systems under strict quality control. But occasionally some defective products are found on the way of their distribution. If any problem occurs, then please contact Autoelex service center or distributors in your country. We will do our best to solve the problems, if any, for you.
7. Product Information (2) Troubleshooting Troubleshooting CIRCUMSTANCE ITEMS TO BE CONFIRMED SOLUTIONS No signs of power to the incubator. ▶ Check electric cord is properly connected. ▶ Check if there is a power outage. ▶ Check whether the plug is damaged. ▶ Connect the cord again. ▶ Check the main socket with any other electric appliances. ▶ Try to insert to another outlet. Temperature will not go high enough. ▶ Check your setting temperature. ▶ Check the air circulation FAN is working.
(3) How to Calibrate the Temperature & Humidity 7. Product Information As this incubator was made with the optimum conditions set at the factory, you don't need to calibrate the temperature or humidity before use except for sensitive birds. Thermometer or Hygrometer Sensor Egg Turning plate Operate incubator for an hour before calibration for temperature stabilization.
7. Product Information (4) Specification Specification 1-1 Name : R-COM PRO 50 / R-COM PRO 50 USB 1-2 Model : PX 50 D / PX 50 D USB 1-3 Supporting Soft : R-COM PRO 50 USB INCUBATION SYSTEM ( WINDOWS ) [ Basic Specification ] Power AC 100V~120V / 220V~240V, 50/60Hz Working Temp. 20 C ~ 42.0 C Working Humid. 30 % ~ 70 % Power Consumption Max.120W (Average 65W) Capacity 24 eggs ~ 116 eggs Weight 6.5 Kg (N.W.) Size (W)633 * (L)523 * (H)171 (mm) Fuse Standard 250V 2.0A (Ø5×20mm) o o 10Kg (G.
R-com Incubator Series PUM P POW ER Mini 3eggs (DX-SCOPE) RCOM KING SURO (EX-20) R R WATE WATE RCOM 20 (PX-20) POW ER INL ET RCOM PRO 20 (PX-20D) PUM P POW ER POW ER INL ET R WATE JURAGON PRO (PX-20RD) JURAGON RX (RX-20) BROODER(BX-501SN) RCOM MARU (ST200~500eggs) RCOM MARU (CT200~500eggs)
R-COM is designed for user's easy and convenient use. It can be changed without notice for improvement in performance, design,treatment, and software, etc. www.R-com.co.kr SELLER MANUFACTURER ● ● ● ● COMPANY : : TEL : : FAX : E-MAIL : #612 DukAm-Ri, JuChon-Myeon, GimHae-City, GyeongNam, KOREA 82-55-337-2560 (Direct to sales team) 82-55-337-2561-3, 2567 (Office) 82-55-337-2568 auto@autoelex.