
User Manual
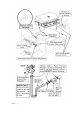

If flame is lifting, remove the front panel to access the burner front (air shutter) then turn
the air shutter clockwise reducing this intake. The screw should be loosened before
turning the air shutter.
If the flame has more yellow than blue, the air shutter should be turned counter clockwise
allowing more air in. This will stabilize the flame. Make sure to tighten the screw after
adjustments are made.
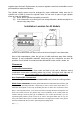
In order to provide gas to the burner, the orifice must be inside the burner venturi
opening. Check to ensure that the burner is properly secured at the front and back.
Lighting Instructions
Before Lighting:
Check gas line/hose for signs of wear, abrasion or cuts. If evidence of
deterioration is visible, replace the part prior to use.
If you smell gas, check for leaks. If odor continues, immediately call for service.
Keep your face and body away from the grill top when lighting.
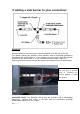
Grill Burner Lighting
1.
Open lid before lighting. Make sure all burners are in the
‘OFF’ position.
2.
Push and turn burner knob to ‘HI/IGN’ position.
3.
The pilot flame will ignite at this point, lighting the main burner.
4.
Continue to hold the knob in until you have ignition.
5.
If there is no ignition after 2-3 seconds, turn the knob back to the “OFF”
position and repeat steps 2-4.
Rotisserie Burner Lighting
1.
Open lid before lighting. Make sure all burners are in the
‘OFF’ position.
2. Push in and hold the control knob for 5 seconds then turn the rear rotisserie control
knob to the “on” position. While there, you’ll hear the igniter “click” This should light
the rear burner.
3. If you do not see the rear burner ignite, repeat step 2 and possibly turn the control
knob a little slower before the click.
19 | Page