
Side Burner User Manual


Before Lighting:
Check gas line/hose for signs of wear, abrasion or cuts. If evidence of deterioration is visible, replace the part prior to use.
If you smell gas, check for leaks. If odor continues, immediately call for service.
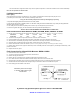
RSB1
RSB2
RJCSSB RDB1 RDB1EL ASB2
7mm
13mm
7mm 7mm 7mm 13mm
*DO NOT LEAVE YOUR SIDE BURNER UNATTENDED WHILE IN OPERATION.*
4. If there is no ignition after trying, turn the knob back to the “OFF” position and repeat steps 2-3.
1. Open lid before lighting. Make sure all knobs are in the ‘OFF’ position.
3. The clicking sound is the electrode sparking near the burner ring. This will ignite the gas to the burner.
2. Push and turn burner knob to ‘HI/IGN’ position. You will hear a clicking sound w/ Sure Strike Valves or you must push the igniter button
depending which side burner you have.
Check for leaks with a soapy water solution every time the cylinder is replaced or reconnected. All leaks must be corrected immediately.
Never use an open flame to check for leaks.
Lighting Instructions
Keep your face and body away from the burner top when lighting or operating.
Fuel Conversion for Side Burners: RSB1, RJCSSB, RDB1, RDB1EL & ADB1
1. Find the extra set of orifices that came with the side burner. (RSB2 does not come with extra orifice, must purchase separately)
3. Pull up and slide burner to the side to expose the orifice in the bottom of the venturi. Repeat for each burner.
Fuel Conversion for Infrared Side Burners: RSB2 & ASB2
1. Purchase orifice from an RCS Dealer.
2. You must remove all grates to expose the main burner or burners on the side burner.
5. Inside the space you will find the orifice (brass fitting), screwed into the end of the valve stem.
4. Where the burner was located going through a hole in the basin and connecting to the valve is now evacuated space.
6. Remove the orifice with a socket and extension. (These are extremely fragile when turning. Be extremely gentle when removing).
7. Replace orifice with new orifice, (repeat for all burners). When re-installing orifice do not over tighten or you will strip the brass fitting. Little
pressure is needed!!!
8. Replace burners then grates.
Socket Size
Side Burner
7. Install infrared burner back into place and also tighten wing nut on bottom of side burner to hold burner in place.
If you have any questions please give us a call at: 1-800-833-5998
www.RCSGasGrills.com
Follow the picture on the right
to hook up side burner to grill
connections.
8. Place cooking grids and lid back on side burner.
2. You must remove lid and cooking grid to expose the infrared burner.
3. Remove the drip pan from burner
4. Remove wing nut on the bottom of the side burner holding the infrared burner in place.
5. Use a 12mm wrench to hold the brass elbow stem while using a 13mm wrench to remove the orifice.
6. Install new orifice and tighten gently (These are extremely fragile when turning. Be extremely gentle when removing).