
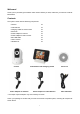
User's Manual


8
Testing your setup
It is recommended that you test your camera setup before permanent installation so that you get the best
picture and sound quality from your video monitor.
Test the camera and video monitor reception:
1. Place the camera and video monitor in two different rooms.
2. Have one person monitor the signal strength on the video monitor.
3. If the signal strength is low, have a second person move the camera to different locations of the room
to find the optimal placement location.
Test the camera volume level:
1. Have a person with the video monitor press and hold the TALK button to confirm the volume level
from the camera. Have the other person adjust the volume dial on the camera as required.
2. The person holding the video monitor can determine if the camera needs to move to a different
location of the room for better sound clarity.
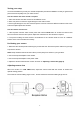
Positioning your camera
1. Determine the camera position that will give you the best view. Ensure the power cable is long enough
to power the camera.
NOTE: Keep cables and wires at least 3 feet (1 meter) away from infants or young children.
2. Connect the power adapter to the camera.
3. Connect the power adaptor to the power outlet.
4. Adjust the camera head with the monitor as shown on Adjusting camera view (page 8).
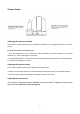
Adjusting camera view
When the monitor is in LIVE VIEW mode, adjust the camera head with the monitor to achieve the
optimal viewing position.
The maximum vertical rotating angle is 150º, and the maximum horizontal rotating angle is 270º.