
User's Manual

Introduction
The LSP-R1000/LSP-R1100 is a combined wireless color camera &
video monitor (receiver). A high-resolution color video camera, it includes
a built-in motion detector and an audio microphone. An ideal combina-
tion for watching the baby, monitoring the porch, pets, yard or the pool. It
is also suited to many small business applications.
Features
•2.4 GHz wireless technology
• 2.5-inch (LSP-R1000) / 1.8-inch (LSP-R1100) LCD display for good
picture display.
• Plug and play installation
• Supports up to 3 cameras.
• LCD display can work with 3 modes : Power save, Auto and Manual
• Adjustable cycle time between cameras in Auto mode.
• The Brightness, Colour, Contrast, Alarm volum and Audio volume can
be adjusted.
• PIR sensor function.
(LSP-R1000 : Motion sensing, LSP-R1100 : Sound trigger).
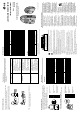
Package Contents
Your package contains the following:
Part Name and Functions
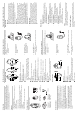
LCD Monitor Overview
a LCD monitor screen.
Displays the live image of the selected wireless camera.
b Channel indicator.
lights green or red when the channel is selected.
Blinks when the motion is detected.
c Mode select buttons.
- P/S : Select when you want to place the system in scan mode.
- AUTO : Select when you want to place the system in auto mode.
- MANUAL : Select when you want to place the system in manual
mode.
d Speaker.
You can listen to the sounds of the wireless camera.
e Power button.
Turn the LCD monitor On or Off.
f Speaker volume adjustment buttons.
Adjust the speaker volume level by using the volume buttons.
g Alarm volume adjustment button.
Adjust the alarm volume of the LCD monitor by tuning the alarm vol-
ume tuner.
h MENU button.
You can select the Brightness, Colour or Contrast setting mode.
i v/V buttonss
Adjusts the level value of the Brightness, Colour or Contrast.
j Audio/Video output jack.
You can connect the other display and/or sound device by using
supplied AV cable.
k DC 9V Power input jack.
l Battary case.
You can use the LCD monitor without the power supply adapter by
using the four AA type batteries or battery pack (optional).
Camera Overview
a Camara lens.
b IR(Infrared Rays) lamp sensor.
c Motion sensor.
d Microphone.
The microphone is included on the camera.
e An infrared lamp.
f Battary terminal box.
You can use the camera without the power supply adapter or battery
pack (Supplied for LSP-R1001 only) by using the four AA type bat-
tery.
g DC 9V Power input jack.
Installing the wireless camera
Installing your camera is a simple process. It can be placed on any hori-
zontal surface.
1. Locate the camera on a hori-
zontal surface.
2. Plug the power supply into
the camera and then to a
wall outlet.
3. Make adjustments of the
camera viewing angle by tilt-
ing and panning the camera
head with your hand.
4. Press the POWER button to
turn on the camera.
Note : Make sure the power adapter cord is long enough to reach your
mounting location.
Operating the Wireless Camera System
Mode operation
• P/S mode :
Press the P/S button on the LCD monitor, the system will be
changed to P/S mode. The LCD monitor screen blanks into a
standby mode while the system continuously scans the active
cameras. If a camera detects motion, the LCD monitor displays
the camera picture and the beeper will sounds. Two minutes
after the last detection, the screen returns to standby mode while
the LCD monitor resumes scanning. Press the MANUAL or
AUTO button to cancel this mode.
• AUTO mode :
Press the AUTO button on the LCD monitor, the system will be
changed to auto mode. The system automatically rotates
through all cameras. When a camera detects motion, the LCD
monitor will display the picture from the camera for a few sec-
onds and the beeper will sound. To avoid searching channels
that do not have cameras/transmitters assigned, set the dip
switches for those corresponding channels to the off position.
The dwell time(Time taken to switch between cameras) is preset
to 4 seconds and can be adjusted between 2-30 seconds. To
adjust the dwell time, press both the AUTO and MANUAL but-
tons simutaneously. Each flash of the LED increases the dwell
time by one second.
• MANUAL mode :
Press the MANUAL button on the LCD monitor to select a spe-
cific camera. The LCD monitor will switch to a different camera
each time the MANUAL button is pressed. When a camera
detects motion, the LCD monitor will display the picture of the
camera for a few seconds, and the beeper will sounds. To avoid
searching channels that do not have cameras assigned, set the
dip switches for those corresponding channels to the OFF posi-
tion.
Menu Operation
•Brightness adjustment
1. Press the MENU button repeatedly on the LCD Monitor to
select the brightness mode. If the LED in the ENTER button
is turned green, stop pressing.
2. Adjust brightness level using the v/V buttons.
• Blue colour adjustment
1. Press the MENU button repeatedly on the LCD Monitor to
select the Colour mode. If the LED in the ENTER button is
turned green and fast flicker, stop pressing.
2. Adjust blue colour level using the v/V buttons.
• Blue colour adjustment
1. Press the MENU button repeatedly on the LCD Monitor to
select the Colour mode. If the LED in the ENTER button is
turned green and slow flicker, stop pressing.
2. Adjust red colour level using the v/V buttons.
• Contrast adjustment
1. Press the MENU button repeatedly on the LCD Monitor to
select the contrast mode. If the LED in the ENTER button is
turned off, stop pressing.
2. Adjust contrast level using the v/V buttons.
Note:
If you press the MENU button, the LED is changed as shown below.
Turned green ➔ Turned green and fast flicker ➔ Turned green and
slow flicker ➔ Turned off ➔ Truned green.
Motion-Sensing Cameras
The cameras are equiped with a motion sensor PIR. When a camera
detects motion, a red light flashes on the camera and an alert sounds on
the LCD monitor.
Before Installation
• The camera must not faces to direct sunlight or any bright light; oth-
erwise, this may cause damage to the camera.
•Avoid viewing areas where half of the area is in bright sunlight and
the other half is dark. All types of cameras have difficulty seeing
wide variations of light.
• This device’s communication range is up to 60 feet (18 m) from the
Wireless System Controller in a typical home, depending on the
number of obstacles. These can include metal framing, thick walls,
and other wireless devices operating at 2.4 GHz. It is recommended
that different positions be tried.
• The 2.4 GHz video signals pass easily through your home interior
walls, but the signal may be reflected by power wires or plumbing
inside the wall. The most common source of interference are
microwave ovens. And try to avoid mounting the LCD monitor near a
microwave oven or other source of RF interference such as wireless
phones.
Installing the LCD Monitor
Installing your LCD Monitor is a simple process.
You can either hang the LCD Monitor to the ceiling with a string or just
place on a leveled place.
1. Locate the LCD Monitor on a
horizontal surface.
2. Plug the power supply into
LCD Monitor and then to a
wall outlet.
3. Turn on the LCD Monitor.
The system of LCD Monitor will be activated in auto mode automati-
cally.
Note : Make sure the power adapter cord is long enough to reach your
mounting location.
DC IN 6V
POWER
SCAN
MANUAL
AUTO
CAMERA
ALARM VOL.
VOL.
1
23
DC IN 6V
DC IN 6V
SCAN
MANUAL
AUTO
CAMERA
ALARM VOL.
VOL.
1
23
AV-OUT
MENU
SCAN
MANUAL
AUTO
CAMERA
ALARM VOL.
VOL.
1
2
3
POWER
a
b
c
de
kl
j
f
h
i
g
DC IN 6V
POWER
a
b
e
c
g
f
d
Wireless LCD
Monitor
DC 9V
Power Adapter (2)
Battery pack for
wireless LCD
Monitor (Supply for
LSP-R1001 only).
Battery pack for
wireless camera
(Supply for LSP-
R1001 only).
AV Cable
Wireless Motion
Sensor Camera