
Installation Guide


15
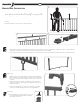
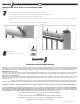
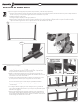
Install support brace
a. Two support braces are included with 6' railing kits. For code purposes, only one is required for installations in the U.S., while all three are
required in Canada. Spread out the braces proportionately (place center one in middle).
b. Four support braces are included with 8' railing kits. For code purposes, only two are needed for installations in the U.S., while all four are
required in Canada. Spread out the braces proportionately.
5
5
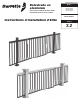
ANGLED RAIL WITH VINYL TOPPER AND POST INSTALLATION
i.
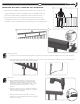
Rails to Posts
a. Bring assembled rails between posts and line up with
installed bases. While holding section with brackets in
between the installed bases (From Steps 2a-c), pre-drill
through the top holes on back of brackets with
9
⁄
32
" drill
bit, and connect brackets to bases with
1
⁄
4
" sex bolts
provided.
b. Attach top brackets to top rails – Predrill two holes from
under the bottom of the top rail through rail. Complete for
each top rail bracket. Drive #8x1
1
⁄
2
⁄2⁄
" Pan Head screws (2 per
2" Pan Head screws (2 per 2
bracket) through drilled holes.
c. Attach bottom brackets to bottom rails – Drive #8x
3
⁄
3
⁄
3
4
⁄4⁄
"
Pan Head screws (1 per bracket) through side of bottom rail
bracket into bottom rail.
6
6
h.
h.
g.
g.
g.
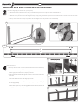
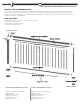
g. Stand up rail section and fully lock the balusters into the rails. Place one foot on the top of the
bottom rail, between second and third baluster while at the same time placing a hand under the
g. Stand up rail section and fully lock the balusters into the rails. Place one foot on the top of the
bottom rail, between second and third baluster while at the same time placing a hand under the
g. Stand up rail section and fully lock the balusters into the rails. Place one foot on the top of the
bottom of the top rail between second and third baluster. Push with foot and pull with hand until
bottom rail, between second and third baluster while at the same time placing a hand under the
bottom of the top rail between second and third baluster. Push with foot and pull with hand until
bottom rail, between second and third baluster while at the same time placing a hand under the
locking is complete (You should hear a snap). Repeat this process for the middle and end of the
bottom of the top rail between second and third baluster. Push with foot and pull with hand until
locking is complete (You should hear a snap). Repeat this process for the middle and end of the
bottom of the top rail between second and third baluster. Push with foot and pull with hand until
panel. All the balusters should now be "locked" into the top and bottom rails. (NOTE: If a snap is not
locking is complete (You should hear a snap). Repeat this process for the middle and end of the
panel. All the balusters should now be "locked" into the top and bottom rails. (NOTE: If a snap is not
locking is complete (You should hear a snap). Repeat this process for the middle and end of the
heard or felt, use a rubber mallet to tap underneath of top rail to ensure a full connection.)
panel. All the balusters should now be "locked" into the top and bottom rails. (NOTE: If a snap is not
heard or felt, use a rubber mallet to tap underneath of top rail to ensure a full connection.)
panel. All the balusters should now be "locked" into the top and bottom rails. (NOTE: If a snap is not
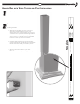
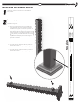
h. Line up top rail profi le on top of the top rail. Press it down onto the top rail so it fi ts snug.
NOTE: Bracket tops are not used on top of the top rail profi le when a vinyl topper is installed.
i. Slide brackets onto ends of assembled rail sections, fi rst removing the top part of the railing bracket.