
Instructions / Assembly


ENGLISH
8
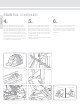
(Fig. 28)
(Fig. 30)
(Fig. 29)
14.
Pre-drill downward using a
1
/
8
" drill bit. Be
sure to drill through the beam and bracket
(Fig. 27).
If needed, an additional rail stiffener (N) can
be purchased separately, and installed in
place in top rail (A) as shown below.
Cut the top rail (A) to length at the stair angle
(Fig. 28).
15.
Snap the top rail (A) onto the top beam (D)
by applying downward pressure. Work from
the bottom of the stair to the top end of the
rail until the full length of the cover locks into
place (Fig. 29 & Fig. 30).
(Fig. 25)
(Fig. 26)
13.
Set the top beam (D) in place by inserting the
rst baluster plug (at the bottom post) in the
corresponding baluster, setting it in place, and
working towards the top (Fig. 25).
Position the beam between posts to ensure
proper alignment. Pre-drill the post for the
center bracket screw using a
1
/
8
" drill bit.
Secure the brackets to the post using
3 mounting screws (G) in each bracket,
beginning with the center screw hole (Fig. 26).
(Fig. 27)
STAIR RAIL CONTINUED
If using stiffener,
insert into top of
top rail as shown.
Stiffener shape will
vary based on top
rail pro le.