
Installation Guide
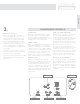


11
ENGLISH
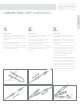
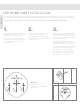
4.
Using supplied alcohol pads clean under side
of rail and both surfaces of under-rail light
channel (if using). Do not throw used pads
away, they are needed in later step.
If using under-rail light channel, remove
adhesive backing on one side of adhesive
strip. Apply adhesive strip to back of under-
rail light channel. Remove adhesive backing
on back of PVC channel and position on the
underside of your top rail. Start at end with
hole allowing small gap for strip light to run
from the post to the light channel. Push rmly
on the channel to securely attach to rail.
TIP: Fold the used alcohol pad over the tip
of a at head screwdriver to help press the
under-rail light strip into the channel without
damaging the LEDs (Fig. 7).
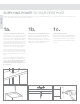
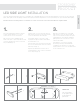
3.
Run a harness down the inside of the post,
with the male connector accessible at the
top of the post (Fig. 5). Thread the female
end of the under-rail light strip through the
hole in the top rail and through the hole in
the post, being careful not to cut or damage
the light strip or wiring if threading through a
metal post. Plug the male connector into the
female connector attached to the under-rail
light strip (Fig. 6).
Attach your brackets to the post and connect
your top rail to the brackets, taking care not
to damage the wiring or under-rail light strip.
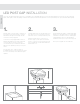
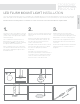
5.
If applying light strip directly to the underside
of your top rail, remove the adhesive strip
from the under-rail light strip and, starting at
the opposite post, rmly press the under-rail
light strip to the underside of the top rail.
When you reach the post where the harness
is connected to the under-rail light strip, any
excess wiring can be gently pushed back
into the hole.
Complete your installation by adding a dab of
silicone caulk to the cut end of the light strip,
protecting the exposed circuit.
(Fig. 6) (Fig. 7)
(Fig. 5)