
Installation Guide


3
ENGLISH
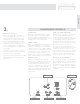
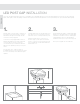
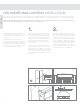
3.
Mount the T-Connector.
Run the 4' output power cable with the
T-connector attached to the location of the
rst light (typically located at the base of
the rst post) or a central location if lights
will be located in multiple directions. The
T-connector can be secured loosely using
(2) #4 x 1" zinc plated or stainless steel
screws (not supplied). Do not tighten the
screws completely as this can damage the
T-connector.
If needed, all 3 of the output connectors on
the T-connector are active and will supply
equal power to the entire system.
Any unused T-connector terminals or splitters
in the system must be sealed using the
attached cap.
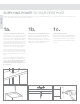
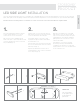
TRANSFORMER CONTROLS
Timer Control Remote Control
On/Off Switch Dimmer Control Photocell Control
On/Off Switch:
When green light is illuminated the + (plus)
lights may or may not be on depending on
the timer or photocell settings. When red
light is illuminated the transformer is powered
off and no other controls will function.
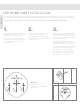
Timer Control and LCD Display:
When the Photocell is OFF, the LCD Display
will show 99. The LED lights will be on
continuously, unaffected by the photocell.
For dusk to dawn operation of the LED lights
(controlled by the Photocell): Ensure the
Photocell is ON. Press the Timer control +
(plus) button until the LCD Display shows 99.
The Photocell has a 2 minute delay.
For Timer operation (LED lights turn on at
dusk and turn off from 1 to 9 hours in 1 hour
increments): Ensure the Photocell is ON.
Press the Timer control – (minus) or + (plus)
buttons until LCD Display shows the desired
ON time in 1 hour increments from 1 to 9
hours. The Photocell has a 2 minute delay.
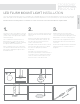
Photocell Control:
To turn on the Photocell, press the ON
button, the green light by the ON button will
be illuminated. NOTE: The Photocell has a
2 minute delay. The transformer will now
operate according to the timer and photocell.
To turn off the Photocell, press the OFF
button, the red light by the OFF button will be
illuminated. The LED lights will now be ON
continuously.
Dimmer Control:
Ensure the LED lights are ON. The - (minus)
button dims LED Lights. The + (plus) button
brightens the LED Lights. For incremental
changes: Press the (–) or (+) dimmer buttons
with short pulses. This will dim the LED lights
by about 10% per press of the button. For
ne adjustment changes: Hold the (–) or (+)
dimmer buttons until the desired brightness
level is reached and then release the button.
Remote Control (15 yard range):
For incremental changes: Press the – (minus)
or + (plus) buttons with short pulses. This will
dim the LED lights by about 10% per press
of the button. For ne adjustment changes:
Hold the (–) or (+) buttons until the desired
brightness level is reached and then release
the button..