
Installation Guide


4
ENGLISH
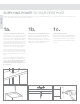
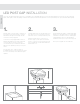
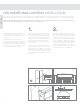
1a.
Using 4" x 4" Wood Posts with Sleeve:
Cut all 4" x 4" posts to a height of 35 ½" from
deck surface for a 36" high installed railing;
41 ½" for a 42" high installed railing.* This will
allow room for excess wiring to be hidden
under your post cap. Right next to mounted
4" x 4", beneath deck surface, drill a ¾"
diameter hole through the deck board – this
will be the hole to feed the wire through for
the rst post closest to the transformer.
Connect the female end of the wire harness
to the T-connector (Fig. 1) and run the wire
harness up the post or post sleeve with the
male connector exiting at the top of the post
(Fig. 2).
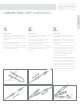
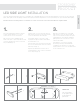
1b.
Using Steel Post Install Kit with Sleeve:
Drill a ½" hole through “boxing” and deck
board (using the bottom base plate as a
guide) – this will be the hole to feed the
wire through for the rst post closest to the
transformer. The wire will run through the
inside of the steel structural post.
*Larger T-top railings with higher brackets
may require cutting the post down to only
an inch shorter. When cutting your posts,
ensure that the screws for your rail
brackets will still screw though into your
wooden posts.
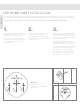
1c.
Using an Aluminum Post:
Drill a ¾" hole through the mounting plate –
this will be the hole to feed the wire through
for the rst post closest to the transformer.
The wire will then run through the inside of
the post.
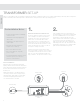
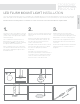
SUPPLYING POWER TO YOUR FIRST POST
Do NOT cut any wires during your installation. Wire harnesses can be purchased in lengths of 5', 7' and 9'. Excess wire can be coiled up in the
posts or beneath the deck surface for a clean installation..
(Fig. 1)
(Fig. 2) (Fig. 1) (Fig. 1)