
Installation Guide


9
ENGLISH
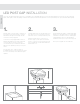
LED FLUSH MOUNT LIGHT INSTALLATION
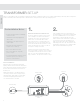
Crossover Product transformer, harnesses, and splitters are compatible with all Crossover Product lighted accessories (post caps, side/stair
lights, dome lights, under-rail lighting, and ush-deck lights) and Transform lighted accessories (Transform post caps, Transform dome lights).
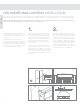
1.
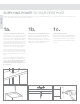
Layout the location of the light(s). To prevent
splitting, do not install within ½" of the edge
(1" from center) of the light and the edge the
deck board (Fig 1).
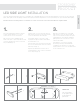
Use a 1" diameter Forstner bit to bore a
at bottom hole 0.7" deep into the deck
board (Fig. 1). NOTE: Do not drill completely
through the deck board with this bit.
Drill a ½" diameter hole in the center of the
hole that was drilled in with the Forstner bit
(Fig. 2). Drill completely through the deck
board with this bit.
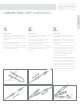
2.
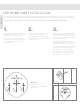
Place the connector and wire attached to the
light through the hole that was drilled in Step
1 (Fig. 3).
Gently insert the ush mount light into the
hole that was drilled in Step 1 (Fig. 4). The
top of the light should sit just below the
surface of the deck board.
If the light is above the deck surface, remove
it and check for debris. If there is no debris,
bore the hole slightly deeper with the
Forstner bit.
If the light is too far below the surface,
remove the light and place a small amount of
clear exterior silicone caulking in the bottom
of the hole and reinsert the light so it is just
below the surface of the deck board.
3.
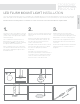
Underneath the deck, plug the male
connector of the harness into the female
connector attached to the light (Fig. 5). Press
rmly until the connection is fully engaged.
Connection is fully engaged when there is
minimal gap between the male and female
connector.
The ush mount light will now be illuminated
if the transformer is on and the harness is
plugged in.
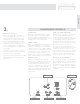
Follow instructions for wiring harness so that there is a male connector at each location that will have a light installed.
(Fig. 5)(Fig. 4)
(Fig. 3)
(Fig. 2)
(Fig. 1)