INSTALLATION GUIDE
TABLE OF CONTENTS Introduction ................................................................. 1 Recommended Applications 2 Before You Begin ........................................ ......................................................... 3 1 - Post Frame Applications ......................................... 1.1 Purlins or Flush Frame Application Walls 1.2 Purlins or Flush Frame Application Roof 4 2 - Pre-Engineered Steel Applications 2.1 Roof Application Method A 2.
INTRODUCTION This installation guide is designed to help users of Reflective Air Insulation understand how it works and to install it properly for maximum benefit. Please review this guide thoroughly before installing Reflective Air in any application. Pay particular attention to the product diagrams, installation instructions and warnings for uses where Reflective Air is not recommended.
Attic Wall RECOMMENDED APPLICATIONS When you are planning to install a reflective insulation, it’s important to remember that air space plays a key role in keeping heat in and reflecting it away. Typical installations call for a ¾-inch air space between the insulation and the cavity materials, as in a wall, to achieve optimal product performance. Reflective insulation is recommended for the following applications.
BEFORE YOU BEGIN Supplies Locate and organize all necessary supplies prior to beginning installation. - Razor knife - Reflective tape with acrylic adhesive - Tape measure - Gloves (optional) Safety Check - When working near electrical circuits and outlets, basic precautions should be observed; power should be turned off until installation is complete.
1. POST FRAME APPLICATIONS 1.1 Purlins or Flush Frame Application Walls 2” x 4” GIRTS AT 16” O.C. 1. Wrap the Reflective Air around the inside of the framework. FRAMING* 2. Fasten the Reflective Air to the outside of each girt. STEEL SIDING Reflective Air With Sag 3. Leave enough Reflective Air between the girts to allow the material to bow inward, creating a 3/4” enclosed airspace. 4. Securely tape all seams using reflective tape.
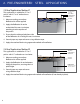
2. PRE-ENGINEERED STEEL APPLICATIONS NOTE: When installing any type of insulation in a building, never alter the ventilation design. Reflective Air TAPE SEAMS IF REFLECTIVE AIR RUNS ACROSS PURLINS ROOF DECK 3/4” TO 1-1/2” AIR SPACE CREATED BY SAG 2.1 Roof Application Method A C PURLIN This application is suitable for Z or C pur lins. Z PURLIN 1. Measure working area where Reflective Air will be applied. 2.
2. PRE -ENGINEERED STEEL APPLICATIONS 2.3 Roof Application Method C Reflective Air This application is suitable for 6” Z or C purlins with 3.5” or 6” unfaced mass insulation. POLY SIDE TO MASS INSULATION ROOF DECK UNFACED MASS INSULATION C PURLIN 1. Measure working area where Reflective Air will be applied. Z PURLIN 2. Apply the Reflective Air to the underside of the mass insulation, attaching it to the top face of the purlins. 3.
3 - RESIDENTIAL APPLICATIONS - WOOD FRAMING 3.1 Typical Residential Wall Application Method A EXTERIOR FINISH* 6” MASS INSULATION Reflective Air TAPE ALL SEAMS 1. Measure working area where Reflective Air will be applied. 2. Fasten the Reflective Air to the stud facing using 1/2” staples every 4” - 6”. STRAPPING HORIZONTAL 1”x3” AT 16” O.C. AIRSPACE 3. The white polyethylene side of the Reflective Air should be facing the mass insulation. SHEATING AND AIR BARRIER INTERIOR FINISH 4.
3 - RESIDENTIAL APPLICATIONS - WOOD FRAMING 3.3 Typical Retrofit for Roof Installation 1. Measure working area where Reflective Air will be applied. 2. Fasten the Reflective Air to the bottom of the rafter facing using 1/2” staples every 4” - 6”. ROOF SHEATING AND FINISH Reflective Air MASS INSULATION TRUSS OR RAFTERS LEAVE OPEN CEILING INTERIOR FINISH 3. Ensure that all seams are securely taped using reflective tape. 4.
3 - RESIDENTIAL APPLICATIONS - WOOD FRAMING 3.5 Typical Basement Ceiling / Heated Crawlspace Application FLOOR FINISH* 1. Measure working area where Reflective Air will be applied. 2. Fasten the Reflective Air to the bottom of the joist facings with the shiny side towards the ceiling using 1/2” staples every 4” - 6”. FLOOR SHEATHING* AIR SPACE FLOOR JOISTS 2” x 8” Reflective Air *According to Floor Design 3. Ensure that all seams are securely taped using reflective tape. 3.6 Garage Door Application 1.
4 - BLOCK OR CONCRETE WALL 4.1 Block or Concrete Wall Method A (Below Grade / Basement) 1. Frame wall. CONCRETE FIBERGLASS Reflective Air SHINY SIDE FACING LIVING SPACE 2. Add mass insulation (optional). 3. Staple Reflective Air to 2 x 4 studs, every 6” (overlapping seams). FIRRING STRIP 4. Use foil tape to join the seams. 5. Horizontally mount firing strips. DRYWALL 6. Install drywall. 4.2 Block or Concrete Wall Method B 1.
5 - CONCRETE SLAB APPLICATIONS 5.1 Application Under Slab 1. Measure working area where Reflective Air will be applied. CONCRETE SLAB 2. Apply Reflective Air on top of the gravel in the same manner as a polyethylene vapor barrier. Reflective Air TAPE ALL SEAMS POLY SIDE UP 3. Ensure that the shiny side of the material is downwards. 4. Butt Reflective Air material, covering the entire floor. SUBSTRUCTURE UNDISTURBED SOIL 5. Ensure that all seams are securely taped using a vapor barrier tape. 6.
6 - PLUMBING & HVAC Wrapping your exposed ductwork and pipes with Reflective Air can significantly reduce your heating and cooling costs by minimizing radiant energy loss. Condensation problems caused by cold pipes as well as radiant heat loss by hot pipes can also be reduced. Your ducts or pipes can be wrapped in one of two ways: Lineal Wrapping or Spiral Wrapping. 6.1 Lineal Duct Wrap Reflective Air provides an important thermal break and vapor barrier for air ducts.
6 - PLUMBING & HVAC 6.3 Lineal Pipe Wrap 1. Cut a length of pipe wrap from Reflective Air roll. 2. Place the white poly side of the insulation on pipe. 3. Pre-shape Reflective Air pipe wrap by wrapping it around the pipe. 4. Seal all seams with reflective tape. Reflective Air REFLECTIVE TAPE PIPE 6.4 Spiral Pipe Wrap 1. Wrap the pipe in a diagonal fashion using Reflective Air. 2. The foil should be pointing outward. 3. Ensure that a 1” overlap is maintained at all times. 4.
6 - PLUMBING & HVAC 6.5 Radiant Floor: In Concrete Floor FLOORING* RADIANT HEAT SYSTEM 1. Unroll Reflective Air over the sand or gravel. FLOORING* CONCRETE RADIANT HEAT SYSTEM 2. Butt, or overlap the seams. Reflective Air 3. Seal the seams with a vapor barrier tape. 4. Install radiant heating and then pour concrete as usual. *according to floor design FLOORING* SOIL CONCRETE RADIANT HEAT SYSTEM ULTRAFLECT SOIL CONCRETE *according to floor design ULTRAFLECT FLOORING* SOIL 6.
WARRANTY 10 YEAR WARRANTY Reach Barrier warrants that its reflective insulation will be free from defect in materials and workmanship resulting in delamination or decomposition, for a period of 10 years from the date of purchase, pro vided that the product is installed according to the manufacturer’s specifications and has been used in an approved application.