
Instructions / Assembly


4
1. POST FRAME APPLICATIONS
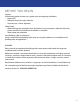
1.1 Purlins or Flush Frame Application Walls
1. Wrap the Reective Air around the inside of the
framework.
2. Fasten the Reective Air to the outside of each girt.
3. Leave enough Reective Air between the girts to allow
the material to bow inward, creating a 3/4” enclosed
airspace.
4. Securely tape all seams using reective tape.
5. The interior nishes to be installed using approved
attachment methods.
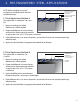
1.2 Purlins or Flush Frame
Application Roof
1. Tack fasten the Reective Air to the
purlins.
2. Ensure that enough material is draped
between the purlins to allow the
Reective Air to sag approximately
3/4” thereby creating an airspace
between the roof decking and the
material.
3. After the rst 4 ft. of Reective Air is
fastened, attach the roof sheeting over
that area.
4. Ensure that all of the adjoining seams are taped using reective tape.
5. Repeat the above steps for the next section of the roof.
6. Ensure that the ridge vent is left exposed (if applicable).
7. The ventilation design should not be tampered with when installing any insulation.
2” x 4” GIRTS AT 16” O.C.
3/4” ENCLOSED
AIR SPACES
FRAMING*
STEEL SIDING
INTERIOR FINISH
*Studs or columns as per wall design
*According to Roof Design.
Note: Ensure adequate Ventilation
STEEL ROOFING
3/4” ENCLOSED AIR SPACE
WALL
TRUSS OR RAFTERS
PURLINS AT 16” OR 24” O.C.*
(EAVES AND SOFFIT SHOULD BE LEFT OPEN)
Reective Air With Sag
Reective Air With Sag