
User Manual

ReadyLift
®
(Part# 66-5251) Strut Extension, Installation Instructions
2012-2014Toyota Tundra 4WD 3” Lift
ReadyLift Suspension Inc.
Toll Free (800)549-4620
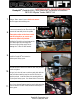
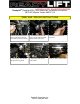
Loosen and remove the two 22mm bolts that
connect the lower ball joint to the spindle.
Please take caution as the lower control
arm will swing down as soon as you
remove the lower ball joint bolts.
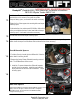
Holding the Strut with one hand remove the
four 14mm upper strut mounting nuts.
Remove the strut, being careful not to
damage the CV Boot on 4WD models.
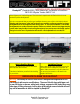
Install the ReadyLift
®
strut extension
and torque to factory specs.
Reinstall strut into vehicle and install the new nuts provided,
but do not tighten.
Using a jack, raise the lower control arm and guide both the
lower strut mount and the sway bar end link into their re-
spective pockets. Install the lower strut mounting bolt and
nut, torque to factory specs. Use thread locker if necessary.
Lower ball joint bolts
Use of a pry bar and hammer may be need to align mounting
holes for the end link bolt. Install 19mm bolt and torque to
factory specs.
10.
9.
8.
11.
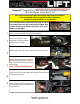
Using a 14mm wrench, loosen but do not remove
the four upper strut mounting nuts.
Total of 4 nuts
7.