
User Manual


www.ReadyLIFT.com - Phone: (800) 549-4620
Installation Instructions 69-5112
4
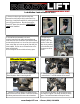
1. Position a floor jack under the front differential.
Raise the pad so that it is touching the diff.
2. Remove the factory 19mm differential mounting
nuts and bolts. The OEM washers will be reused.
3. Install the 1” spacers between the differential sup-
ports and the front cross-member. Install the new bolts
with factory washers and the new nuts and washers.
4. Re-install the skid-plate, use two OEM bolts for the
front and the supplied and torque the bolts to factory
specs. Re-install the wheels and torque to factory
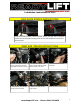
5. Remove the three upper strut mounting bolts.
Remove the strut from the vehicle and mount it in a
bench vise. Install the ReadyLift
®
kit, and torque fasten-
ers to OEM specifications. Note the shape of the
ReadyLift
®
spacer; the strut will be rotated 180 de-
grees when reinstalled.
6. Reinstall the strut assembly in its stock
location. Leave the three upper strut mounting nuts
loose Raise the lower control arm and install the lower
strut mounting bolt and nut. Use a floor jack to raise the
lower control arm up in order to get the lower ball joint
bolts installed. Be sure to use a thread locker on the
lower ball joint bolts.
Be sure to tighten all nut and bolts to factory specs.
7. Repeat steps 2
through 6 on the
Driver’s Side of the
vehicle. Follow each
step closely, making
sure to double-check
the torque on all fas-
teners.
Differential Drop Installation