
Installation Guide
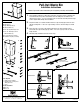

Parts Included
A Waste Bin (1)
B Wire Cage (1)
C Cage Mounting Clips (2)
D Slide Assemblies (2)
E #6 x 3/8 Large Mounting Screws
F #8 x 1/2" Mounting Screws for
Slide Assemblies (4)
G 6 x 3/4" Cage Clip Screws (4)
H Installation Template (not shown)
Pull-Out Waste Bin
Installation Instructions
Inspect all parts and read all instructions prior to beginning assembly and installation.
310416B_0615
2700 Oak Industrial Drive NE , Grand Rapids, MI 49505 USA
800.253.1561 • 616.459.3311 • www.kv.com
©2015 Knape & Vogt. All rights reserved. Made in USA. Knape & Vogt
®
reserves the right to change specifications without notice.
Tools Required
• Phillips head screwdriver
• Drill with 1/16" (1.5mm) bit for
drilling pilot holes
• Pencil
Product Assemblies
ECW9-1-20
ECW10-1-35
D
E
G
C
A
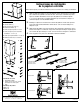
1. Place installation template on cabinet floor. Drill 4 holes at locations shown on template with
1/16" drill bit. Once the position is determined, fasten the sliding base assemblies to the
cabinet floor by using 2 – #8 x 1/2" mounting screws for each slide assembly shown in image
1 below. Tighten with a Phillips head screwdriver.
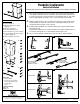
2. Fully extend slides out of cabinet and then install 1/ea cage mounting clip bottom onto each
slide by fastening with 2 – #6 x 3/8" cage mounting screws as shown in images 2a and 2b
below.
3. Place wire cage on top of the cage mounting clip bottoms as shown in image 3 below.
Then install each cage mounting clip tops with 2 – #6 x 3/4" cage clip screws as shown in
image 4 below.
4. With slides fully extended insert the bin into the cage.
1
WIDE INSTALLATION
USES 1
ST
AND 3
RD
HOLE BACK
NARROW INSTALLATION
USES 2
ND
AND 4
TH
HOLE BACK
WIDE INSTALLATION
NARROW INSTALLATION
3
4
B
F
2b
2a