
Instructions / Assembly
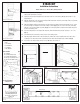


Front Back
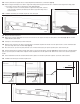
5/8"
Front of the Face Frame
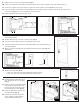
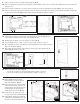
24. Insert the basket into rear sockets at an angle until you reach the desired depth as shown. (Fig. 16)
25. Lower the front steel mounting strap into front mounting brackets and press firmly while supporting the bottom of the mounting brackets
until basket snaps into both brackets as shown. (Fig. 17)
a. If the strap does not snap into the front mounting brackets, then lift the basket at an angle
and adjust the depth of the basket in the back mounting socket and lower again.
26. Installation is complete for a 1-1/2" face frame or frameless cabinet.
Steel mounting strap
Fig. 17
Fig. 16
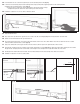
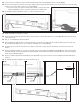
27. Fully extend drawer slides.
28. Press release levers up and down on opposite sides on each side of the slide as shown (Fig. 18) while removing the basket. Set basket aside.
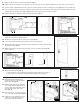
29. Subtract11/16"fromMeasurementAtogetmeasurementB.
30. UsemeasurementBtodrawalineontheleftfaceframeatthisdistancefromthefloorofthecabinet.Drawaverticalline5/8"backfromthefrontofcabinet
to intersect with measurement B line as shown. (Fig. 19)
31. Usinga1/8"drillbit,drilla3/4"deeppilotholewherethelinesintersect,andthenrepeatfortherighthandsideofthefaceframe.
32. Insert the slide assembly into the rear mounting sockets until the desired depth is reached. (Fig. 20) Then adjust inner slide members until the pilot hole is visible
throughtheslide.Completelyinsert#6x3/4"flatheadscrewsthroughtheholesandtightenontherightandlefthandsideofthecabinet.
33. Carefully push inner slide members back into slide. Then insert the basket back into the slide assembly. There will be some resistance.
34. Installation is complete for a 1-3/4" face frame cabinet.
Release Lever
Right - Up
Left - Down
Right - Up
Left - Down
Release Lever
Wire Basket
Fig. 18
Wood Basket
Fig. 19
“B” Line
Fig. 20