40V Lithium-Ion Cordless Lawn Mower RM-LM01-B2Z-340 Operator’s Manual SERVICE HELPLINE: 1-888-899-1688 www.realmimportexport.com Read all safety rules and instructions carefully before operating this tool.
CONTENTS Contents ..................................................................... ………….......................2 Safety Instruction………..................................................................................3-8 Know Your Lawn Mower…………….................................................................9 Install the Lawn Mower ....................................................................................10 To Start & Stop the Mower.............................................................
SAFETY INSTRUCTION WHEN USING ELECTRICAL APPLIANCES, BASIC SAFETY PRECAUTIONS SHOULD ALWAYS BE FOLLOWED: ﹒READ ALL INSTRUCTIONS BEFORE USE. ﹒ TO PROTECT AGAINST ELECTRIC SHOCK, DO NOT IMMERSE CORD, PLUG OR APPLIANCE, IN WATER OR ANY OTHER LIQUID. ﹒UNPLUG FROM OUTLET WHEN NOT IN USE AND BEFORE CLEANING. ﹒ DO NOT OPERATE ANY APPLIANCE WITH A DAMAGED CORD OR PLUG OR AFTER THE APPLIANCE MALFUNCTIONS, OR HAS BEEN DAMAGED IN ANY MANNER.
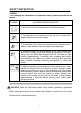
SAFETY INSTRUCTION SYMBOL The following are explanations of important safety hazard pictorials on the mower. SYMBOL DESIGNATION/EXPLANATION 1.User must read and understand the instruction manual. 2. To avoid the risk of serious injury do not mow up and down slopes. Always mow across slopes. 3. To avoid the risk of injury to bystanders keep all persons and pets at a safe distance from the mower while operating. 4. Rotating blades can cause serious injury.
SAFETY INSTRUCTION FOR ALL LAWN MOWERS: a) Avoid dangerous environments - don’t use appliances in damp or wet locations. b) Don’t use in the rain. c) Keep away from children - all bystanders (visitors) should be kept at a safe distance from the work area. d) Dress properly - do not wear loose clothing or jewellery. They can be caught in moving parts.Use of rubber gloves and substantial footwear is recommended when working outdoors.Wear protective hair covering to contain long hair.
SAFETY INSTRUCTION SAFETY INSTRUCTIONS FOR WALK-BEHIND MOWERS I. GENERAL OPERATION 1. Read, understand, and follow all instructions on the machine and in the manual(s) before starting. 2. Do not put hands or feet near or under the machine. Keep clear of the discharge opening at all times. 3.Only allow responsible adults, who are familiar with the instructions, to operate this machine. Clear the area of objects such as rocks, wire, toys, etc., which could be thrown by the blade.
SAFETY INSTRUCTION SAFETY INSTRUCTIONS FOR WALK-BEHIND MOWERS III. CHILDREN Tragic accidents can occur if the operator is not alert to the presence of children. Children are often attracted to the machine and the mowing activity. Never assume that children will remain where you last saw them. 1) Keep children out of the mowing area and under the watchful care of a responsible adult other than the operator. 2) Be alert and turn mower off if a child enters the area.
SAFETY INSTRUCTION BATTERY& CHARGER CAUTION USE ONLY APPROVED REPLACEMENT BATTERIES, OTHER BATTERIES MAY CAUSE INJURY OR DAMAGE TO THE MOWER. The battery that is supplied with this mower is a maintenance-free, sealed, 36 V storage battery. It can be tipped without danger of acid spillage. The charger will require approximately 2.5 hours to recharge a fully discharged battery. Do not tip or store upside down. BATTERY SAFETY RULES 1.
SAFETY INSTRUCTION BATTERY& CHARGER Replace any damaged charger cords or the charger immediately. Keep the mower and the charger away from water, heat sources (radiators, heaters, stoves, etc.), flames, and chemicals. Do not dispose of this product in fire, batteries inside this product may explode or leak. Read this owner's manual and safety rules carefully before operating the mower.
KNOW YOUR LAWN MOWER Read this operator's manual and safety rules before operating your lawn mower. Compare the illustration in Figure 1 to your lawn mower in order to familiarize yourself with the location of various controls and adjustments. Save this manual for future reference.
PACKING LIST • • • • • • • Lawn mower Grass catcher bag 40V Battery (Pre-installed at the factory). 40V Charger Power line and plug Operator’s Manual Safety Key Note: • Carefully remove the parts from the box. • Inspect the parts carefully in order to verify that no breakage or damage occurred during shipping. • Do not discard the packing material until all parts have been examined. INSTALL THE LAWN MOWER INSTALLING THE HANDLE Fig 3.1 Fig 3.2 Connect the bottom part of the handle to the lawnmower.
INSTALLING THE GRASS CATCHER Connect the top and bottom part of the grass catcher. (see Figure 4.1) To seat the grass catcher onto the lawnmower, it is first necessary to lift the rear safety grass catcher cover.(see Figure 4.2) NOTE: For optimal performance empty grass bag often during use. A full grass bag will inhibit performance of the mower and collection of grass clippings. TO START & STOP THE MOWER Carefully follow the illustration below, in order, when starting or stopping the mower. (see Fig.5.
Fig. 5.2 Fig. 5.1 CAUTION Do not attempt to override the operation of the safety key or lever. WARNING The operation of any mower can result in foreign objects being thrown into the eyes, which can cause severe eye damage. Always wear safety glasses while operating the mower and while performing any adjustments or repairs. CAUTION Ensure that other people and pets remain at least 50 ft.(15m) away when the mower is in use.
TO START & STOP THE MOWER Adjusting Mower height ( see Fig . 6 ) •Move the lever towards the front of the appliance to lower the height of cut. •Push the height adjustment lever into one of the 5 height locations. Fig. 6 REMOVE THE BATTERY FROM MOWER ( see Fig . 7 ) Note: The battery can be removed from the mower. Step 1: Open the battery cover Step 2: Remove the battery Fig.
TO START & STOP THE MOWER CHARGING PROCEDURE Note: The battery can’t be charged in the mower. Step 1: The red light will light up during the recharge cycle. Step 2: The green light will light up when the battery is fully charged. 1) Remove the battery and plug the charger connector into the battery input connector. See diagram below. 2) Insert the 100-120V plug from the charger into the electrical outlet.
BATTERY USE Push the Battery Capacity Indicator switch. The lights will indicate the battery's capacity, according to the following chart. WARNING Do not mow a slope that has an angle of greater than 15° (a rise of approximately2-1/2 ft. [75 m] every 10 ft. [3m]). Mow across the face of a slope, and never up and down. MOWING TIPS NOTE: A sharp blade will greatly enhance the performance of the mower, especially when cutting high grass.
TO START & STOP THE MOWER MOWING TIPS Do not mow in circles. Travel back and forth across the lawn. • When cutting thick grass, reduce walking speed in order to allow for a more effective cut and a proper discharge of the clippings. For a healthy lawn, always cut off one-third or less of the total length of the grass. The average lawn should be approximately 1-1/2 to 2 in. (3.8 to 5 cm) long during cool months, and more than 2 in. (5 cm) long during hot months.
CUTTING BLADE REPLACEMENT (see Fig.9) WARNING Always protect your hands by wearing heavy gloves and/or wrapping the cutting edges with rags or other materials when performing any maintenance on the blades. 1. ELEASE THE SWITCH LEVER TO TURN THE MOWER OFF, WAIT FOR THE BLADE TO COME TO A COMPLETE STOP, AND THEN REMOVE THE BATTERY 2.While wearing leather padded gloves, wedge a block of wood between the blade and the mower deck in order to prevent the blade from turning when the nut is being removed. 3.
CLEAN THE MOWER WARNING: To reduce the risk of electric shock and damage to the mower, do not expose the mower to water. The underside of mower deck should be cleaned after each use as grass clippings, leaves, dirt and other debris will accumulate causing rust and corrosion. Remove any build-up of grass and leaves on or around the motor cover (do not use water). Wipe the mower clean with a dry cloth occasionally.
SERVICING 1. When servicing the mower, use only replacement parts that are available from the manufacturer. The use of parts that do not meet the original equipment specifications may lead to improper performance, and may compromise safety. 2. Before cleaning, repairing, or inspecting, verify that the blade and all moving parts have come to a complete stop, and remove the safety key. In order to prevent accidental start-ups, remove the safety key when the mower is not in use. 3.
PARTICULAR ATTENTION HAS TO BE GIVEN WHERE CHILDREN AND VULNERABLE PEOPLE ARE PRESENT. •CHILDREN OF LESS THAN 3 YEARS SHOULD BE KEPT AWAY UNLESS CONTINUOUSLY SUPERVISED. • DO NOT USE IF THE POWER CORD OR PLUG IS DAMAGED. TO BE REPAIRED BY A QUALIFIED ELECTRICIAN OR TO BE REPLACED BY THE MANUFACTURER, SERVICE AGENT OR SIMILARLY QUALIFIED PERSON, IN ORDER TO AVOID A HAZARD. PLUG WIRING This appliance is fitted with a moulded BS 1363 13-amp plug.
TROUBLESHOOTING PROBLEM The mower does not start. POSSIBLE CAUSE SOLUTION 1.The battery is not charged. 2.The switch is defective. 3.Grass jammed at blade. 4.The battery is not attached to the motor. 5.Battery may require service or replacement. 6.Key is not installed. 1.Charge the battery. 2.Replace the switch (call the helpline, at 1-888-899-1688. 3.Remove battery; check under deck for jams. 4.Check the connection between the motor connector and the battery. 5.
LIMITED THREE-YEAR WARRANTY REALM hereby warranties this product, to the original purchaser with proof of purchase, for a period of three (3) years against defects in materials, parts or workmanship. REALM, at its own discretion will repair or replace any and all parts found to be defective, through normal use, free of charge to the customer.
101 wales avenue,Avon,MA 02322,United States Service Helpline: 1-888-899-1688 Email: info@realmimportexport.