
User's Guide


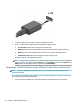
Table Of Contents
- Welcome
- Components
- Network connections
- Connecting to a wireless network
- Connecting to a wired network
- Using HP MAC Address Pass Through to identify your computer on a network (select products only)
- Navigating the screen
- Entertainment features
- Using a camera (select products only)
- Using audio
- Using video
- Connecting a DisplayPort device using a USB Type-C cable (select products only)
- Connecting a Thunderbolt device using a USB Type-C cable (select products only)
- Connecting video devices by using a VGA cable (select products only)
- Connecting video devices using an HDMI cable (select products only)
- Connecting a Thunderbolt DisplayPort device
- Discovering and connecting wired displays using MultiStream Transport
- Discovering and connecting to Miracast-compatible wireless displays (select products only)
- Discovering and connecting to Intel WiDi certified displays (select Intel products only)
- Using data transfer
- Managing power
- Using Sleep and Hibernation
- Shutting down (turning off) the computer
- Using the Power icon and Power Options
- Running on battery power
- Security
- Protecting the computer
- Using passwords
- Setting passwords in Windows
- Setting passwords in Computer Setup
- Managing a BIOS administrator password
- Using DriveLock Security Options
- Windows Hello (select products only)
- Using antivirus software
- Using firewall software
- Installing software updates
- Using HP Client Security (select products only)
- Using HP Device as a Service (HP DaaS) (select products only)
- Using an optional security cable (select products only)
- Using a fingerprint reader (select products only)
- Maintenance
- Backing up, restoring, and recovering
- Using Windows tools
- Creating HP Recovery media (select products only)
- Restoring and recovery
- Restoring, resetting, and refreshing using Windows tools
- Restoring using HP Recovery Manager and the HP Recovery partition
- Recovering using HP Recovery Manager
- Recovering using the HP Recovery partition (select products only)
- Recovering using HP Recovery media
- Changing the computer boot order
- Removing the HP Recovery partition (select products only)
- Computer Setup (BIOS), TPM, and HP Sure Start
- Using HP PC Hardware Diagnostics
- Specifications
- Electrostatic Discharge
- Accessibility

5 Entertainment features
Use your HP computer for business or pleasure to meet with others via the camera, mix audio and video, or
connect external devices like a projector, monitor, TV, or speakers. See Components on page 3 to locate the
audio, video and camera features on your computer.
Using a camera (select products only)
Your computer has a camera (integrated camera) that records video and captures photographs. Some models
allow you to video conference and chat online using streaming video.
▲ To access the camera, type camera in the taskbar search box, and then select Camera from the list of
applications.
Using audio
You can download and listen to music, stream audio content (including radio) from the web, record audio, or
mix audio and video to create multimedia. You can also play music CDs on the computer (on select models) or
attach an external optical drive to play CDs. To enhance your listening enjoyment, attach headphones or
speakers.
Connecting speakers
You can attach wired speakers to your computer by connecting them to a USB port or to the audio-out
(headphone)/audio-in (microphone) combo jack on your computer or on a docking station.
To connect wireless speakers to your computer, follow the device manufacturer's instructions. To connect
high-denition speakers to the computer, see Setting up HDMI audio on page 21. Before connecting
speakers, lower the volume setting.
Connecting headphones
WARNING! To reduce the risk of personal injury, lower the volume setting before putting on headphones,
earbuds, or a headset. For additional safety information, see the Regulatory, Safety and Environmental
Notices.
To access this guide:
▲ Select the Start button, select HP, and then select HP Documentation.
You can connect wired headphones to the headphone jack or to the audio-out (headphone)/audio-in
(microphone) combo jack on your computer.
To connect wireless headphones to your computer, follow the device manufacturer's instructions.
Connecting a microphone
To record audio, connect a microphone to the microphone jack on the computer. For best results when
recording, speak directly into the microphone and record sound in a setting free of background noise.
16 Chapter 5 Entertainment features