
Data Sheet


Project Santa Cruz Development Kit Overview
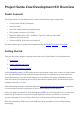
Devkit Contents
The Project Santa Cruz Development Kit contains the following major components:
• Carrier board with Wi-Fi antennas
• Azure Eye SoM
• Azure Ear SoM (includes microphone array)
• RBG camera (connects to Eye SoM)
• Required cables: MIPI, USB-C, USB Micro Type-B to USB-A, power cable.
• Welcome card with hex key
• Section of 80/20 1010 Series mounting rail
For more detailed specs, please see the datasheets for the devkit, Eye SoM, and Ear SoM.
Getting Started
There are three main stages to getting started with your Project Santa Cruz Development Kit:
1. Onboarding
2. Devkit unboxing and set up
3. Out of Box Experience (OOBE)
In the onboarding stage, you will assign an Azure subscription within your account to Project Santa
Cruz. The onboarding tool will walk you through the process of creating an IoT Hub within your
Azure subscription to use with Project Santa Cruz. You will have the option of enabling services,
such as the Device Provisioning Service (DPS), Azure Device Update (ADU), and Automatic Import
Updates, within your IoT Hub.
After onboarding has been completed, follow the devkit unboxing and set up guide for guidance
on connecting the various components of the kit and powering on your device.
Once your devkit is powered on, work through the OOBE (out-of-box experience) to connect your
devkit to a Wi-Fi network, set up an SSH login (optional), connect your devkit to your Azure
account, and assign it to your Project Santa Cruz IoT Hub (created during onboarding).
After the onboarding, devkit set up, and OOBE have been completed, you are ready to begin
prototyping.