User Guide Lenovo IdeaPad Flex 3 (11", 05)
Read this first Before using this documentation and the product it supports, ensure that you read and understand the following: • Appendix A “Important safety information” on page 29 • Safety and Warranty Guide • Setup Guide First Edition (January 2020) © Copyright Lenovo 2020. LIMITED AND RESTRICTED RIGHTS NOTICE: If data or software is delivered pursuant to a General Services Administration “GSA” contract, use, reproduction, or disclosure is subject to restrictions set forth in Contract No. GS35F-05925.
&RQWHQWV About this guide . . . . . . . . . . . . . iii Chapter 1. Meet your computer . . . . . 1 Front . . . . . . . . . . . . . Base . . . . . . . . . . . . . Left . . . . . . . . . . . . . Right . . . . . . . . . . . . . Features and specifications . . . . Statement on USB transfer rate . Operating environment . . . . . . . . . . . . . . . . . . . . . . . . . . . . . . . . . . . . . . . . . . . . . . . . . . . . . 1 2 3 4 5 6 6 Chapter 2. Get started with your computer . . . . . . . . . . . . .
ii User Guide
About this guide • This guide applies to Lenovo product model(s) listed below. Illustrations in this guide may look slightly different from your product model. Model name Machine type (MT) Lenovo IdeaPad Flex 3 11IGL05 82B2 • This guide may contain information about accessories, features, and software that are not available on all models. • This guide contains instructions that are based on the Windows 10 operating system.
iv User Guide
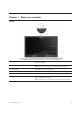
Chapter 1. Meet your computer Front 1. Camera Capture still and moving images for taking photos, recording videos, and video chatting. 2. Camera cover slider Move the slider to cover or uncover the camera lens. Note: The camera cover helps you better protect your privacy. 3. Camera light If the light is on, the camera is in use. 4. Microphone Capture or record sound and voice. 5. Multi-touch screen Display text, graphics, and videos. 6.
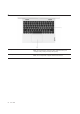
Base 1. Keyboard Enter characters and interact with programs. Note: The keyboard also includes hotkeys and function keys for changing settings and performing tasks quickly. 2. Touchpad Perform finger touch and all the functions of a traditional mouse. Note: The touchpad also supports multi-touch function.
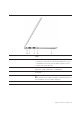
Left 1. Power connector Connect to power with the included power cord and ac power adapter. 2. Charging light Indicate whether the computer is connected to ac power. • Solid white: Connected to ac power; battery capacity 91%–100% • Solid amber: Connected to ac power; battery capacity 1%–90% • Off: Not connected to ac power 3. USB (3.2 Gen 1) Type-A connector Connect to a USB-compatible device, such as a USB keyboard, a USB mouse, a USB storage device, or a USB printer. 4.
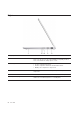
Right 1. Right speaker Produce sound. 2. Novo button hole Press the Novo button to open the Novo Button menu. From the menu, you can choose to open the UEFI/BIOS setup utility, the Boot menu, or the Windows startup options screen. 3. Power light • On: The computer is turned on. • Off: The computer is turned off or in hibernation mode. • Blinking: The computer is in sleep mode. 4. Power button Press the button to turn on the computer or put the computer into sleep mode. 5.
Features and specifications Dimensions • Width: 281.7 mm (11.09 inches) • Depth: 198 mm (7.80 inches) • Thickness: 17.5 mm (0.69 inches) ac power adapter • Input: 100 V ac–240 V ac, 50 Hz–60 Hz • Output: 20 V dc • Power: 45 W Battery pack • Capacity: 37.5 Wh • Number of cells: 3 Microprocessor Memory To view the microprocessor information of your computer, right-click the Start button and then select System.
Note: The battery capacity is the typical or average capacity as measured in a specific test environment. Capacities measured in other environments may differ but are no lower than the rated capacity (see product label).
Chapter 2. Get started with your computer Get started with Windows 10 Learn the basics of Windows 10 and start working with it right away. For more information about Windows 10, see the Windows help information. Windows account You must create at least one account to use the Windows operating system. It can be either a local account or a Microsoft account. Local accounts A local account is created on a particular Windows-enabled device and it can only be used on that device.
Note: To add family members, you need to sign in with a Microsoft account. Step 3. Set the user name and password for the user account. Windows desktop 1. Account Change account settings, lock the computer, or sign out of the current account. 2. Documents Open the Documents folder, a default folder to save your received files. 3. Pictures Open the Pictures folder, a default folder to save your received pictures. 4. Settings Open Settings. 5.
• Press the Windows logo key on the keyboard. Open Control Panel • Open the Start menu and select Windows System ᇆ Control Panel. • Use Windows Search. Open an app • Open the Start menu and select the app you want to open. • Use Windows Search. Lenovo Vantage and Lenovo PC Manager Lenovo Vantage and Lenovo PC Manager is software developed by Lenovo.
Step 1. Click the action center icon in the Windows notification area. Step 2. Click the Airplane mode icon to turn it on or off. Note: Click Expand if you cannot find the airplane mode icon. The Novo Button menu The Novo Button menu can be displayed before the operating system starts.
Operating modes The screen of your computer can open up to an angle of 360 degrees, enabling you to use your computer for different purposes. Mode Notebook mode Suitable for • Entering text • Drag and drop operations using the touchpad Stand mode • Giving a presentation • Viewing a slide show Chapter 2.
Mode Suitable for Tent mode Watching movies Tablet mode Playing touch-enabled games Turn on screen rotation lock In stand, tent, or tablet mode, auto rotation is turned on so that the orientation of the screen changes based on how you place or hold the computer. However, you can turn on rotation lock to keep the screen in a fixed orientation. Step 1. Select the action center icon in the Windows notification area. Step 2. Select the Rotation lock icon to turn it on.
Turn on or off tablet mode Windows 10 provides the tablet mode that makes touch operations more friendly. When rotating your computer screen to switch to tablet, stand, or tent mode, you will be prompted to switch to Windows tablet mode. You can also manually turn on or off Windows tablet mode. Step 1. Select the action center icon in the Windows notification area. Step 2. Select the Tablet mode icon to turn it on or off.
Use the multi-touch screen If your computer screen supports multi-touch function, you can navigate the screen with simple touch gestures. Note: Not all gestures are available on all apps. Tap once • From the Start menu: Open an app or item. • From the desktop: Select an app or item. • In an open app: Perform an action such as Copy, Save, and Delete, depending on the app. Tap twice quickly Open an app or item from the desktop. Tap and hold Open a shortcut menu.
Move two fingers farther apart Zoom in. Swipe in from the right edge Open the action center to see your notifications and quick actions. Swipe in from the left edge View all your open windows in task view. • Swipe downwards shortly from the top edge (for full-screened app or when your computer is in the tablet mode) Show a hidden title bar. • Swipe in from the top edge to the bottom edge (when your computer is in the tablet mode) Close the current app. Chapter 2.
16 User Guide
Chapter 3. Explore your computer Manage power Use the information in this section to achieve the best balance between performance and power efficiency. Check the battery status The battery status icon or is in the Windows notification area. You can check the battery status, view the current power plan, and access battery settings quickly. Click the battery status icon to display the percentage of battery power remaining and change the power mode. A warning message is displayed when the battery is low.
Change settings in UEFI/BIOS setup utility This section introduces what is UEFI/BIOS and the operations you can perform in its setup utility. What is UEFI/BIOS setup utility UEFI/BIOS is the first program that runs when a computer starts. UEFI/BIOS initializes hardware components and loads the operating system and other programs. Your computer may include a setup program (setup utility) with which you can change certain UEFI/BIOS settings. Open the UEFI/BIOS setup utility Step 1.
Password types You can set various types of passwords in the UEFI/BIOS setup utility. Password type Pre-requisite Usage Administrator password No You must enter it to start the setup utility. User password The administrator password must be set. You can use the user password to start the setup utility. Master hard disk password No You must enter it to start the operating system. User hard disk password The master hard disk password must be set.
If you remove the administrator password, the user password is also removed. Set user password You must set the administrator password before you can set the user password. The administrator of the setup utility might need to set a user password for use by others. Step 1. Open the UEFI/BIOS setup utility using the administrator password. Step 2. Select Security ᇆ Set User Password and press Enter. Step 3. Enter a password string that contains only letters and numbers and then press Enter.
Step 2. Select Security. Step 3. Change or remove the hard disk password. To change or remove master password, select Change Master Password and press Enter. Note: If you remove the master hard disk password, the user hard disk password is also removed. To change user password, select Change User Password and press Enter. Note: The user hard disk password cannot be removed separately. Step 4. Select Exit ᇆ Exit Saving Changes.
Step 1. In the Windows 10 search box, enter Create a restore point and select the matched result. Step 2. Select the System Protection tab and then select Create. Note: System protection must be turned on for the system drive (typically with drive letter C) before you can create restore points. Select a drive and then select Configure to turn on or disable system protection. Restore from a system restore point Step 1. In Windows 10 search box, enter Recovery and select the matched result. Step 2.
Note: For computers without a USB Type-A connector, you may need to purchase and use an adapter (USB Type-C to Type-A) to use a recovery drive. Step 2. On the Choose an option screen, select Troubleshoot. Step 3. Choose a recovery option. Select Advanced Options ᇆ System Restore to restore your computer to a system restore point. Or select Recover from a drive to reset your computer.
24 User Guide
Chapter 4. Help and support Frequently asked questions How do I open the Control Panel? • Open the Start menu and select Windows System ᇆ Control Panel. • Use Windows Search. How should I turn off my computer? Open the Start menu and select Power ᇆ Shut down. How do I partition my storage drive? Refer to https://support.lenovo.com/solutions/ht503851 What should I do if my computer stops responding. Press and hold the power button until the computer turns off. Then restart the computer. 1.
Resources How to access? Lenovo Support Web site with the latest support information of the following: • Drivers and software • Diagnostic solutions Visit https://support.lenovo.com • Product and service warranty • Product and parts details • Knowledge base and frequently asked questions • Open the Start menu and select Get Help or Tips. Windows help information • Use Windows Search or the Cortana® personal assistant. • Microsoft support Web site: https:// support.microsoft.
Call Lenovo If you have tried to correct the problem yourself and still need help, you can call Lenovo Customer Support Center. Before you contact Lenovo Record product information and problem details before you contact Lenovo.
Purchase additional services During and after the warranty period, you can purchase additional services from Lenovo at https:// www.lenovo.com/services. Service availability and service name might vary by country or region.
Appendix A. Important safety information Safety notices This information can help you safely use your computer. Follow and retain all information included with your computer. The information in this document does not alter the terms of your purchase agreement or the Limited Warranty. For more information, see "Warranty Information" in the Safety and Warranty Guide that comes with your computer. Customer safety is important. Our products are developed to be safe and effective.
Protect yourself from the heat generated by the ac power adapter. When the ac power adapter is connected to an electrical outlet and your computer, it generates heat. Extended contact with your body, even through clothing, may cause a skin burn. • Do not place the ac power adapter in contact with any part of your body while it is in use. • Never use it to warm your body. • Do not wrap the cords around the ac power adapter while in use. Prevent your computer from getting wet.
Handle your computer gently. Do not drop, bump, scratch, twist, hit, vibrate, push, or place heavy objects on your computer, display, or external devices. Carry your computer carefully. • Use a quality carrying case that provides adequate cushioning and protection. • Do not pack your computer in a tightly packed suitcase or bag. • Before putting your computer in a carrying case, make sure that it is off, in sleep mode, or in hibernation mode.
• Power cords, plugs, power adapters, extension cords, surge protectors, or power supplies that are cracked, broken, or damaged. • Signs of overheating, smoke, sparks, or fire. • Damage to a battery (such as cracks, dents, or creases), discharge from a battery, or a buildup of foreign substances on the battery. • A cracking, hissing, or popping sound, or strong odor that comes from the product.
When replacing CRUs, be cautious of sharp edges or corners that might cause injury. If you suffer an injury, seek medical care immediately. Power cords and power adapters DANGER Use only the power cords and power adapters supplied by the product manufacturer. The power cords shall be safety approved. For Germany, it shall be H03VV-F, 3G, 0.75 mm2, or better. For other countries, the suitable types shall be used accordingly. Never wrap a power cord around a power adapter or other object.
Plugs and outlets DANGER If a receptacle (power outlet) that you intend to use with your computer equipment appears to be damaged or corroded, do not use the outlet until it is replaced by a qualified electrician. Do not bend or modify the plug. If the plug is damaged, contact the manufacturer to obtain a replacement.
General battery notice DANGER Batteries supplied by Lenovo for use with your product have been tested for compatibility and should only be replaced with approved parts. A battery other than the one specified by Lenovo, or a disassembled or modified battery is not covered by the warranty. Battery abuse or mishandling can cause overheating, liquid leakage, or an explosion. To avoid possible injury, follow these instructions: • Do not open, disassemble, or service any battery.
The Lenovo-authorized repair facilities or technicians recycle Lenovo batteries according to local laws and regulations. When replacing the lithium coin-cell battery, use only the same type or equivalent type that is recommended by the manufacturer. The battery contains lithium and can explode if not properly used, handled, or disposed of. Swallowing the lithium coin-cell battery will cause choking or severe internal burns in just two hours and might even result in death. Keep batteries away from children.
Heat and product ventilation DANGER Computers, ac power adapters, and many accessories can generate heat when turned on and when batteries are charging. Notebook computers can generate a significant amount of heat due to their compact size. Always follow these basic precautions: • When your computer is turned on or the battery is charging, the base, the palm rest, and some other parts may become hot.
Electrical current safety information DANGER Electric current from power, telephone, and communication cables is hazardous. To avoid a shock hazard: • Do not use your computer during a lightning storm. • Do not connect or disconnect any cables or perform installation, maintenance, or reconfiguration of this product during an electrical storm. • Connect all power cords to a properly wired and grounded electrical outlet. • Connect properly wired outlets to any equipment that will be attached to this product.
Liquid crystal display (LCD) notice CAUTION: The liquid crystal display (LCD) is made of glass, and rough handling or dropping the computer can cause the LCD to break. If the LCD breaks and the internal fluid gets into your eyes or on your hands, immediately wash the affected areas with water for at least 15 minutes; if any symptoms are present after washing, get medical care.
Glass parts notice CAUTION: Some parts of your product may be made of glass. This glass could break if the product is dropped on a hard surface or receives a substantial impact. If glass breaks, do not touch or attempt to remove it. Stop using your product until the glass is replaced by trained service personnel. Static electricity prevention Static electricity, although harmless to you, can seriously damage computer components and options. Improper handling of static-sensitive parts can damage the part.
Appendix B. Accessibility and ergonomic information This chapter provides information about accessibility and ergonomics. Accessibility information Lenovo is committed to providing users who have hearing, vision, and mobility limitations with greater access to information and technology. This section provides information about the ways these users can get the most out of their computer experience. You also can get the most up-to-date accessibility information from the following Web site: https://www.
keyboard with all the standard keys. You can select keys using the mouse or another pointing device, or you can tap to select the keys if your computer supports multi-touch screen. • High Contrast High Contrast is a feature that heightens the color contrast of some text and images on your screen. As a result, those items are more distinct and easier to identify. • Personalized keyboard Adjust keyboard settings to make your keyboard easier to use.
– Change the size of all the items on your screen. 1. Right-click a blank area on the desktop and then click Display settings ᇆ Display. 2. Change the item size by following the on-screen instructions. For some applications, your configuration might not take effect until you sign out and then sign in again. – Change the size of the items on a Web page. Press and hold Ctrl, and then press the plus-sign key (+) to enlarge or the minus-sign key (–) to reduce the text size.
Display: Position the display to maintain a comfortable viewing distance of 510 mm to 760 mm (20 inches to 30 inches). Avoid glare or reflections on the display from overhead lighting or outside sources of light. Keep the display screen clean and set the brightness to levels that enable you to see the screen clearly. Press the brightness control keys to adjust display brightness. Head position: Keep your head and neck in a comfortable and neutral (vertical, or upright) position.
Appendix C. Compliance information This appendix provides the various compliance statements for Lenovo products. Radio frequency compliance statements Computer models equipped with wireless communications comply with the radio frequency and safety standards of any country or region in which it has been approved for wireless use. Besides this document, ensure that you read the Regulatory Notice for your country or region before using the wireless devices contained in your computer.
Brazil Este equipamento não tem direito à proteção contra interferência prejudicial e não pode causar interferência em sistemas devidamente autorizados. This equipment is not protected against harmful interference and may not cause interference with duly authorized systems.
Environmental information by countries and regions This section provides environmental, recycling, and RoHS information about Lenovo products. Recycling and environmental information Lenovo encourages owners of information technology (IT) equipment to responsibly recycle their equipment when it is no longer needed. Lenovo offers a variety of programs and services to assist equipment owners in recycling their IT products. For information about recycling Lenovo products, go to: https://www.lenovo.
Japan recycling statements Collecting and recycling a disused Lenovo computer or monitor If you are a company employee and need to dispose of a Lenovo computer or monitor that is the property of the company, you must do so in accordance with the Law for Promotion of Effective Utilization of Resources. Computers and monitors are categorized as industrial waste and should be properly disposed of by an industrial waste disposal contractor certified by a local government.
Equipamentos elétricos e eletrônicos não devem ser descartados em lixo comum, mas enviados à pontos de coleta, autorizados pelo fabricante do produto para que sejam encaminhados e processados por empresas especializadas no manuseio de resíduos industriais, devidamente certificadas pelos orgãos ambientais, de acordo com a legislação local. A Lenovo possui um canal específico para auxiliá-lo no descarte desses produtos.
For proper collection and treatment, go to: https://www.lenovo.com/lenovo/environment Recycling information for mainland China Battery recycling information for Taiwan Battery recycling information for the United States and Canada RoHS compliance statements Lenovo is committed to protecting the environment. An important priority for Lenovo is the implementation of RoHS (Restriction of Hazardous Substances) requirements globally. Lenovo meets all the RoHS requirements currently in effect.
Ukraine Mainland China 䅰恂₼⦌䟄䟄⣷ℶ❐㦘⹂䓸德棟Ⓟ䦇␂䤓㽤㈚㽤屓✛␅Ⅵ尐㻑᧨勣㎂⏻⚇⺈㦻ℶ❐₼㦘⹂䓸德㖘捷ↅ⒕ 伊᧨⭿㢝Ⱁₚᇭ Table 1.
Taiwan ⠽⏒Unit 棟䞷䓸役♙␅▥⸇䶵壮 Restricted substances and its chemical symbols 擪Lead (Pb) 㻭 Mercury (Hg) 昧 Cadmium (Cd) ⏼⎈攊 Hexavalent chromium (Cr +6) ⮩䅃勾啾 Polybrominated biphenyls (PBB) ⮩䅃ℛ啾搩 Polybrominated diphenyl ethers (PBDE) ⮥㹋 - Ⴜ Ⴜ Ⴜ Ⴜ Ⴜ 榊恾㨎俓ↅ - Ⴜ Ⴜ Ⴜ Ⴜ Ⴜ 㳮㬿捷ↅ - Ⴜ Ⴜ Ⴜ Ⴜ Ⴜ 櫾䯉娱ヤ - Ⴜ Ⴜ Ⴜ Ⴜ Ⴜ 榊䄟∪㑘⣷ - Ⴜ Ⴜ Ⴜ Ⴜ Ⴜ ⏁ⷧ孬函 - Ⴜ Ⴜ Ⴜ Ⴜ Ⴜ 懇⏴孬函 - Ⴜ Ⴜ Ⴜ Ⴜ Ⴜ 揜ↅ - Ⴜ Ⴜ Ⴜ Ⴜ Ⴜ ⌨劒1.
• • • • Reorient or relocate the receiving antenna. Increase the separation between the equipment and receiver. Connect the equipment into an outlet on a circuit different from that to which the receiver is connected. Consult an authorized dealer or service representative for help. Lenovo is not responsible for any radio or television interference caused by using cables and connectors other than those recommended by Lenovo or by unauthorized changes or modifications to this equipment.
Zulassungsbescheinigung laut dem Deutschen Gesetz über die elektromagnetische Verträglichkeit von Betriebsmitteln, EMVG vom 20. Juli 2007 (früher Gesetz über die elektromagnetische Verträglichkeit von Geräten), bzw. der EU Richtlinie 2014/30/EU, der EU Richtlinie 2014/53/EU Artikel 3.1b), für Geräte der Klasse B. Dieses Gerät ist berechtigt, in Übereinstimmung mit dem Deutschen EMVG das EG-Konformitätszeichen CE - zu führen.
Supplemental information for the Eurasian Union Назначение персональный компьютер для личного и служебного использования, для передачи данных, с поддержкой различных профилей подключения (Wi-Fi, Bluetooth и пр.).
Lenovo encourages you to make efficient use of energy an integral part of your day-to-day operations. To help in this endeavor, Lenovo has preset the following power-management features to take effect when your computer has been inactive for a specified length of time. Table 2.
Appendix D. Notices and trademarks Notices Lenovo may not offer the products, services, or features discussed in this document in all countries. Consult your local Lenovo representative for information on the products and services currently available in your area. Any reference to a Lenovo product, program, or service is not intended to state or imply that only that Lenovo product, program, or service may be used.
Any performance data contained herein was determined in a controlled environment. Therefore, the result obtained in other operating environments may vary significantly. Some measurements may have been made on development-level systems and there is no guarantee that these measurements will be the same on generally available systems. Furthermore, some measurements may have been estimated through extrapolation. Actual results may vary.