
Operator's Guide


Live Interactive Holography System 3D Control Device Guide
3. 3D Control Device Description
The 3D Control Device incorporates buttons and a joystick that duplicate buttons seen on the
HOLOSCOPE-i system’s main screen during the active session.
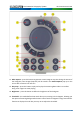
The numbers of the following paragraphs correlate to the numbered arrows in Figure 2.
Warning
The 3D Control Device is powered by a rechargeable Li-Ion battery. Always ensure
that the 3D Control Device is charged outside of the interventional suite.
1. Operational LED – indicates that the battery is charged, and the unit is ready to operate
when properly paired with the system.
2. Menu – press this button to access the HOLOSCOPE-i system’s Holo-Menu. Available options
are: Log off, Demo mode, Preferences and Settings, Software versions and Shut down.
3. 3-Dimensional Joystick – allows the operator to manipulate the hologram after the mode
or action (Rotate, Zoom, etc.) has been activated.
4. Select – press this button to select a mark or a measurement that you made on the
hologram (see # 5 and # 6 below).
5. Mark – activate this function to mark any anatomical landmark. A marker will appear on the
screen. Use your finger or control device to mark the area in the visual field and press the
Select button (see # 4 in Figure 2) to mark.
6. Measure – two measurements may be taken and saved on the hologram; press the Measure
button to enter the appropriate mode. Measurements are made by marking two points in
the hologram between which the measurement is desired, and then pressing the Select
button (see # 4 in Figure 2). The anchor points of both measurements will be color-coded, and
their length will be displayed on the screen.
7. Undo – press this button to reverse your last action.
8. Play – press this button to continue the stream during a real-time session.
9. Reset – all the hologram interactions (Rotate, Spin, Zoom, etc.) may be “un-done” in one
move by pressing this button; the hologram will return to its original state as when loaded,
and all marks will be removed.
10. Move – when this button is pressed, the hologram may be panned anywhere within the
visual FOV. This is performed via the joystick (forward, backward, right, left, up or down).
4