USER MANUAL READ CAREFULLY BEFORE OPERATION ULTRA HD Blu-ray DiscTM Player UBR-X100 / UBR-X110 UBR-X200
Table of Contents IMPORTANT INFORMATIONS .................................................. 1 Important Safety Instructions ................................................................................... 1 Precautions ................................................................................................................ 2 Trademarks ................................................................................................................ 3 Compatible Disc Types ...........................
Subtitle Selection ..................................................................................................... 14 BD-Live ..................................................................................................................... 15 ADVANCED OPERATIONS ....................................................... 16 Zoom Control ............................................................................................................ 16 Subtitle Shift .......................................
IMPORTANT INFORMATION CAUTION: DANGER OF EXPLOSION IF BATTERY IS INCORRECTLY REPLACED. REPLACE ONLY WITH THE SAME OR EQUIVALENT TYPE. CAUTION: TO REDUCE THE RISK OF ELECTRIC SHOCK, DO NOT REMOVE COVER (OR BACK). NO USER-SERVICEABLE PARTS INSIDE. REFER SERVICING TO QUALIFIED SERVICE PERSONNEL. THIS PRODUCT UTILIZES A LASER. USE OF CONTROLS OR ADJUSTMENTS OR PERFORMANCE OF PROCEDURES OTHER THAN THOSE SPECIFIED HEREIN MAY RESULT IN HAZARDOUS RADIATION EXPOSURE. DO NOT OPEN COVERS AND DO NOT REPAIR YOURSELF.
I M P O R T A N T I N F O R M A T I O N Precautions • • • • • Before connecting the AC power cord to the appliance, make sure the voltage designation of the appliance corresponds to the local electrical supply. If you are unsure of your power supply, contact your local power company. The acceptable power input range is AC 110V~ 60Hz. (UBR-X200) AC 100V–240V~ 50/60Hz. (UBR-X100X110) The apparatus with CLASS I construction shall be connected to a MAINS socket outlet with a protective earthing connection.
I M P O R T A N T I N F O R M A T I O N Trademarks • The Blu-ray DiscTM, Blu-rayTM, Blu-ray 3DTM, BD-LiveTM, BONUSVIEWTM, Ultra HD Blu-rayTM word marks and logos and the 4K Ultra HDTM logo are trademarks of the Blu-ray Disc Association. • Java and all other Java trademarks and logo are registered trademarks of Oracle and/or its affiliates. • DVD Logo is a trademark of DVD Format / Logo Licensing Corporation.
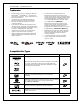
I M P O R T A N T I N F O R M A T I O N Discs that cannot be played • • • • • • BDs with cartridge DVD-RAMs HD-DVDs Data portion of CD-Extras DVDs / Blu-Rays with a region code not matching the player’s region code • Some Dual-Discs: A Dual-Disc is a two-sided disc with DVD-video on one side and digital audio on the other side. The digital audio side does not meet the technical specifications of the Red Book CD format so playback is not guaranteed. Audio discs with copy-protection may not be playable.
I M P O R T A N T I N F O R M A T I O N Region management information This player is designed and manufactured to respond to the region management information. If the region number of a BD-Video or DVD disc does not correspond to the region number of this player, this player cannot play the disc. BD-Video: Blu-Ray Discs with marks containing the region code A. DVD-Video: DVDs with marks containing the region code 1 and ALL.
COMMON CONNECTION METHODS Connecting to an A/V Receiver via HDMI • If you have an HDMI-capable receiver that supports 4K HDR video pass-through, you can simply run an HDMI cable from the player’s HDMI OUT (Main) output into your receiver and enable HDMI video pass-through on the receiver (see your receiver’s owner’s manual for more information). The receiver usually has an HDMI output that you can connect to your TV to pass the video signal. • Some receivers contain a mixture of HDMI 2.0 and HDMI 1.
Connecting to a TV via HDMI • Use an HDMI cable to connect the player’s HDMI OUT (Main) output directly into your TV. This connection method delivers both audio and video in a pure digital format via a single cable. • In order to play 4K UHD content, you must connect the UBR-X100 / X110 / X200’s HDMI OUT (Main) output into an HDMI 2.0 and HDCP 2.2 compliant input of the 4K UHD TV. NOTE • This connection method will output sound via the TV’s speakers.
Connecting to a Stereo Audio System via RCA-style Cables (UBR-X200 only) • • If your audio system offers only stereo audio inputs, or if you would like to connect a dedicated stereo audio system in addition to the surround audio system which is already connected to the HDMI, coaxial or optical outputs, you can connect the dedicated stereo audio system to the STEREO AUDIO OUT terminals of the player.
• If the A/V receiver or amplifier only has 5.1ch audio inputs, you can omit the SBL (Surround Back Left) and SBR (Surround Back Right) outputs. In the Setup Menu, set the Down Mix Mode to 5.x in the Speaker Setting section of the Audio section (see page 30).
Connecting to the Internet The UBR-X100 / X110 / X200 players can play audio, video and photos via your home network. This feature supports DLNA and SMB/CIFS protocols (Feature under development). The UBR-X100 / X110 / X200 players also support the BD-Live feature offered on some Blu-ray Disc titles. BD-Live offers extra downloadable content and additional online interactive programs.
BASIC OPERATIONS Disc Playback 1. Press the POWER button to turn on the player. 2. Press the OPEN/CLOSE button to eject the disc tray. 3. Place the disc with the label side facing up and the recorded side facing down. 4. Press the OPEN/CLOSE button again to retract the tray. 5. The player will read the disc information and begin playback. 6. To stop playback, press the STOP button. 7. To turn off the player, press the POWER button. OPTION Menu 1.
• Secondary Audio : Mix the Secondary Audio and menu sounds into the primary audio. • Still off : Still off. • Bitrate : Audio, Video and total bitrate of the current file. • Short skip : Skip forward 30 seconds during playback. • Replay : Skip back 10 seconds during playback. During Photo File Playback : • File : Current and total files. • Play Mode : Select Normal, Shuffle or Random playback mode. • Slide Show : Select the slideshow speed : slow, middle or fast.
Blu-ray Disc Menu Navigation 1. Blu-ray Discs usually contain a Top Menu and a Pop-up Menu. The Top Menu normally appears at the beginning of playback, after the previews and copyright messages. The Pop-up Menu can be accessed during the movie without interrupting playback. 2. During playback, press the POP-UP MENU button to access the Pop-up Menu. Press the MENU button to access the Top Menu. 3. Navigate in the menu using the ARROW buttons, then press the OK button to make a selection. 4.
Volume Control 1. On the UBR-X200, the volume control only affects the analogue audio output. It does not apply to digital audio output (HDMI, Coaxial and Optical) either in raw bitstream format or in PCM format. 2. The VOL +/- buttons on the player’s remote control are provided as an alternative way of controlling the audio volume. It is recommended that you use this control to make the audio volume from the player the same as from other sources, such as TV programs or a VCR.
BD-Live Some Blu-ray Disc titles are released with the BD-Live feature. BD-Live offers extra downloadable content and additional online interactive programs. BD-Live content varies by disc and studio, and may include additional subtitles, commentaries, preview trailers, games, and online chat. A Broadband internet connection is required to enjoy BD-Live content.
ADVANCED OPERATIONS Zoom Control This feature zooms in / out of the displayed frame and also changes the aspect ratio (image width vs. height). To change the zoom level, press the ZOOM button on the remote control. Each press of the ZOOM button will switch the zoom level in sequence. NOTE • • Some early DVD titles (released from 1997 until early 2000’s) use a 4:3 non-anamorphic widescreen aspect ratio.
A D V A N C V E D O P E R A T I O N S Repeat Playback To repeat a certain chapter, title, track or disc, press the REPEAT button on the remote control. Each press of the REPEAT button changes the repeat mode using the following sequence : DVD and DVD-Audio : Blu-ray : CD and SACD (UBR-X110 / UBR-X200): NOTE • Some Blu-ray discs may not accept the “Repeat” function. Repeat a Selected Section 1.
A D V A N C V E D O P E R A T I O N S Playback by Chapter or Track Number During the playback of a disc, you can use the NUMBER buttons on the remote control to directly jump to a specified chapter or track number. For example • To select the seventh track, press the [7] button : • To select the 16th track, press [1] followed by [6] in quick succession : NOTE • Some DVD-Audio and Blu-ray discs may not support this feature. Memory and Automatic Resume 1.
MEDIA FILES PLAYBACK In addition to playing standard disc-based formats such as Blu-ray, DVD, CD and SACD (UBR-X110 / UBR-X200), the UBR-X100 / X110 / X200 players can play digital media files. You can enjoy digital music, movies and photos stored on a data disc (recordable CD, DVD or Blu-ray), an external USB drive, or via network storage. Due to the variation of media, encoding software and techniques used, compatibility cannot be guaranteed for all user-created or downloaded content.
M E D I A F I L E S P L A Y B A C K drive. Most computers, especially those installed with Windows, already support SMB clients. Please refer to respective OS instructions to set up the SMB/CIFS shared file/folder. NOTE • • NAS is a networked appliance that provides file-based data storage services to other devices on the network. Commercial products are available on the market. SMB (Server Message Block) or CIFS (Common Internet File System) is mostly known as Microsoft Windows Network.
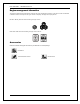
M E D I A F I L E S P L A Y B A C K HOME Menu The UBR-X100 / X200 players present a Home Menu to assist you in navigating and playing media files from an inserted optical disc, USB flash drive or external hard drive. Basically, the Home Menu is the starting point for accessing media files. Appuyez You can bring up the Home Menu with the HOME button on the remote control. Currently there are five selections : • Disc : enables the player to start playback of an inserted optical disc.
M E D I A F I L E S P L A Y B A C K Viewing Photo Files To view digital photo files stored on an optical disc or USB drive, select Photos from the Home Menu. A file browser will appear to assist you in navigate the files and folders. The first step is to select the Data Disc or USB device that contains the photo files. The player will take a moment to read the media and list the folders and photo files.
SETUP MENU OPTIONS The Setup Menu of the UBR-X100 / X110 / X200 players presents many setup and configuration options. For most users, the default configuration will be sufficient and you will not require any changes to the settings. However, if you need to configure the player to perfectly match your home theatre setup and viewing preferences, please refer to the following sections for details about each configuration option.
S E T U P M E N U O P T I O N S 4. When the scroll icon is shown at the top or bottom of the Setup Menu, it indicates that there are more menu items that can be accessed by scrolling with the UP/DOWN ARROW buttons. 5. For example, in the Playback section, you may use the UP/DOWN ARROW buttons to select the Last Memory setup item, and press the OK button to change the Last Memory setting. 6.
S E T U P M E N U O P T I O N S Display The Display section of the Setup Menu allows you to configure video output options. 1. TV Screen: Sets the aspect ratio of the player’s output image. • 16:9 Full – 16:9 content will be displayed in its native aspect ratio, and 4:3 contents will be stretched horizontally. • 16:9 Normal – 16:9 content will be displayed in its native aspect ratio, and 4:3 content will be displayed with black borders on both sides in order to maintain the original 4:3 aspect ratio.
S E T U P M E N U O P T I O N S 4. Dolby Vision : Setting the Dolby Vision Mode. • Auto (By default) – Dolby Vision signal is sent if it is supported by both the content and the display. The player automatically detects Dolby Vision content if the TV is Dolby Vision compatible, and if these two criteria are met, the player will be able to output the Dolby Vision video signal from the Main HDMI output (Main). Otherwise, only SDR video signal will be sent.
S E T U P M E N U O P T I O N S Video parameter Video Parameter allows you to adjust many control parameters in order to achieve optimum picture quality. To enter the Video Parameter menu, press the SETUP button on the remote control during playback. To change a Video Parameter, use the UP/DOWN buttons to highlight the parameter, and use the LEFT/RIGHT buttons to change its value.
S E T U P M E N U O P T I O N S Remember that excessive noise reduction may cause a loss of detail. We recommend using the noise reduction function only when you encounter poorly encoded or compressed video that has apparent noise artifacts. 9. HDR-SDR Adj. : Allows you to adjust the target luminance for better HDR to SDR conversion. The luminance content higher than the target luminance will be maped into the luminance range lower than the target luminance.
S E T U P M E N U O P T I O N S Audio The Audio section of the Setup Menu allows you to configure audio output options. 1. Digital Out : Sets the output format for S/PDIF digital coaxial and optical connections for use with a Dolby Digital and DTS compatible home theater amplifier. • Bitstream – Forces audio in compressed bitstream format for decoding through the amplifier, if the amplifier can decode Dolby Digital and / or DTS content.
S E T U P M E N U O P T I O N S NOTE • Dynamic Range Compression is applied to the analogue audio output and digital audio outputs (HDMI, Coaxial and Optical) when the audio format is set to PCM. 5. SACD Mode (UBR-X110 / UBR-X200) : Select which audio layer to play for SACD (Super Audio CD). • • • CD – Play the CD layer of a hybrid SACD disc SACD 2CH – Play the high resolution 2-channel stereo audio layer SACD MCH – Play the high resolution multi-channel surround audio layer 6.
S E T U P M E N U O P T I O N S 7. Speaker Test Tone (UBR-X200) : Test tones are artificially-created sounds that are used to test your audio speaker system and help to identify any wiring faults. Please note these test tones only work with the multi-channel analogue audio outputs and are only suitable for channel identification purposes. For comprehensive speaker configuration, we recommend using the dedicated test tones found on professional audio calibration discs.
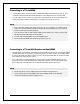
S E T U P M E N U O P T I O N S A typical 7.1-channel speaker layout and their speaker distance measurements are displayed as below : In the above diagram, measure the distance (in cm) from the primary listening position to the Front Left or Front Right Speaker. Enter the distance of the Front Speakers (! in the above picture). Next, measure the distance (in cm) from center speaker (") to the listening position.
S E T U P M E N U O P T I O N S Audio Signal Reference Chart (UBR-X200) Blu-ray Discs may contain many types of audio signal formats, some of which are high resolution types such as Dolby TrueHD and DTS-HD Master Audio. Blu-ray Discs also have many optional audio components such as the Secondary Audio Program and menu clicking sound. The player’s Audio menu allows you to configure the audio output to meet your specific preference.
S E T U P M E N U O P T I O N S Recommended Audio Format Options Depending on your specific audio/video connection method, the Audio options of the UBR-X100 / X110 / X200 may need to be adjusted to match your configuration. Refer to the video and audio connection methods described previously in this guide and the following audio setup guidelines.
S E T U P M E N U O P T I O N S Stereo Analogue Audio to Receiver (UBR-X200) If you primarily listen to stereo content or if your receiver only offers stereo audio connections, please use the analogue RCA-style cables to connect the FL (Front Left) and FR (Front Right) terminals of the player to your receiver.
S E T U P M E N U O P T I O N S HDMI The HDMI section of the Setup Menu allows you to configure video and audio HDMI options. 1. HDMI Mode : Allow you to select the Audio/Video HDMI output mode : • Single : audio and video streams are sent through single HDMI. • Separate : audio and video streams are sent separately through two HDMIs. 2. HDMI Color Space : Allows you to select the color space for the HDMI video output. 3.
S E T U P M E N U O P T I O N S 4. HDMI Audio Out : Allows you to select the digital audio output format from the HDMI port. The options are the following : • Bitstream – Digital audio output via HDMI will be in bitstream format. This option is recommended when connecting the HDMI output to an A/V receiver or processor that supports advanced audio decoding, such as Dolby Atmos, Dolby TrueHD and DTS:X or DTS-HD Master Audio.
S E T U P M E N U O P T I O N S Network The Network section of the Setup Menu system allows you to configure the player’s network connection, test the connection, and enable or disable BD-Live access. 1. IP Address Setting : Determines how the player obtains its IP address. • Auto Set Ip Address (DHCP) – The player automatically obtains its IP address information using DHCP (Dynamic Host Configuration Protocol). This is the default setting. In most cases, automatic IP configuration should be used.
S E T U P M E N U O P T I O N S 4. Connection Test : Allows you to test the internet connection. It is recommended to test the internet connection when you connect the player to the internet for the first time or when changes or modifications of the parameters have been made in the IP Adress Setting section. 5. BD-Live Connection : Used to permit or restrict BD-Live content access. • Permitted – BD-Live access is permitted.
Language Configuration of language preferences. This menu contains the following sub-items : • OSD – Allows you to choose the language for the player’s Setup Menu and the on-screen display. • Audio – Allows you to choose the preferred audio language for DVD and Blu-ray Discs. If an audio track of the selected language is available on the disc, the audio track will be played back. • Subtitle – Allows you to choose the preferred subtitle language for DVDs and Blu-ray Discs.
S E T U P M E N U O P T I O N S Options The Options section of the Setup Menu allows you to configure additional options related to the UBRX100 / X110 / X200 players : 1 2 3 FL Dimmer : Turns on / off the front panel display. This menu contains the following sub-items : • Normal – Front display intensity is normal. • Slightly dimmed– Front display intensity is lower. • Dimmed – Front display intensity i slow. • Off – Front display is off.
S E T U P M E N U O P T I O N S 6 Load default : To reset all settings to the factory default value. This operation is only available when the playback is completely stopped or when there is no disc loaded. 7 System Information : Displays the firmware version and the MAC address (physical network address of the player).
Useful Notes • In order to extend the life of your player, it is recommended that you wait at least 30 seconds before you power it on after switching it off. • Remove discs and turn the power off after operation. • Some features of the player may not be compatible with certain discs or files. • Some discs with special features may not be fully supported by the UBR-X100 / X110 / X200 players. This is not a malfunction of the units.
No disc or incompatible disc loaded in player Eject disc and check. Dirty disc recording surface Eject the disc and clean any dirt or fingerprints. Disc not properly loaded Eject disc and make sure the label side is facing up and the record side is facing down. Condensation on the laser pick-up head Turn on the player, eject the disc and leave the player on for about an hour. Remote control is out of range Use the remote control within the effective range.
Specifications Designs and specifications are subject to change without notice. Disc Types* UHD Blu-ray, Blu-ray, Blu-ray 3D, DVD-Video, DVD-Audio, AVCHD, SACD(UBR-X110 / UBR-X200), CD, Kodak Picture CD, CD-R/RW, DVD±R/RW, DVD±R DL, BD-R/RE Output Analogue Audio: 7.1ch, 5.1ch, stereo. (UBR-X200) Dedicated Stereo Analogue Audio: XLR balanced, RCA single-ended. (UBR-X200) Coaxial/Optical Audio: up to 2ch/192kHz PCM, Dolby Digital, DTS. HDMI Audio: up to 7.1ch/192kHz PCM, up to 5.1ch DSD, Bitstream.
RS-232 and IP Control The REAVON UBR-X200 has an RS-232 control port and can be integrated into most custom home theatre control systems. This RS-232 port is configured as "Data Circuit Terminal Equipment" or DCE (DCE) by means of a 9-pin D-Sub type female connector (pin). REAVON UBR-X100 / X110 and X200 players can also be controlled by IP commands. RS-232 and IP control codes are available for download at www.reavon.
WARRANTY REAVON Limited Two Years Warranty Your REAVON product has been manufactured to precise standards, and with rigid quality control throughout every process of manufacturing. It is warranted by REAVON against faulty materials or workmanship for two (2) full years from the original date of purchase. This warranty applies only to REAVON brand products purchased from REAVON or an authorized REAVON retailer.
WWW.REAVON.