Version Number: RBM1300-20210109A1 Operation Manual Reboot RBM1300 welding machines adopts the latest pulse width modulation (PWM) technology and insulated gate bipolar transistor (IGBT) power module, which can change work frequency to medium frequency so as to replace the traditional Transistor transformer with the medium frequency transformer. its characterized with portable, small size, light weight, low consumption and etc.
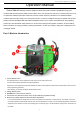
Version Number: RBM1300-20210109A1 6. Adjust the value knob Clockwise rotate to enlarge the current, and anti-clockwise rotate to reduce the current. 7. MIG Welding torch connector 8. Polarity selection plug In MMA and LIFT TIG state, this plug does not need to be connected; in MIG gas welding state, this plug is connected to positive terminal 8; in MIG airless welding state, this plug is connected to negative terminal 9. 9. Negative Terminal Negative Terminal.
Version Number: RBM1300-20210109A1 7 Hose clamp 2 Used to fix the trachea to prevent air leakage. 8 Conductive tip0.8 3 Spare parts, need to be replaced frequently, please keep inventory. 9 Conductive tip1.0 3 Spare parts, need to be replaced frequently, please keep inventory. 10 Porcelain nozzle 3 For flux-cored welding wire,Spare parts need to be replaced frequently, please keep inventory. 11 Wire feed wheel 1 V-shaped wire feed wheel adapts to solid welding wire 0.8mm/1.0mm.
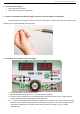
Version Number: RBM1300-20210109A1 Part 3: Simple test for powering on the machine Reboot RBM1300 Welding machines will be subjected to strict various tests when they leave the factory to ensure that each welding machine that reaches the user is of high quality, because our machine has to go through tens of thousands of kilometers of long-distance transportation from the factory to the delivery to you.
Version Number: RBM1300-20210109A1 Attached table: Self-examination of abnormal conditions without response when turning on the machine: 1. The machine's power switch is not turned on. 2. The power input voltage is wrong. 3. The power plug is loose. 4. The internal circuit is loose (due to long-distance transportation, bumps), you need to open the cover and check the internal connection line.
Version Number: RBM1300-20210109A1 1. MMA mode If you want to repair some broken fences or fix brackets, you like to use traditional welding rods for operation, you can use REBOOT RBM1300 MMA mode for welding. 1、 Select “MMA” process. 2、 Connect welding holder and ground clamp. 3、To adjust the current, only the current can be adjusted. Note: 1) The welding rod specification supported by reboot RBM1300 is below 3.2(1/8in), usually 2.5(3/32in) and 3.2(1/8in).
Version Number: RBM1300-20210109A1 3) Connect the ground clamp to clean bare metal. No rust, paint or other coatings, and ensure good electrical conductivity. 4) The ideal distance between the welding rod and the welding object is 1-2mm(1/64-5/64in), to ensure that the welding rod and the workpiece are in continuous and stable contact. The welding rod should not be too high or pressed too low to avoid arc breaking and adhesion.
Version Number: RBM1300-20210109A1 3、Connect MIG gun and ground clamp. 4、Install wire spool 0.030”(0.8mm)/0.040”(1.
Version Number: RBM1300-20210109A1 5、Set drive roll Face the side marked 0.030” away from the machine. Remarks: 1. There are two grooves on one wire feed wheel, one side is 0.030” (0.8mm) and the other side is 0.040” (1.0mm) to match the corresponding wire diameter. 2. Gas welding requires the use of V-type wire feed wheels, which are suitable for ordinary carbon steel welding wire and stainless steel welding wire, and need to use CO2 gas or CO2 and Argon gas mixture.
Version Number: RBM1300-20210109A1 8、Please connect CO2 gas: 1. Attach gas hose to machine. 2. Attach hose and regulator to gas bottle. 9、Remove consumables and depress trigger until wire comes out. Replace consumables. Press and hold the torch switch wrench for more than 3 seconds to not weld. This is fast wire feeding. Let the welding wire be quickly delivered to the gun head. 10、Adjust wire feed speed, current and voltage. 1. Choose MIG, MMA, LIFT TIG working mode. 2. Choose welding wire diameter 0.
Version Number: RBM1300-20210109A1 11、With contact tip 1/4” from metal, depress trigger completely to initiate arc. 12、To replace the welding wire. Use the cutting pliers to cut off the front section of the contact tip that is more than the welding wire, loosen the wire feed mechanism pinch wheel, rotate the welding wire reel clockwise, turn the welding wire back to the wire feed reel, pay attention to pinch the welding wire with your right hand to avoid the wire bounce.
Version Number: RBM1300-20210109A1 5) Support welding material, carbon steel, stainless steel, aluminum can not be welded. 6) The diameter of the welding wire, the groove of the wire feed wheel and the aperture of the contact tip must match. 7) The pressure roller of the wire feeding structure should not be too tight or too loose, which will cause the wire feeding to be unstable.
Version Number: RBM1300-20210109A1 4、Connect MIG gun and ground clamp. Flux-cored wire Note: No need to use gas cylinder and gas meter 5、Install wire spool. 0.030”(0.8mm)/0.040”(1.0mm)diameter, 4”(100mm 1kg)wire spool. 5、Set drive roll. Face the side marked 0.030” away from the machine. Remarks: 1. There are two grooves on one wire feed wheel, one side is 0.030” (0.8mm) and the other side is 0.040” (1.0mm) to match the corresponding wire diameter.
Version Number: RBM1300-20210109A1 2. Gear wire feed wheel, gear wire feed wheel is suitable for flux-cored welding wire, our standard configuration has 1 piece of 1kg flux-cored welding wire, which can be directly installed and used. 6、Feed wire and set pressure. 7、Connect to Input Power. Please refer to the digital sign on the rear panel of the machine for input voltage. Connecting the wrong voltage will damage the machine.
Version Number: RBM1300-20210109A1 8、Remove consumables and depress trigger until wire comes out, Replace consumables. Press and hold the torch switch wrench for more than 3 seconds to not weld. This is fast wire feeding. Let the welding wire be quickly delivered to the gun head. 9、 Be sure to use porcelain nozzles. 10、Adjust wire feed speed , current and voltage.
Version Number: RBM1300-20210109A1 1.Choose MIG, MMA, LIFT TIG working mode. 2.Choose welding wire diameter 0.8mm/1.0mm, choose airless (Flux-cored wire). 3. The machine has a unified function, so just adjust this knob the the welding current, voltage and wire feeding speed are adjusted automatically at the same time. 4.
Version Number: RBM1300-20210109A1 Note: 1) Please strictly follow the picture instructions to connect, otherwise it will not be possible to solder. 2) The flux-cored welding wire supports 0.8mm, 1.0mm. 3) The machine can install 1kg(2.2lb) welding wire reels. 4) The machine is equipped with a 1kg(2.2lb) flux cored wire, which can be directly installed and used. 5) Support welding material, carbon steel, aluminum and stainless steel cannot be welded.
Version Number: RBM1300-20210109A1 Remark: TIG welding gun is not included in the package, you need to purchase it separately. 3、 Adjust the current, only the current can be adjusted.
Version Number: RBM1300-20210109A1 Note: Standard accessories package kit not included this tig torch. Remark: 1. ceramic nozzel, 2 .tungsten collet, 3. tungsten collet body, 4 .short back cap, 5. long back cap. The above structure is a wearing part, please keep it in stock.
Version Number: RBM1300-20210109A1 Part 6: Internal diagram of the machine 1. 2. 3. 4. 5. 7 imported transistors, stable and powerful current output. 3 high-power large capacitors, the machine is more stable. Cooling fans, greatly improving the machine load duration. The main transformer of all copper, the power is larger. In addition, an output reactance is added, the output welding current is more stable, the welding shape is good, and there is less spatter. 6.
Version Number: RBM1300-20210109A1 Part 7:Troubleshooting Observe all Safety Guidelines detailed throughout this manual PROBLEMS (SYMPTOMS) POSSIBLE CAUSE OUTPUT PROBLEMS Major physical or electrical damage is evident. “Do not Plug in machine or turn it on”. Contact your local Authorized Field Service Facility. 1. Make sure correct voltage is applied to the machine. No wire feed, weld output or gas flow when gun trigger is pulled. Fan does NOT operate. 2.
Version Number: RBM1300-20210109A1 Part 8: Welding parameter settings RMB1300 machine welding parameters Material Wire Type Shielding Gas 20-30 SCFH C25 75% Ar 25% CO2 Material Thickness-220V Polarity Setting DCEP Solid Wire ER70S-6 Mild Steel Stainles s Steel C100 100% CO2 Flux-Core d E71T-11 None ER308L Tri-Mix 90% He 7.5% Ar 2.5% CO2 DCEP Wire Size Settings 24 Ga. 0.6mm 20 Ga. 0.9mm 0.025" 0.6mm Wire speed Voltage Inductance 90 14 3-5 110 14.5 3-5 - - 0.030" 0.